Script nén log file, sau đó move sang thư mục backup

Gồm 2 script, cơ chế:
– Dọn nén các file .log trong folder chứa log, ở đây là /opt/batch/<tên batch>/log (Điều chỉnh tron file chạy chính)
– Sau khi nén xong thì đưa lên file server để chứa: ở đây đã mount file server vào /net/filesv (cấu hình điều chỉnh trong file thứ cấp)
– Các file log được dọn là các file log có từ tháng trước, và hiện tại không có tiến trình nào đang đọc ghi: ví dụ: hnay là tháng 8 thì sẽ dọn các file có timestamp là tháng 7

File chạy chính, clean_all_log.sh

#!/bin/bash

## find all directory named log or logs and call clean_log_batch.sh script 


START=$(date +%s)

function timecal {
        END=$(date +%s)
        TOTAL=$(expr $END - $START)
        HOURS=$(expr $TOTAL / 3600)
        MINUTES=$(expr $TOTAL % 3600 / 60)
        RUNNING_TIME="$MINUTES minute(s)"
        [[ $HOURS -gt 0 ]]&&{ RUNNING_TIME="$HOURS hour(s), $RUNNING_TIME"; }
        echo "[INFO] Total time: $RUNNING_TIME"
}

trap "timecal" EXIT

BASEDIR=$(dirname $0)
## batch dir, value must be absolute path
BATCH_DIR=/opt/batch
[ ! -d $BATCH_DIR ]&&{ echo $BATCH_DIR not found; exit 1; }
LOG_DIRS=$(find $BATCH_DIR -type d -name 'log' -or -name 'logs')
for LOG_DIR in $LOG_DIRS
do
	echo "[INFO] Clean log path $LOG_DIR"
	./clean_log_batch.sh $LOG_DIR	
done

File thứ cấp: clean_log_batch.sh

#!/bin/bash

## This script requires autofs installed on the running machine
## and read/write on REMOTE_HOST via nfs share
## LOG_DIR must be absolute path

## Log file must have timestamp in its name with format YYYY[.-_]mm[/-_]dd
## Log file must have .log in its name
## Log file must have its name pattern placed before timestamp
## Even so, cover all the log pattern generated by developers on a whim without a standard still be painful

LOG_DIR=$1
TEMP_DIR=${LOG_DIR}/temp
REMOTE_HOST=filesv
REMOTE_FOLDER=/net/${REMOTE_HOST}/drbd/applog/applicationserver/`hostname`${1}
MONTHS_TO_KEEP=1  # months to keep log, the older ones will be archived. e.g: if current month is Sep, and month to keep is 1, the logs from August and older will be archived.

[[ ! -d $1 ]]&&{ echo "[ERROR] $1 not found";exit 1; }
[[ ! -d /net/${REMOTE_HOST} ]]&&{ echo "[ERROR] remote dir /net/${REMOTE_HOST} not found"; exit 1; }
[[ ! -d $TEMP_DIR ]]&&{ mkdir -p ${TEMP_DIR}; }   # Create temp folder if it doesn't exist
TIMELINE=$(date -d "$(date +%Y-%m-15) -$MONTHS_TO_KEEP months" +'%Y%m')

cd $LOG_DIR

# move all .gz files to temp dir if they 're available in LOG_DIR
find . -maxdepth 1 -type f -name "*.gz" -exec mv {} $TEMP_DIR/ \;

PATTERNS=$(ls -p | awk -F'[._-]20[0-9][0-9]|20[0-9][0-9]' '/.log/ {print $1}' | uniq | sed 's/\.log//' | grep -v /)
for PATTERN in $PATTERNS
do
 RETRY=$(ls $LOG_DIR/${PATTERN}* 2>/dev/null | wc -l) # Times of retry until exit from loop. This value is equal to the number of files with PATTERN in LOG_DIR. 
 OLDEST_TIME_STAMP=$(ls -p | grep -m1 "^${PATTERN}[._-]\{0,1\}\(log[._-]\)\{0,1\}20[0-9][0-9]" 2>/dev/null | sed "s/${PATTERN}//" | tr -cd '[:digit:]')
 if [[ ${#OLDEST_TIME_STAMP} -lt 8 ]]; then
  echo "[WARN] Timestamp extracted from file name $OLDEST_TIME_STAMP is invalid. Ignore pattern $PATTERN"
  continue
 fi
 RETRY_TIME=0
# while the 6 first characters of time stamp (e.g: 201607) is greater than current time
# and $RETRY_TIME is less than $RETRY
 while [[ "${OLDEST_TIME_STAMP}" ]]&&[[ ${OLDEST_TIME_STAMP:0:6} -le ${TIMELINE} ]]&&[[ $RETRY_TIME -lt $RETRY ]]
 do
# TIME_STAMP_PATTERN format: YYYY-mm
  YEAR=${OLDEST_TIME_STAMP:0:4}
  MONTH=${OLDEST_TIME_STAMP:4:2}
  TIME_STAMP_PATTERN=${YEAR}-${MONTH}
  echo "[INFO] Archiving ${PATTERN}_${TIME_STAMP_PATTERN}"
# files with PATTERN and TIME_STAMP_PATTERN
  LOG_FILES=$(find . -maxdepth 1 -type f -regextype sed -regex "\./${PATTERN}[-_.]\{0,1\}${YEAR}[-._]\{0,1\}${MONTH}.*" -or -regextype sed -regex "\./${PATTERN}.*[-_.]\{0,1\}${YEAR}[-_.]\{0,1\}${MONTH}.*")
# Check if log files is being used by any process
  fuser $LOG_FILES && {
    echo "[WARNING] There 're files being used. Abort archive ${PATTERN}_${TIME_STAMP_PATTERN}"
    RETRY_TIME=$(($RETRY_TIME + 1))
    continue
  }
  tar -cvzf ${TEMP_DIR}/${PATTERN}_${YEAR}-${MONTH}.tar.gz ${LOG_FILES} --remove-files
# Reset the OLDEST_TIME_STAMP variable
  OLDEST_TIME_STAMP=$(ls -p | grep -m1 "${PATTERN}[._-]\{0,1\}\(log[._-]\)\{0,1\}20[0-9][0-9]" 2>/dev/null | sed "s/${PATTERN}//" | tr -cd '[:digit:]')
  RETRY_TIME=$(($RETRY_TIME + 1)) # increase value of RETRY_TIME by 1
 done
done
# Exit if TEMP_DIR empty
[[ "$(ls -A $TEMP_DIR)" ]]||{ exit 0; }
# copy all archived file from TEMP_DIR to remote host
# and delete if copy is successful
mkdir -p $REMOTE_FOLDER && \
rsync -have --progress --backup --backup-dir=${REMOTE_FOLDER} --remove-source-files ${TEMP_DIR}/* ${REMOTE_FOLDER} && rmdir ${TEMP_DIR}


Tìm hiểu về DRBD – hệ thống lưu trữ trên linux

1. DRBD là gì?

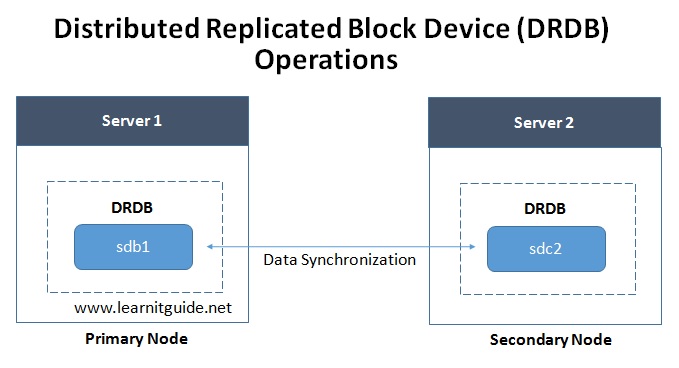
DRBD viết tắt của Distributed Replicated Block Device, là một tiện ích sử dụng để nâng cao tính sẵn sàng của hệ thống. Nó là được xây dựng trên nền ứng dụng mã nguồn mở để đơn giản hóa việc chia sẻ các dữ liệu trong hệ thống lưu trữ với nhau qua đường truyền mạng. Chúng ta có thể hiểu nôm na rằng đây là RAID-1 sử dụng các giao tiếp mạng để trao đổi dữ liệu cho nhau.

Về tổng quan, DRBD gồm 2 server cung cấp 2 tài nguyên lưu trữ độc lập, không liên quan gì với nhau. Trong một thời điểm, một server sẽ được cấu hình làm node primary đọc và ghi dữ liệu; node còn lại là secondary làm nhiệm vụ đồng bộ dữ liệu từ node primary để đảm bảo tính đồng nhất dữ liệu 2 node.

2. Quá trình hoạt động cơ bản của DRBD

Nhìn chung, các dịch vụ đồng bộ dữ liệu hoạt động ở chế độ Active – Passive. Ở chế độ này, node chính (primary) sẽ lắng nghe toàn bộ các thao tác (đọc, ghi) của người dùng. Node phụ (secondary) sẽ được kích hoạt thành node chính khi một giải pháp cluster nào đó phát hiện node chính down. Việc ghi dữ liệu sẽ được xảy ra đồng thời trên cả 2 node. DRBD hỗ trợ 2 kiểu ghi dữ liệu là fully synchronous and asynchronous.

DRBD cũng có thể hỗ trợ chế độ Active – Active, điều đó có nghĩa là việc ghi dữ liệu sẽ đồng thời xảy ra trên 2 node. Mode này được dựa trên một hệ thống chia sẻ tập tin, chẳng hạn như Global File System (GFS) hoặc các phiên bản Oracle Cluster File System 2 (OCFS2), trong đó bao gồm khả năng phân phối và quản lý file.

3. Các chế độ replication của DRBD

DRBD hỗ trợ 3 chế độ replication, cụ thể như sau:

3.1 Protocol A

  • Giao thức đồng bộ không đồng thời. Các thao tác ghi dữ liệu trên node chính sẽ được thực thi đến khi nào hoàn thành tác vụ, các gói tin replication được lưu trữ ở bộ đệm TCP. Trong trường hợp fail-over, dữ liệu này có thể bị mất.

3.2 Protocol B

  • Giao thức đồng bộ đồng thời trên RAM (semi-synchronous), các thao tác ghi được thực hiện trên node chính ngay khi có yêu cầu, các gói tin replication được gửi ngay khi node chính đã ghi xong. Khi fail-over, dữ liệu sẽ bị mất.

3.3 Protocol C

  • Giao thức đồng bộ, dữ liệu được ghi hoàn thiện chỉ khi nào 2 node chính và phụ xác nhận là đã hoàn thành. Giao thức này đảm bảo tính an toàn dữ liệu và được sử dụng phổ biến khi cấu hình DRBD.

4. Cấu trúc của DRBD

DRBD được chia làm 2 thành phần:

  • Module trong kernel có nhiệm vụ thiết lập các space-user dùng để quản lý các disk DRBD, nó thực hiện các quyền điều khiển với các thiết bị virtual block (khi replicate dữ liệu local với sang máy remote). Giống như một virtual disk, DRBD cung cấp một mô hình linh loạt cho hầu hết các loại ứng dụng đều có thể sử dụng.
  • Các module DRBD khởi tạo những chỉ dẫn các điểu khiển cơ bản được khai báo trong brbd.conf, ngoài ra còn phân định ra các thành phần được xác định bởi IP và Port

Một vài câu lệnh dùng để quản lý cài đặt DRBD:

  • DRBDadm: Công cụ quản trị DRBD cao nhất
  • DRBDsetup: Cấu hình DRBD nạp vào kernel
  • DRBDmeta: Cho phép tạo, dump, khôi phục và chỉnh sửa cấu trúc của meta-data.

Hướng dẫn thêm ổ đĩa mới vào máy chủ centos – How to add new hard disk to Centos server

Môi trường thực hiện: Centos 7
ổ cứng mới = 80GB
mount point = /net

kiểm tra ổ đĩa mới thêm bằng fdisk -l

[root@localhost ~]# fdisk -l

Disk /dev/sda: 21.5 GB, 21474836480 bytes, 41943040 sectors
Units = sectors of 1 * 512 = 512 bytes
Sector size (logical/physical): 512 bytes / 512 bytes
I/O size (minimum/optimal): 512 bytes / 512 bytes
Disk label type: dos
Disk identifier: 0x000b1107

   Device Boot      Start         End      Blocks   Id  System
/dev/sda1   *        2048     2099199     1048576   83  Linux
/dev/sda2         2099200    41943039    19921920   8e  Linux LVM

Disk /dev/sdb: 85.9 GB, 85899345920 bytes, 167772160 sectors
Units = sectors of 1 * 512 = 512 bytes
Sector size (logical/physical): 512 bytes / 512 bytes
I/O size (minimum/optimal): 512 bytes / 512 bytes


Disk /dev/mapper/centos-root: 18.2 GB, 18249416704 bytes, 35643392 sectors
Units = sectors of 1 * 512 = 512 bytes
Sector size (logical/physical): 512 bytes / 512 bytes
I/O size (minimum/optimal): 512 bytes / 512 bytes


Disk /dev/mapper/centos-swap: 2147 MB, 2147483648 bytes, 4194304 sectors
Units = sectors of 1 * 512 = 512 bytes
Sector size (logical/physical): 512 bytes / 512 bytes
I/O size (minimum/optimal): 512 bytes / 512 bytes

[root@localhost ~]#

Thấy phần ổ đĩa mới: Disk /dev/sdb: 85.9 GB, 85899345920 bytes, 167772160 sectors
gõ: fdisk /dev/sdb

[root@localhost ~]# fdisk /dev/sdb
Welcome to fdisk (util-linux 2.23.2).

Changes will remain in memory only, until you decide to write them.
Be careful before using the write command.

Device does not contain a recognized partition table
Building a new DOS disklabel with disk identifier 0xa07e2d9e.

Command (m for help): m
Command action
   a   toggle a bootable flag
   b   edit bsd disklabel
   c   toggle the dos compatibility flag
   d   delete a partition
   g   create a new empty GPT partition table
   G   create an IRIX (SGI) partition table
   l   list known partition types
   m   print this menu
   n   add a new partition
   o   create a new empty DOS partition table
   p   print the partition table
   q   quit without saving changes
   s   create a new empty Sun disklabel
   t   change a partition's system id
   u   change display/entry units
   v   verify the partition table
   w   write table to disk and exit
   x   extra functionality (experts only)

Command (m for help): n
Partition type:
   p   primary (0 primary, 0 extended, 4 free)
   e   extended
Select (default p): p
Partition number (1-4, default 1):
First sector (2048-167772159, default 2048):
Using default value 2048
Last sector, +sectors or +size{K,M,G} (2048-167772159, default 167772159):
Using default value 167772159
Partition 1 of type Linux and of size 80 GiB is set

Command (m for help): w
The partition table has been altered!

Calling ioctl() to re-read partition table.
Syncing disks.
[root@localhost ~]#

Đã tạo xong phân vùng, tiến hành format sang định dạng ext4, lưu ý, phân vùng mới tạo từ sdb ở trên giờ là sdb1

[root@localhost ~]# mkfs -t ext4 /dev/sdb1
mke2fs 1.42.9 (28-Dec-2013)
Filesystem label=
OS type: Linux
Block size=4096 (log=2)
Fragment size=4096 (log=2)
Stride=0 blocks, Stripe width=0 blocks
5242880 inodes, 20971264 blocks
1048563 blocks (5.00%) reserved for the super user
First data block=0
Maximum filesystem blocks=2168455168
640 block groups
32768 blocks per group, 32768 fragments per group
8192 inodes per group
Superblock backups stored on blocks:
        32768, 98304, 163840, 229376, 294912, 819200, 884736, 1605632, 2654208,
        4096000, 7962624, 11239424, 20480000

Allocating group tables: done
Writing inode tables: done
Creating journal (32768 blocks): done
Writing superblocks and filesystem accounting information: done

Giờ ổ đĩa đã sẵn sàng, chỉ cần mount vào đâu đó thì chúng đã sẵn sàng sử dụng, ví dụ mount vào /net1

[root@localhost ~]# mount /dev/sdb1 /net1/
[root@localhost ~]#
[root@localhost ~]#
[root@localhost ~]# df -h
Filesystem               Size  Used Avail Use% Mounted on
/dev/mapper/centos-root   17G  1.5G   16G   9% /
devtmpfs                 478M     0  478M   0% /dev
tmpfs                    489M     0  489M   0% /dev/shm
tmpfs                    489M  6.7M  482M   2% /run
tmpfs                    489M     0  489M   0% /sys/fs/cgroup
/dev/sda1               1014M  125M  890M  13% /boot
tmpfs                     98M     0   98M   0% /run/user/0
/dev/sdb1                 79G   57M   75G   1% /net1

Đã thêm thành công

Để tự động mount ổ khi reboot, có thể thao tác bằng nhiều cách:
– Chạy tự động lệnh mount /dev/sdb1 /net1/ mỗi lần khởi động
– thêm vào /etc/fstab

/dev/sdb1 /net1                       ext4     noauto        0 0


Hướng dẫn cài đặt centos 7 qua network PXE

PXE (Preboot eXecution Environment) Server cho phép cài đặt OS qua network, có thể thiết lập tự động chọn các cấu hình ban đầu khi cài đặt OS. Lợi ích chính của việc này đó là chúng ta có thể cài đặt server 1 lần, sau đó sử dụng để cài đặt một cách tự động cho hàng chục, thậm chí hàng trăm máy khác nhau mà không cần phải mất công burn file ISO sang USB hay DVD như trước đây.

Trong bài viết dưới đây chúng ta sẽ cài đặt 1 PXE server, phục vụ cài centos 7 cho máy khác.

Chi tiết:

  • Server IP = 192.168.150.11
  • Host name = pxe.example.com
  • OS = CentOS 7.x
  • SELinux = enabled
  • Firewall = disabled

Step:1 Cài đặt các gói cần thiết cho PXE

Các gói cần thiết: “dhcp, tftp-server, ftp server(vsftpd), xinted”.

[root@pxe ~]# yum install dhcp tftp tftp-server syslinux vsftpd xinetd vim -y

Step:2 Cấu hình DHCP

Sau khi cài đặt gói dhcp ở trên, chúng ta tạo file cấu hình cho  nó có nội dung dưới đây, các bạn có thể thay thế IP tương ứng vủa nhà mình vào.

[root@pxe ~]# vi /etc/dhcp/dhcpd.conf
# DHCP Server Configuration file.
ddns-update-style interim;
ignore client-updates;
authoritative;
allow booting;
allow bootp;
allow unknown-clients;
# internal subnet for my DHCP Server
subnet 192.168.150.0 netmask 255.255.255.0 {
range 192.168.150.21 192.168.150.151;
option domain-name-servers 192.168.150.11;
option domain-name "pxe.example.com";
option routers 192.168.150.11;
option broadcast-address 192.168.150.255;
default-lease-time 600;
max-lease-time 7200;
# IP of PXE Server
next-server 192.168.150.11;
filename "pxelinux.0";
}


Step:3 Cấu hình tftp server (/etc/xinetd.d/tftp)

TFTP (Trivial File Transfer Protocol ) is được sử dụng để tranfer file qua network mà không cần xác thực. Với PXE server, tftp được sử dụng cho bootstrap loading. Để cấu hình tftp server, sửa file ‘ /etc/xinetd.d/tftp’, thay đổi thông số ‘disable = yes‘ -> ‘disable = no’ và để nguyên đám còn lại mặc định, nội dung của nó sẽ tương tự như sau:

[root@pxe ~]# vi /etc/xinetd.d/tftp
service tftp
{
 socket_type = dgram
 protocol    = udp
 wait        = yes
 user        = root
 server      = /usr/sbin/in.tftpd
 server_args = -s /var/lib/tftpboot
 disable     = no
 per_source  = 11
 cps         = 100 2
 flags       = IPv4
}

Toàn bộ các file phục vụ cho việc boot qua network được đặt trong thư mục tftp root “/var/lib/tftpboot

Chạy các câu lênh sau để chép các file cần thiết vào ‘/var/lib/tftpboot/’

[root@pxe ~]# cp -v /usr/share/syslinux/pxelinux.0 /var/lib/tftpboot
[root@pxe ~]# cp -v /usr/share/syslinux/menu.c32 /var/lib/tftpboot
[root@pxe ~]# cp -v /usr/share/syslinux/memdisk /var/lib/tftpboot
[root@pxe ~]# cp -v /usr/share/syslinux/mboot.c32 /var/lib/tftpboot
[root@pxe ~]# cp -v /usr/share/syslinux/chain.c32 /var/lib/tftpboot
[root@pxe ~]#
[root@pxe ~]# mkdir /var/lib/tftpboot/pxelinux.cfg
[root@pxe ~]# mkdir /var/lib/tftpboot/networkboot
root@pxe ~]#

Step:4 Mount ISO Centos 7 và copy tới thực mụcftp

Download file iso trên mạng, mount vào và copy cả folder vào thư mục sau ‘/var/ftp/pub

[root@pxe ~]# mount -o loop CentOS-7-x86_64-DVD-1511.iso /mnt/
mount: /dev/loop0 is write-protected, mounting read-only
[root@pxe ~]# cd /mnt/
[root@pxe mnt]# cp -av * /var/ftp/pub/

Copy Kernel file (vmlimz) và initrd file từ thư mục đã mount ở trên vào thư mục ‘/var/lib/tftpboot/networkboot/

[root@pxe ~]# cp /mnt/images/pxeboot/vmlinuz /var/lib/tftpboot/networkboot/
[root@pxe ~]# cp /mnt/images/pxeboot/initrd.img /var/lib/tftpboot/networkboot/
[root@pxe ~]#

Step:5 Create kickStart & PXE menu file.

Tạo 1 password được mã hoá, sẽ sử dụng sau này bằng lệnh dưới, thay cái 123@123a bằng pass của mình. Xong copy output lại, có việc cần tới.

[root@pxe ~]# openssl passwd -1 123@123a
$1$qwUUn.B3$Da8qxnXqxwh6zwBWrnE7/. 
[root@pxe ~]#

Default kickstart file được đặt tại /root với tên ‘anaconda-ks.cfg’. chúng ta sẽ tạo file kickstart mới tại  /var/ftp/pub với tên ‘centos7.cfg

Copy nội dung dưới ném vào file /var/ftp/pub/centos7.cfg

Thay thế cấu hình dòng rootpw –iscrypted bằng chuỗi pass mã hoá đã thực hiện ở trên.

[root@pxe ~]# vi /var/ftp/pub/centos7.cfg

#platform=x86, AMD64, or Intel EM64T
#version=DEVEL
# Firewall configuration
firewall --disabled
# Install OS instead of upgrade
install
# Use FTP installation media
url --url="ftp://192.168.150.11/pub/"
# Root password
rootpw --iscrypted $1$e2wrcGGX$tZPQKPsXVhNmbiGg53MN41
# System authorization information
auth useshadow passalgo=sha512
# Use graphical install
graphical
firstboot disable
# System keyboard
keyboard us
# System language
lang en_US
# SELinux configuration
selinux disabled
# Installation logging level
logging level=info
# System timezone
timezone Europe/Amsterdam
# System bootloader configuration
bootloader location=mbr
clearpart --all --initlabel
part swap --asprimary --fstype="swap" --size=1024
part /boot --fstype xfs --size=300
part pv.01 --size=1 --grow
volgroup root_vg01 pv.01
logvol / --fstype xfs --name=lv_01 --vgname=root_vg01 --size=1 --grow
%packages
@^minimal
@core
%end
%addon com_redhat_kdump --disable --reserve-mb='auto'
%end

Tạo PXE menu file (/var/lib/tftpboot/pxelinux.cfg/default), Copy nội dung bên dưới bỏ vào

[root@pxe ~]# vi /var/lib/tftpboot/pxelinux.cfg/default

[root@pxe ~]# vi /var/lib/tftpboot/pxelinux.cfg/default

default menu.c32
prompt 0
timeout 30
MENU TITLE LinuxTechi.com PXE Menu
LABEL centos7_x64
MENU LABEL CentOS 7_X64
KERNEL /networkboot/vmlinuz
APPEND initrd=/networkboot/initrd.img inst.repo=ftp://192.168.150.11/pub ks=ftp://192.168.150.11/pub/centos7.cfg

Step:6 Bật các dịch vụ

Sử dụng các lệnh dưới đây

[root@pxe ~]# systemctl start xinetd
[root@pxe ~]# systemctl enable xinetd
[root@pxe ~]# systemctl start dhcpd.service
[root@pxe ~]# systemctl enable dhcpd.service
Created symlink from /etc/systemd/system/multi-user.target.wants/dhcpd.service to /usr/lib/systemd/system/dhcpd.service.
[root@pxe ~]# 
[root@pxe ~]# systemctl start vsftpd
[root@pxe ~]# systemctl enable vsftpd
Created symlink from /etc/systemd/system/multi-user.target.wants/vsftpd.service to /usr/lib/systemd/system/vsftpd.service.
[root@pxe ~]#
[root@pxe ~]# setsebool -P allow_ftpd_full_access 1
[root@pxe ~]#


Mở port cho firewall

[root@pxe ~]# firewall-cmd --add-service=ftp --permanent
success
[root@pxe ~]# firewall-cmd --add-service=dhcp --permanent
success
[root@pxe ~]# firewall-cmd --add-port=69/tcp --permanent 
success
[root@pxe ~]# firewall-cmd --add-port=69/udp --permanent 
success
[root@pxe ~]# firewall-cmd --add-port=4011/udp --permanent
success
[root@pxe ~]# firewall-cmd --reload
success
[root@pxe ~]#


Nếu lười quá, thì cứ stop firewall lại là xong, cho đỡ rách việc

systemctl disable –now firewalld

Step:7 Boot the clients with pxe boot option.

Dưới đây là video hướng dẫn thực hiện

Tìm hiểu kiến trúc Java Memory Model và Garbage Collection

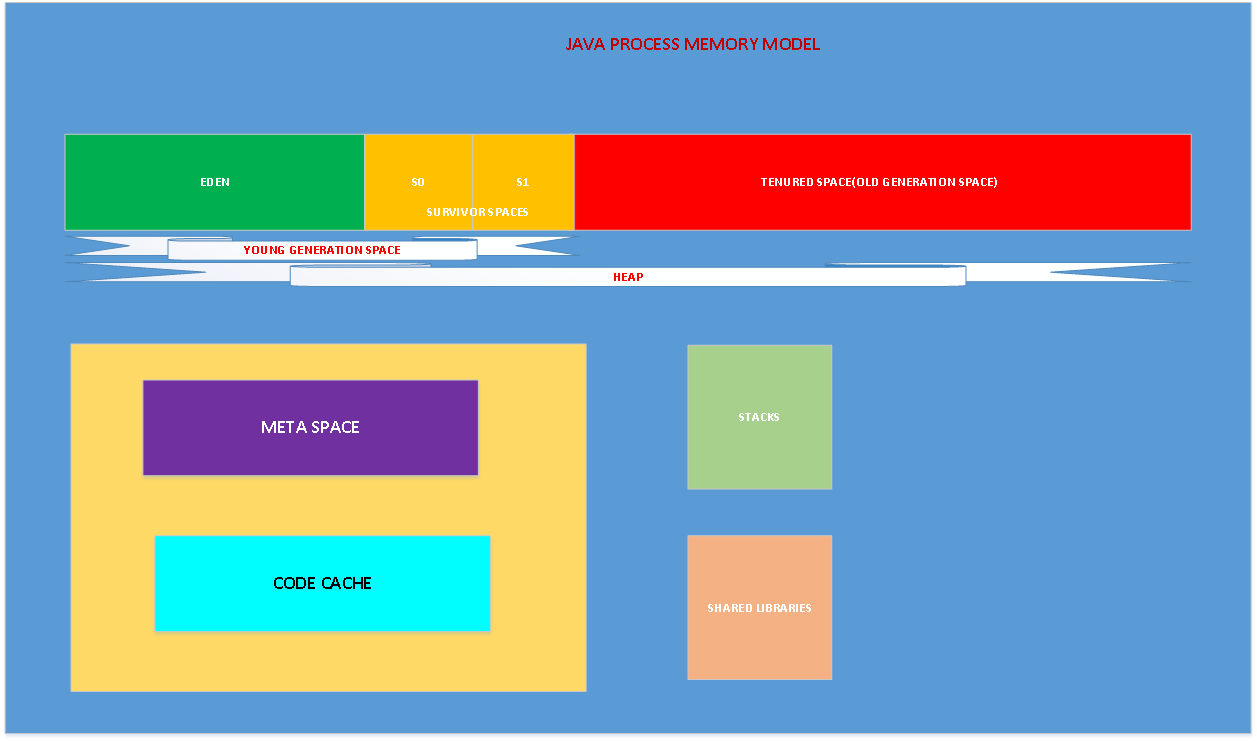
Trong bài viết này, kiến thức được áp dụng cho java 8  JDK8 Oracle Hot Spot 64 bit JVM. Trước hết, dưới đây là mô tả các vùng bộ nhớ của java

Mỗi khi khởi tạo JVM, OS cấp phát bộ nhớ cho process. Process cho chính con JVM, và phần bộ nhớ cấp cho nó bao gồm: Heap, meta space, JIT code cache, thread stack, và shared library. Chúng ta gọi phần bộ nhớ này là Native memory. Native memory là phần bộ nhớ được cung cấp cho các tiến trình bởi OS. Phần bộ nhớ này là bao nhiêu thì còn phụ thuộc vào  OS, CPU, và JRE. Chúng ta cùng tìm hiểu qua về các phần bộ nhớ có trong JVM:

Heap Memory: JVM sử dụng phần bộ nhớ này để lưu trữ các object. Phần bộ nhớ này được chia ra làm 2 vùng khác nhau gọi là “Young Generation Space” và “Tenured Space“.

Young generation: hay còn gọi là New Space được chia thành 2 phần nhỏ hơn gọi là Eden Space” và “Survivor Space.

Eden Space: khi chúng ta khởi tạo 1 object, phần bộ nhớ cho object đó sẽ lấy từ eden space.

Survivor space: chứa những object còn sót lại sau khi Young garbage collection hoặc Minor garbage collection hoạt động (2 trình dọn rác). Phần này được chia là 2 khối bộ nhớ bằng nhau: S0 và S1

Tenured space: object sẽ chạm ngưỡng tenused tối đa trong quá trình minor GC hoặc Young GC sẽ được move tới vùng này, hoặc vùng old generation space

Dưới đây, chúng ta sẽ nói thêm về garbage collection sau.

Meta space: Phần bộ nhớ này nằm bên ngoài của Heap memory, và cũng là 1 phần của native memory. theo tài liệu mặc định, meta space không có giới hạn max cụ thể là bao nhiêu. Trong các phiên bản java trước, phần bộ nhớ này được gọi là perm gen space. Phần bộ nhớ này có nhiệm vụ lưu trữ các định nghĩa các class bởi class loader. Nó được thiết kế để tránh lỗi out of memory. Tuy nhiên, nếu nó tăng tưởng vượt quá dung lượng có sẵn của bộ nhớ vật lý thì hệ điều hành sẽ ném nó sang phần virtual memory (swap).  Điều này sẽ ảnh hưởng nghiêm trọng tới hiệu năng của ứng dụng và việc chuyển qua lại giữa virtual memory và physical memory là một tiến trình tốn kém về mặt hiệu năng. Có một số option được thiết lập khi khởi tạo JVM để giới hạn phần dung lượng meta space, tuy nhiên, làm như vậy có thể gây ra lỗi out of memory.

Code cache: JVM có một trình biên dịch để biên dịch byte code và convert chúng sang ngôn ngữ máy. Để tối ưu cho JVM, trình JIT (Just in time) được ra đời, các khối code thường được truy cập sẽ được biên dịch sang ngôn ngữ máy bởi JIT và lưu trữ trong vùng code cache. Sau đó, phần này sẽ được trình biên dịch bỏ qua.

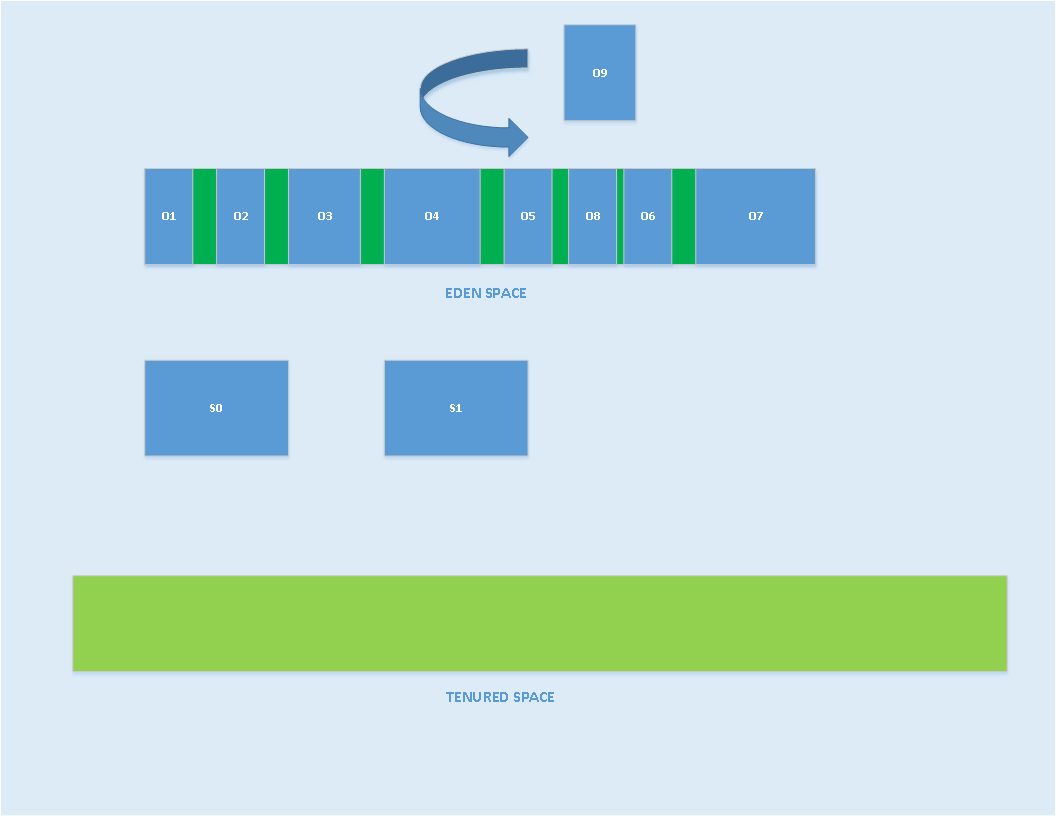
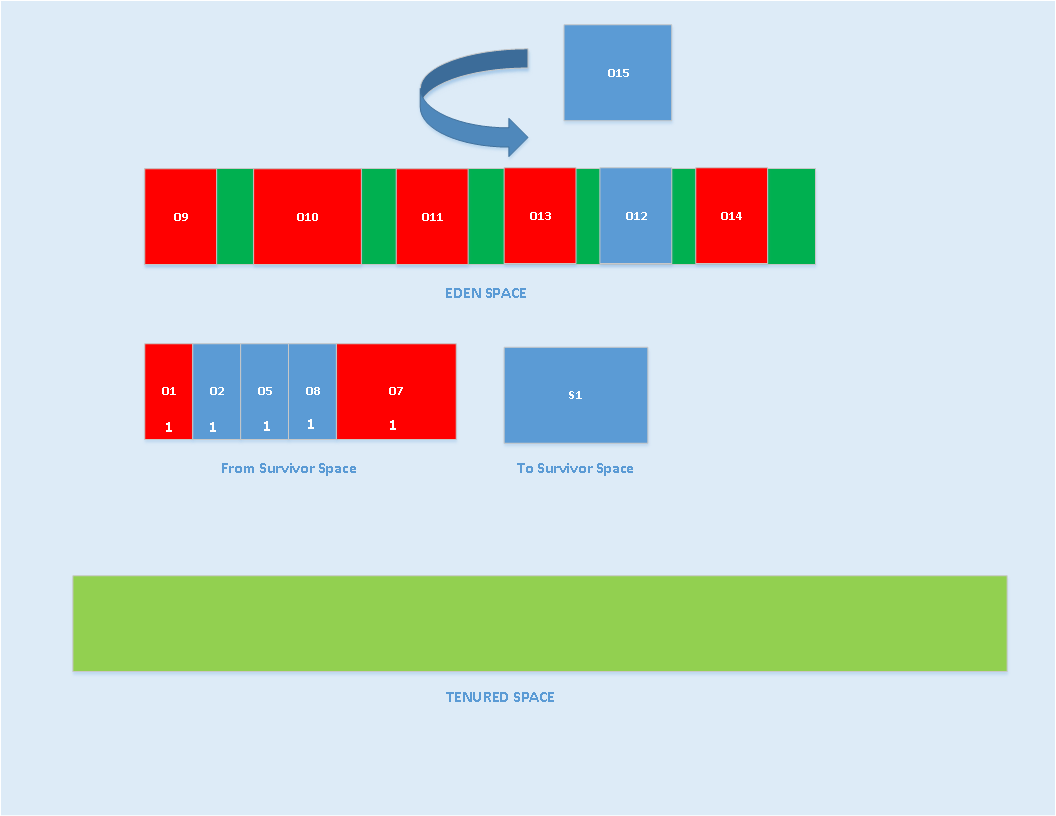
Bây giờ, chúng ta sẽ thảo luận về tiến trình garbage collection. JVM sử dụng các tiến trình riêng rẽ cho việc garbage collection (GC). Như đã đề cập tới ở trên, khi ứng dụng tạo các object, JVM sẽ cố lấy phần bộ nhớ cần thiết từ eden space. JVM thực hiện quá trình GC dưới dạng minor GC và major GC. Dưới đây là minh hoạ cho minor GC

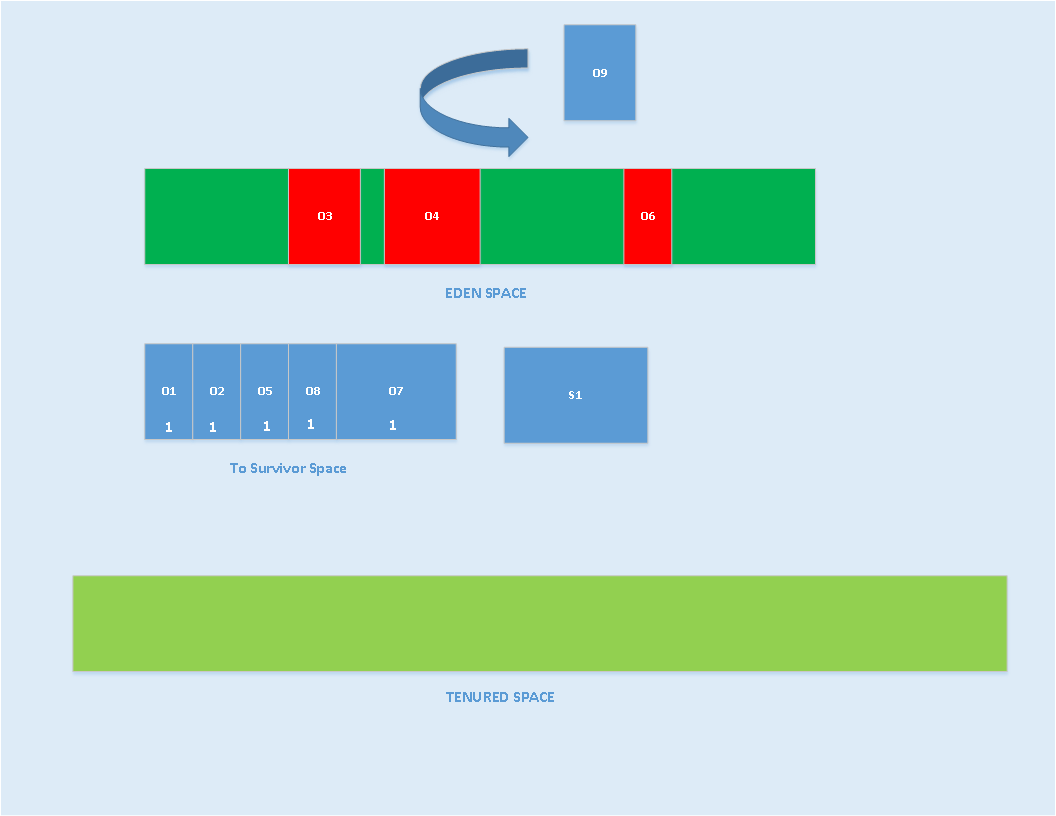
Khi khởi tạo, survivor space và tenured space rỗng. Khi JVM không thể lấy bộ nhớ từ eden space được nữa thì nó khởi động tiến trình minor GC. Trong khi minor GC, các object không thể sử dụng được nữa sẽ bị đánh dấu là collected. JVM sẽ chọn một trong 2 phần của survivor space làm “to space”, nó có thể là S0 hoặc S1. Ví dụ nó chọn S0 làm “to space”, JVM sẽ copy các object còn có thể sử dụng vào “to space” (S0) và tăng 1 con số gọi là Age của object đó lên 1, các object không nhét vào survivor space được sẽ bị nhét vào tenured space. Tiến trình này được gọi là “premature promation”. Ở hình bên dưới, tôi đã làm cho “to space” lớn hơn dung lượng được cấp phát, lưu ý rằng survivor không được tăng.

Trong hình trên, các object được đánh dấu màu đỏ có nghĩa rằng nó không còn sử dụng được nữa. Còn lại thuộc về GC roots, vẫn đang còn được sử dụng và sẽ không bị move đi bởi GC. GC sẽ ném phần màu đỏ đi và trả lại bộ nhớ trống cho eden space.

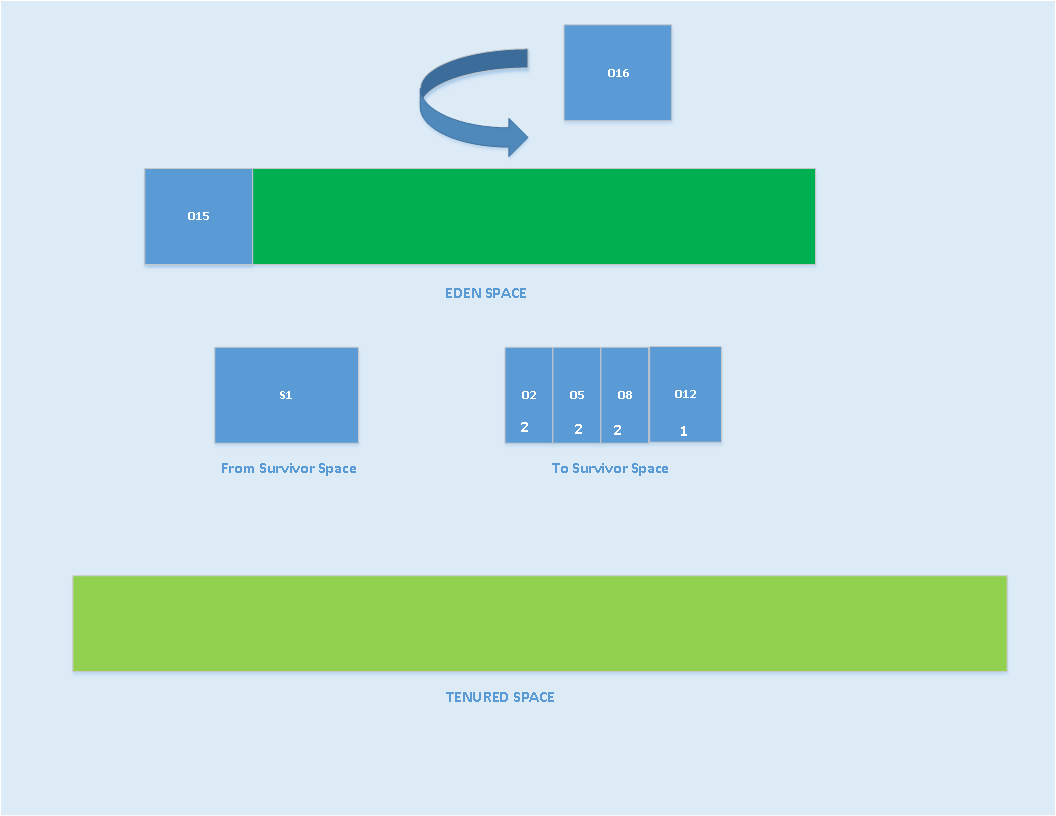
Đối với quá trình minor GC thứ 2, GC sẽ đánh dấu các object vô dụng từ eden space và “to space” S0, và copy GC roots sang survivor khác là S1, Age của các object sẽ được tăng lên tiếp.

Trong hình trên, object được đánh dấu với màu đỏ, sẽ bị GC copy từ eden vào survivor tới vùng survivor S1 và object được tăng thêm.

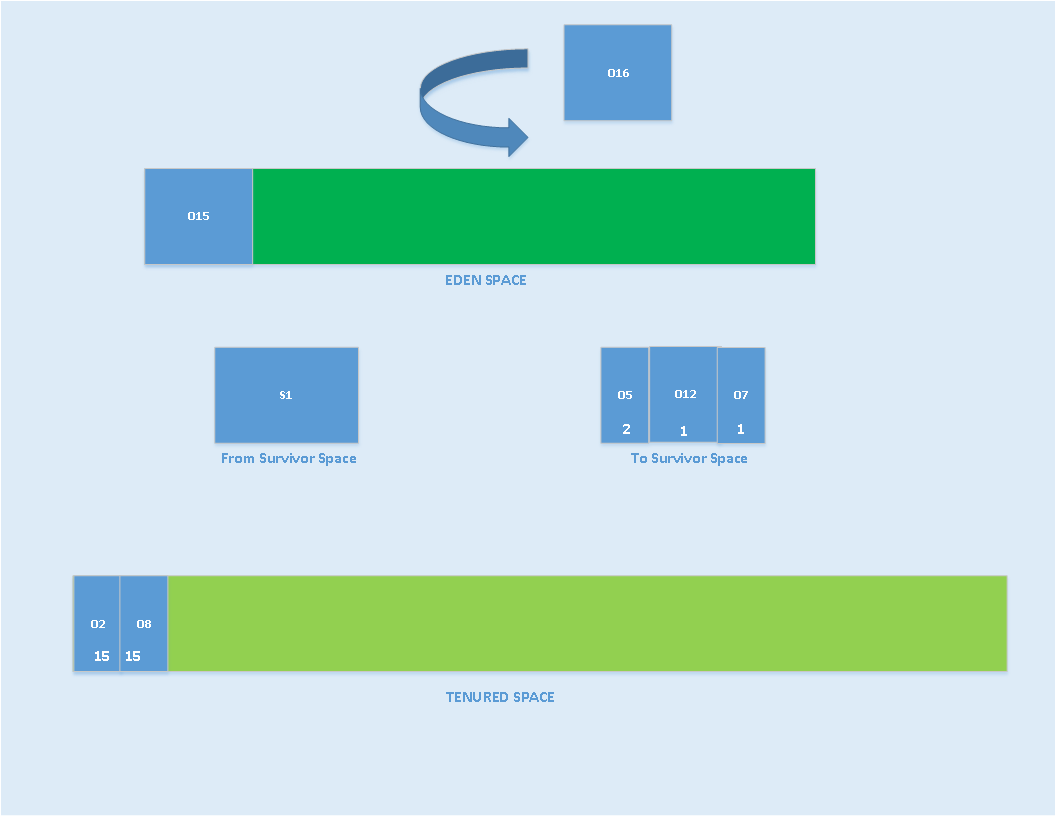
Tiến trình trên được lặp lại với mỗi minor GC, khi object được chạm tới số Age tối đa cho phép, nó sẽ bị ném sang tenured space.

Vì lẽ đó, JVM có 1 option gọi là MaxTenuringThreshold, để định nghĩa số Age tối đa của object. mặc định con số này là 15

Chung kết lại là minor GC sẽ thu hồi lại bộ nhớ từ Young Generation Space. Minor GC là một tiến trình “stop the world”. Thỉnh thoảng, ứng dụng bị dừng lại, nhưng không đánh kể. Minor GC có thể được chạy dưới dạng đơn luồng hoặc đa luồng, tuỳ vào GC collector được sử dụng.

Nếu minor GC được chạy vài lần, thì Tenured space sẽ bị đầy dần lên và phải cần thêm GC nữa. Khi đó, JVM khởi chạy major GC. đôi khi, có thể gọi tiến trình này là full GC.Nhưng, như 1 phần của full GC, JVM sẽ thu hồi phần bộ nhớ từ Meta space, nếu không có object nào trong heap, thì những class đã được load sẽ bị remove khỏi meta space.

Dưới đây là những trigger mà JVM sử dụng để gọi major GC:

  • Nếu developer sử dụng hàm system.gc() hoặc Runtime.getRunTime().gc()
  • Nếu JVM nhận thấy rằng không đủ bộ nhớ tenred space.
  • Nếu khi thực hiện minor GC, JVM cảm thấy không thể lấy đủ bộ nhớ từ eden hoặc survivor space.
  • Nếu có option MaxMetaspaceSize được đặt sẵn, và JVM không đủ memory để load class mới.

Hướng dẫn cài đặt oracle client trên redhat 7 – How to install oracle client 12 on redhat

Chuẩn bị:
– Redhat enterprise 7, có thể cài thêm repo: https://devopsvn.xyz/cai-dat-centos-repo-cho-redhat-rhel-7/

– Bộ cài Oracle client 12: https://www.oracle.com/technetwork/database/enterprise-edition/downloads/oracle12c-linux-12201-3608234.html

Trên máy chủ linux, cài đặt các gói: unzip, gcc

yum install -y gcc unzip

Download bộ cài client: linuxx64_12201_client.zip

Giải nén bộ cài, ta được thư mục client

[root@testora opt]# tree -L 3
.
├── client
│   ├── install
│   │   └── ***********
│   ├── response
│   │   ├── client_install.rsp  #File response, cấu hình cho quá trình cài đặt
│   │   └── netca.rsp
│   ├── runInstaller # File cài đặt
│   ├── stage
│   │   ├── **********
│   └── welcome.html
└── linuxx64_12201_client.zip

Mở file response/client_install.rsp và thiết lập các thông số như sau:

UNIX_GROUP_NAME=oracle
INVENTORY_LOCATION=/u01/oracle/ora_inventory
ORACLE_HOME=/u01/oracle/client_v12.2_base/home
ORACLE_BASE=/u01/oracle/client_v12.2_base
oracle.install.client.installType=Administrator

Một số lưu ý:
INVENTORY_LOCATION : đường dẫn thư mục này phải khác với đường dẫn cho ORACLE_HOME và ORACLE_BASE

đường dẫn ORACLE_HOME nên nằm bên trong ORACLE_BASE

oracle.install.client.installType nên để Administrator, sau này sẽ có nhiều tùy chỉnh hơn.

UNIX_GROUP_NAME: Oracle client không cài được dưới user root, nên phải tạo user khác cho nó, group tương ứng với user đó là gì thì điền vào đây, Group này phải có quyền đọc ghi , exec tất cả các đường dẫn đã khai báo trên. (dùng đường dẫn nào thì vào chown cho nó)

Sau khi khai báo, đứng ở thư mục chứa file runInstaller ở trên, chạy:

./runInstaller -silent -responseFile /opt/client/response/client_install.rsp</span>

Nhớ thay đường dẫn đúng vào file client_install.rsp ở trên.

Sau khi chạy, sẽ hiển thị dạng:

[oracle@testora client]$ ./runInstaller -silent -responseFile /opt/client/response/client_install.rsp
Starting Oracle Universal Installer...

Checking Temp space: must be greater than 415 MB.   Actual 32130 MB    Passed
Checking swap space: must be greater than 150 MB.   Actual 3967 MB    Passed
Preparing to launch Oracle Universal Installer from /tmp/OraInstall2019-06-22_01-52-44PM. Please wait ...
[oracle@testora client]$
[oracle@testora client]$
[oracle@testora client]$ [WARNING] [INS-13014] Target environment does not meet some optional requirements.
   CAUSE: Some of the optional prerequisites are not met. See logs for details. installActions2019-06-22_01-52-44PM.log
   ACTION: Identify the list of failed prerequisite checks from the log: installActions2019-06-22_01-52-44PM.log. Then either from the log file or from installation manual find the appropriate configuration to meet the prerequisites and fix it manually.
You can find the log of this install session at:
 /u01/oracle/ora_inventory/logs/installActions2019-06-22_01-52-44PM.log
The installation of Oracle Client 12c was successful.
Please check '/u01/oracle/ora_inventory/logs/silentInstall2019-06-22_01-52-44PM.log' for more details.

As a root user, execute the following script(s):
        1. /u01/oracle/ora_inventory/orainstRoot.sh


Successfully Setup Software.

[oracle@testora client]$

Làm theo hướng dẫn, chuyển qua user root, chạy /u01/oracle/ora_inventory/orainstRoot.sh là xong.


Cài đặt centos repo cho redhat rhel 7

Case: Cài đặt redhat enteprise, chưa active gì, trong máy không có repo nào để cài gói cơ bản, mở /etc/yum.repo.d rỗng.

Để cài đặt centos repo cho redhat, tiền hành làm như sau:
Tạo file mới có định dạng .repo ví dụ Centos.repo trong thư mục /etc/yum.repo.d

Nội dung:

[centos]
name=CentOS-7
baseurl=http://ftp.heanet.ie/pub/centos/7/os/x86_64/
enabled=1
gpgcheck=1
gpgkey=http://ftp.heanet.ie/pub/centos/7/os/x86_64/RPM-GPG-KEY-CentOS-7

Sau đó lưu lại dưới tên Centos-Base.repo
Tiếp tục chạy lệnh:

yum repolist
Tiếp theo đã có thể cài đặt các gói bằng yum

Sử dụng zabbix theo dõi thông tin metric của cluster hadoop

Yêu cầu:

  • Monitor đc các thông số cơ bản của cluster hadoop:
    • Số lượng app được submit
    • Số app đang chạy
    • Số app đang pending
    • Số memory: total, used
    • Số Vcore: Total, used
    • Node: số node, số node bị mất, số node có trạng thái unhealthy

Thực hiện:

  • Có thể xem các con số trên tại trang running custer của resource manager:

  • Ngoài ra, còn có thể sụng API để lấy các con số này:

Dưới đây là script thực hiện lấy các giá trị:

Apps Submitted
Apps Pending
Apps Running
Memory Used

Memory Total

VCores Used

VCores Total

Active Nodes

lostNodes

unhealthyNodes

totalNodes

Các giá trị này để gửi tới zabbix để xây dựng biểu đồ, và lưu trữ, thiết lập cảnh báo.

Dưới đây là script lấy số liệu:

#!/bin/bash
echo "appsSubmitted
appsPending

appsRunning

allocatedMB

totalMB

allocatedVirtualCores

totalVirtualCores

activeNodes

lostNodes

unhealthyNodes

totalNodes" > /tmp/readkey

curl -s -H "Content-Type: application/xml" http://c2s-spk06:8088/ws/v1/cluster/metrics http://c2s-spk07:8088/ws/v1/cluster/metrics > /tmp/input

IFS=$'\n'

for i in `cat /tmp/readkey`;do

a=`egrep -o "${i}\":[0-9]+" /tmp/input | awk -F':' '{print $2}'`

echo "$HOSTNAME yarn.metric.$i $a"

done


Output có dạng:

c2s-spk06 yarn.metric.appsSubmitted 443
c2s-spk06 yarn.metric.appsPending 0
c2s-spk06 yarn.metric.appsRunning 25
c2s-spk06 yarn.metric.allocatedMB 265216

c2s-spk06 yarn.metric.totalMB 307200

c2s-spk06 yarn.metric.allocatedVirtualCores 131

c2s-spk06 yarn.metric.totalVirtualCores 320

c2s-spk06 yarn.metric.activeNodes 5

c2s-spk06 yarn.metric.lostNodes 0

c2s-spk06 yarn.metric.unhealthyNodes 0

c2s-spk06 yarn.metric.totalNodes 5

Thiết lập đặt vào cron của máy hadoop, chạy 10 phút 1 lần, và đẩy output cho zabbix sender xử lý, gửi tới zabbix server, chi tiết cú pháp xem help của zabbix sender.

*/10 * * * * /bin/bash GetClusterMetricSpark.sh | /usr/local/zabbix/bin/zabbix_sender -i - -z ws-zbx


Các thông số của CPU trên linux

Các thông số của CPU khi sử dụng lệnh top
Cpu(s): 0.1%us, 0.2%sy, 0.0%ni, 99.7%id, 0.0%wa, 0.0%hi, 0.0%si, 0.0%st
0.1%us CPU đang sử dụng 0.1% năng lực xử lý cho running user space processes, tức các tiến trình không thuộc về hoạt động của kernel như shell, các trình biên dịch, database, webserver, và các chương trình khác. Nếu CPU không ở trạng thái nghỉ, idle thì thường phần lớn năng lực của nó đang dùng cho các tiến trình user như thế này.

99.7%id Con số này nói cho chúng ta biết, CPU dành 99.7% thời gian của nó để nghỉ ngơi trong lần lấy mẫu gần nhất, không có gì để làm. Tổng của các con số us, id, ni càng gần 100% càng tốt, nếu không, có lẽ có gì đó sai sai đang xảy ra.
0.2%sy Con số này là lượng thời gian mà CPU dành cho xử lý của kernel, tất cả các process và tài nguyên hệ thống được phụ trách bởi linux kernel. Khi các tiến trình của người dùng (user space processes) cần cái gì đó từ hệ thống như xin cấp phát bộ nhớ, đọc ghi, tạo thêm tiến trình con, thì kernel sẽ làm những việc này. Trong thực tế, kernel sẽ tự đặt lịch, quyết định tiến trình nào sẽ chạy trước, cái nào chạy sau. Con số CPU dành cho phần này càng ít càng tốt, nếu nhiều hơn, có lẽ có vấn đề gì đó như I/O đang tăng cao quá mức.
0.0%ni Con số này phần trăm CPU sử dụng để thay đổi độ ưu tiên các process.
0.0%wa Con số thể hiện %CPU đang dành cho việc ngồi đợi I/O
0.0%hi Con số thể hiện %CPU dùng cho việc xử lý phần cứng bị gián đoạn. Phần cứng gián đoạn từ nhiều phạm vi khác nhau như ổ đĩa lởm, đường truyền mạng tậm tịt, etc, gây ra gián đoạn những gì CPU đang xử lý.
0.0%si Con số thể hiện %CPU dùng cho việc xử lý khi có phần mềm bị gián đoạn. Không thường xảy ra ở mức CPU, thường xảy ra từ lớp kernel trở lên.
0.0%st COn số này dành cho các máy chủ ảo, khi linux chạy trong máy ảo, trên lớp hypervisor, số st ( short for stolen) thể hiện bao nhiêu CPU đã sử dụng để đợi thằng hypervisor, khi nó phục vụ tài nguyên cho các con CPU khác. Con số này bắt nguồn từ thực tế rằng, có nhiều processor ảo dùng chung processor vật lý với nhau.

Một số vấn đề với các con số trên: (để nguyên tiếng anh)

High user mode – If a system suddenly jumps from having spare CPU cycles to running flat out, then the first thing to check is the amount of time the CPU spends running user space processes. If this is high then it probably means that a process has gone crazy and is eating up all the CPU time. Using the top command you will be able to see which process is to blame and restart the service or kill the process.

High kernel usage – Sometimes this is acceptable. For example a program that does lots of console I/O can cause the kernel usage to spike. However if it remains higher for long periods of time then it could be an indication that something isn’t right. A possible cause of such spikes could be a problem with a driver/kernel module.

High niced value – If the amount of time the CPU is spending running processes with a niced priority value jumps then it means that someone has started some intensive CPU jobs on the system, but they have niced the task.
If the niceness level is greater than zero then the user has been courteous enough lower to the priority of the process and therefore avoid a CPU overload. There is probably little that needs to be done in this case, other than maybe find out who has started the process and talk about how you can help out!
But if the niceness level is less than 0, then you will need to investigate what is happening and who is responsible, as such a task could easily cripple the responsiveness of the system.

High waiting on I/O – This means that there are some intensive I/O tasks running on the system that don’t use up much CPU time. If this number is high for anything other than short bursts then it means that either the I/O performed by the task is very inefficient, or the data is being transferred to a very slow device, or there is a potential problem with a hard disk that is taking a long time to process reads & writes.

High interrupt processing – This could be an indication of a broken peripheral that is causing lots of hardware interrupts or of a process that is issuing lots of software interrupts.

Large stolen time – Basically this means that the host system running the hypervisor is too busy. If possible, check the other virtual machines running on the hypervisor, and/or migrate to your virtual machine to another host.


Notice: ob_end_flush(): failed to send buffer of zlib output compression (0) in /home/devopsvn/public_html/wp-includes/functions.php on line 5427