Nâng cấp windows server từ Evaluation lên Standard, Datacenter

Lệnh nâng cấp từ Windows Server Evaluation lên Windows Server Standard

DISM /Online /Set-Edition:ServerStandard /ProductKey:XXXXX-XXXXX-XXXXX-XXXXX-XXXXX /AcceptEula

Lệnh nâng cấp từ Windows Server Evaluation lên Windows Server Datacenter

DISM /Online /Set-Edition:ServerDatacenter /ProductKey:XXXXX-XXXXX-XXXXX-XXXXX-XXXXX /AcceptEula

Trong đó: XXXXX-XXXXX-XXXXX-XXXXX-XXXXX bạn hãy thay bằng key


Triển khai Network loadbalancing trên windows server

Mô hình:

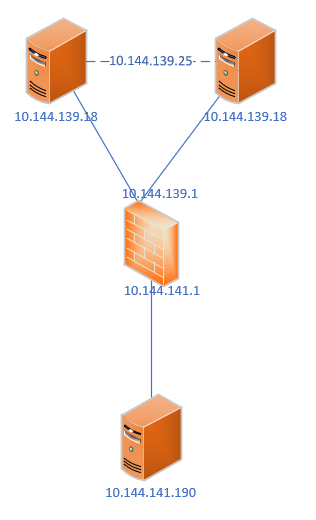
10.144.139.17 và 10.144.139.18 là 2 máy windows (Chạy active directory). Mong muốn cần tạo IP VIP cho 2 con này, IP VIP là 10.144.139.25

Thử nghiệm với máy windows 10.144.141.190 kết nối tới VIP, firewall sử dụng là Juniper SRX 4100

Tiến hành cấu hình:

Tạo loadbalancing giữa 2 máy windows, cài đặt features: Network Load Balancing trên cả 2 máy

image003

image005

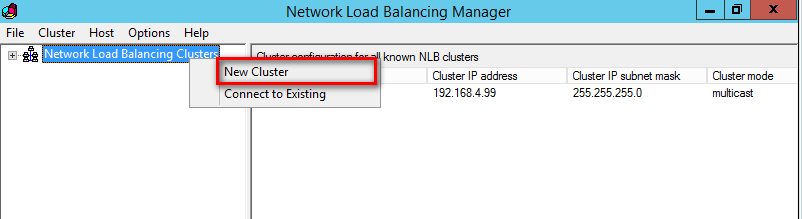
Đứng trên máy 10.144.139.17, Sau khi cài đặt, mở màn hình Network Load Balancing, nháy phải vào chọn new Cluster

image009

Nhập 10.144.139.17, bấm connect -> next -> Nhập VIP IP giữa 2 con: 10.144.139.25 và subnet tương ứng, kiểu  như này
image016
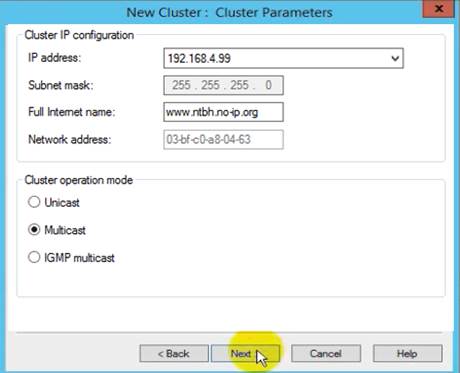
Internetname có thể ko cần, Cluster operation mode thì để Multicast. Nếu chọn unicast thì máy bị đứt kết nối khỏi mạng luôn. Sau đó next next tới hết

Quay lại màn hình Network Load Balancing, nháy phải vào cluster, chọn add Host, nhập thêm host 10.144.139.18 và làm tương tự.

Quay sang màn hình của Máy 10.144.139.18, Nháy phải, chọn connect to Existing

image009

Sau đó nhập IP 10.144.139.17 là xong.

Ping thử IP 10.144.139.25 trên cả 2 máy 17, 18 và 1 máy trong cùng mạng LAN đó thấy đã OK.

Tuy nhiên từ 10.144.141.190 vẫn chưa Ping được IP ảo mới tạo do SRX không học Mac của 10.144.139.25 này. Tiến hành cấu hình trên firewall SRX:

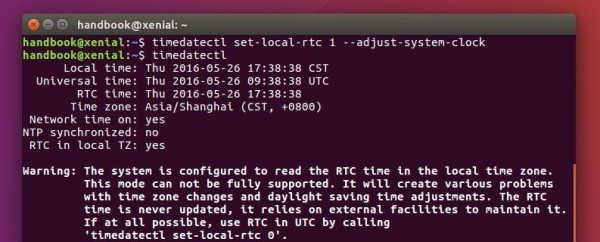
– ĐỨng từ 10.144.141.190 ping tới 10.144.139.25 thấy chưa thông, show trên firewall:

# run monitor traffic interface reth0.1561
verbose output suppressed, use <detail> or <extensive> for full protocol decode
Address resolution is ON. Use <no-resolve> to avoid any reverse lookup delay.
Address resolution timeout is 4s.
Listening on reth0.1561, capture size 96 bytes
01:54:24.337022  In arp who-has 10.144.139.25 tell 10.144.139.1
01:54:24.337254  In arp reply 10.144.139.25 (03:bf:0a:90:8b:19) is-at 03:bf:0a:90:8b:19
01:54:24.337256  In arp reply 10.144.139.25 (03:bf:0a:90:8b:19) is-at 03:bf:0a:90:8b:19

trong đó reth0.1561 là interface của dải 10.144.139.xxx, ta thấy MAC ảo của IP 25 là 03:bf:0a:90:8b:19
Khai báo trên SRX:

# set interfaces reth0.1561 family inet address 10.144.139.1/26 arp 10.144.139.25 multicast-mac 03:bf:0a:90:8b:19
# commit

Ping thử thấy  từ 190 đã thông tới 25
Done


Fix lỗi thời gian bị thay đổi do cài song song ubuntu và windows

Đối với những ai cài song song 2 hệ điều hành windows và ubuntu chắc hẳn đều sẽ gặp lỗi time của máy bị thay đổi sau khi chuyển qua lại giữa 2 hệ điều hành, mỗi lần thế phải tự chỉnh lại rất khó chịu.

Nguyên nhân do Ubuntu maintain hardware clock ở giờ UTC, còn windows cũng maintain hardware clock nhưng với localtime.

Cách fix có 2 cách:

  • Bắt ubuntu sử dụng localtime như windows.
  • Bắt windows sử dụng utc time như ubuntu.

Cách 1 – Bắt ubuntu sử dụng localtime như windows
Có thể edit file /etc/default/rcS hoặc chạy lệnh

timedatectl set-local-rtc 1 --adjust-system-clock

Check lại

timedatectl


Cách 2 – Bắt windows sử dụng utc time như ubuntu.

Mở windows CMD với quyền admin:

Reg add HKLM\SYSTEM\CurrentControlSet\Control\TimeZoneInformation /v RealTimeIsUniversal /t REG_DWORD /d 1
Reg add HKLM\SYSTEM\CurrentControlSet\Control\TimeZoneInformation /v RealTimeIsUniversal /t REG_QWORD /d 1


Port forwarding với netsh (Windows)

Đôi khi, cần thực hiện portwarding 1 số máy trong LAN , với các hệ thống có firewall thì có thể làm điều này dễ dàng, tuy nhiên, đôi lúc giật gấu vá vai, đành phải tạm khắc phục nếu không có firewall. Ở bài trước, chúng ta đã làm điều này dễ dàng với iptables, nhưng iptables chỉ có trên linux. Với các đơn vị nhỏ nhỏ, đa phần là máy người dùng, windows, k lẽ đi cài 1 con linux lên thì về mặt chi phí ko còn khả thi nữa (tiền 1 con PC còn quá tiền mua con firewall phò). May thay, windows cũng làm được điều này với lệnh netsh, mở cmd dưới quyền administrator lên:

Cú pháp:

netsh interface portproxy add v4tov4 listenport=3621 listenaddress=192.168.1.151 connectport=1521 connectaddress=10.1.36.66

Giải thích: máy windows sẽ listen port 3621 , mọi traffic tới port 3621 sẽ điều hướng tới connectaddress=10.1.36.66 và connectport=1521

Để biết hiện tại máy đang proxy những gì:

netsh interface portproxy show all


Đổi phiên bản office từ retail sang VL

Mở notepad, paste đoạn code bên dưới vào, save lại dưới tên active_office.cmd, sau đó nháy phải vào file cmd vừa tạo, chọn run as administrator, bấm phím bất kỳ để xác nhận

@echo off
Title Converter Office 2016 Retail to Volume

echo Press Enter to start VL-Conversion...
echo.
pause
echo.

for /f "tokens=6 delims=[]. " %%G in ('ver') do set win=%%G

set LICPATH=%ProgramFiles(x86)%\Microsoft Office\root\Licenses16

echo path %LICPATH%

if %win% GEQ 9200 (
cd /D "%SystemRoot%\System32"
cscript slmgr.vbs /ilc "%LICPATH%\ProPlusVL_KMS_Client-ppd.xrm-ms"
cscript slmgr.vbs /ilc "%LICPATH%\ProPlusVL_KMS_Client-ul.xrm-ms"
cscript slmgr.vbs /ilc "%LICPATH%\ProPlusVL_KMS_Client-ul-oob.xrm-ms"
cscript slmgr.vbs /ilc "%LICPATH%\client-issuance-bridge-office.xrm-ms"
cscript slmgr.vbs /ilc "%LICPATH%\client-issuance-root.xrm-ms"
cscript slmgr.vbs /ilc "%LICPATH%\client-issuance-root-bridge-test.xrm-ms"
cscript slmgr.vbs /ilc "%LICPATH%\client-issuance-stil.xrm-ms"
cscript slmgr.vbs /ilc "%LICPATH%\client-issuance-ul.xrm-ms"
cscript slmgr.vbs /ilc "%LICPATH%\client-issuance-ul-oob.xrm-ms"
cscript slmgr.vbs /ilc "%LICPATH%\pkeyconfig-office.xrm-ms"
cscript slmgr.vbs /ipk:XQNVK-8JYDB-WJ9W3-YJ8YR-WFG99
)
if %win% LSS 9200 (
cscript "%ProgramFiles(x86)%\Microsoft Office\Office16\ospp.vbs" /inslic:"%LICPATH%\ProPlusVL_KMS_Client-ppd.xrm-ms"
cscript "%ProgramFiles(x86)%\Microsoft Office\Office16\ospp.vbs" /inslic:"%LICPATH%\ProPlusVL_KMS_Client-ul.xrm-ms"
cscript "%ProgramFiles(x86)%\Microsoft Office\Office16\ospp.vbs" /inslic:"%LICPATH%\ProPlusVL_KMS_Client-ul-oob.xrm-ms"
cscript "%ProgramFiles(x86)%\Microsoft Office\Office16\ospp.vbs" /inslic:"%LICPATH%\pkeyconfig-office.xrm-ms"
cscript "%ProgramFiles(x86)%\Microsoft Office\Office16\ospp.vbs" /inpkey:XQNVK-8JYDB-WJ9W3-YJ8YR-WFG99
)
echo.
echo Retail to Volume License conversion finished.
echo.
pause


Active office 2019 không cần dùng phần mềm

Bước 1: Mở notepad, paste nội dung sau và lưu lại dưới tên active.cmd

@echo off
title Kich hoat Microsoft Office 2019 ALL versions mienphi!&cls&echo ============================================================================&echo #Kich hoat Microsoft Office 2019 hop phap - Khong su dung phan mem&echo ============================================================================&echo.&echo #San pham ho tro:&echo - Microsoft Office Standard 2019&echo - Microsoft Office Professional Plus 2019&echo.&echo.&(if exist "%ProgramFiles%\Microsoft Office\Office16\ospp.vbs" cd /d "%ProgramFiles%\Microsoft Office\Office16")&(if exist "%ProgramFiles(x86)%\Microsoft Office\Office16\ospp.vbs" cd /d "%ProgramFiles(x86)%\Microsoft Office\Office16")&(for /f %%x in ('dir /b ..\root\Licenses16\ProPlus2019VL*.xrm-ms') do cscript ospp.vbs /inslic:"..\root\Licenses16\%%x" >nul)&(for /f %%x in ('dir /b ..\root\Licenses16\ProPlus2019VL*.xrm-ms') do cscript ospp.vbs /inslic:"..\root\Licenses16\%%x" >nul)&echo.&echo ============================================================================&echo Activating your Office...&cscript //nologo ospp.vbs /unpkey:6MWKP >nul&cscript //nologo ospp.vbs /inpkey:NMMKJ-6RK4F-KMJVX-8D9MJ-6MWKP >nul&set i=1
:server
if %i%==1 set KMS_Sev=kms7.MSGuides.com
if %i%==2 set KMS_Sev=kms8.MSGuides.com
if %i%==3 set KMS_Sev=kms9.MSGuides.com
if %i%==4 set KMS_Sev=kms.digiboy.ir
if %i%==5 goto notsupported
cscript //nologo ospp.vbs /sethst:%KMS_Sev% >nul&echo ============================================================================&echo.&echo.
cscript //nologo ospp.vbs /act | find /i "successful" && (echo.&echo ============================================================================&choice /n /c YN /m "Truy cap devopsvn.xyz: [Y,N]?" & if errorlevel 2 exit) || (echo Ket noi voi may chu KMS khong thanh cong! Dang ket noi lai... & echo Vui long cho... & echo. & echo. & set /a i+=1 & goto server)
explorer "https://devopsvn.xyz"&goto halt
:notsupported
echo.&echo ============================================================================&echo Phien ban Office cua ban khong duoc ho tro.&echo Download phien ban moi nhat tai day: http://devopsvn.xyz/:halt
pause >nul

Bước 2: mở file active.cmd vừa tạo dưới quyền administrator và ngồi chờ. Thành công sẽ báo

Print Spooler Error code 3. The system cannot find the path specified

Xử lý lỗi:

Print Spooler Error code 3. The system cannot find the path specified

Không thể start service print spooler, báo lỗi như trên, mở properties của service thì thấy execute path không có gì. Có thể xử lý như sau:

HKEY_LOCAL_MACHINE\SYSTEM\CurrentControlSet\services\Spooler registry key and right-click Spooler > New > Expandable String Value > then name the value ImagePath then double-click ImagePath and type (or copy and paste) the following under "Value data":

%SystemRoot%\System32\spoolsv.exe

Then press "OK"

Close regedit and see if you can start the Print Spooler service.

TÌm tin nhắn trong skype với nhiều điều kiện

Skype lưu đường dẫn profile của mỗi user trong folder C:\Users\<user name>\AppData\Roaming\Skype\<Skype name, tên đăng nhập>\main.db

Mở file này bằng sqlite brower, bảng lưu tin nhắn thuộc bảng Messages, một số trường chính:

  • body_xml: trường lưu nội dung message
  • timestamp: thời gian tin nhắn, hiển thi dưới dạng unixtime
  • author: người gửi

Một số câu truy vẫn

select date(timestamp, ‘unixepoch’, ‘localtime’), body_xml from Messages where

timestamp >= 1540479600 and

body_xml like ‘%【アロー価格取込バッチログ確認】%’

  • lọc ra các message có thời gian sau thời gian cần tìm (convert thời gian cần tìm sang unixtime để truy vấn) chưa từ khoá 【アロー価格取込バッチログ確認】

Thủ thuật Notepad++

Xóa các dòng chứa từ khóa biết trước

Ví dụ: Muốn xóa các dòng có từ “tukhoa”

1. Menu => Search => Mark (hoặc Ctrl + F, chọn Tab Mark

)

2. Nhập từ cần xóa: “tukhoa”

3. Check ô Mark line và Wrap aroud => Chọn Find All

4. Search => Bookmark => Remove Bookmarked Lines. (Xóa dòng đã đánh dấu)

Xóa dòng không chứa từ khóa

Ví dụ: Muốn xóa các dòng không có từ “tukhoa”

1,2,3 Lặp lại như trên.

4. Chọn Remove Unmarked Lines.

Xóa dòng trắng (không có gì)

Edit => Line Operations => Remove Empty Lines (Containing Black Character)

Thêm từ khóa vào đầu dòng

1. Ctrl + F => Replace

2. Tích ô Regular expression và Wrap around

3. Find what gõ: ^

4. Replace with gõ từ khóa cần thêm: tukhoa

5. Replace All.

Thêm từ khóa vào cuối dòng

Như trên chỉ khác tìm từ $

Xóa từ khóa cuối dòng

Ví dụ xóa từ tukhoa ở cuối

Như trên.


Find what gõ

: tukhoa$


Replace with: để trống.

Xóa từ khóa đầu dòng

Như trên.


Find what gõ: ^tukhoa

Xóa mọi thứ sau từ khóa

Find what: tukhoa.*

Xóa mọi thứ trước một từ khóa

Find what: ^.+tukhoa

Xóa mọi số (number)

Find what: [0-9] +

Ở phần tiếp theo, mình sẽ giới thiệu thêm một số thủ thuật nội dung, quản lý notepad ++.


Notice: ob_end_flush(): failed to send buffer of zlib output compression (0) in /home/devopsvn/public_html/wp-includes/functions.php on line 5427