[Ubuntu 20.04] Xử lý /var/log/journal/ quá lớn

Một ngày đẹp trời rà soát máy chủ, hệ điều hành ubuntu 20 và thấy thư mục /var/log/journal/ to tổ chảng

root@mefin-ntl-rke-03:/var/log/journal/c27b494019ba448580a9cc1dce75e9c6# ll -h
total 4.1G
drwxr-sr-x+ 2 root systemd-journal 4.0K Apr 19 09:04  ./
drwxr-sr-x+ 3 root systemd-journal 4.0K Dec 25 03:57  ../
-rw-r-----+ 1 root systemd-journal 128M Jan 17 18:59 'system@16ca61f2092a4b948aef42e48d42a204-000000000016a25b-0005b8db6105890b.journal'
-rw-r-----+ 1 root systemd-journal 128M Jan 20 19:41 'system@16ca61f2092a4b948aef42e48d42a204-000000000019cff5-0005b91758244858.journal'
-rw-r-----+ 1 root systemd-journal  96M Jan 22 10:13 'system@16ca61f2092a4b948aef42e48d42a204-00000000001d04e2-0005b954467d0756.journal'
-rw-r-----+ 1 root systemd-journal 128M Jan 25 10:14 'system@16ca61f2092a4b948aef42e48d42a204-00000000001eb945-0005b97492f226fb.journal'
-rw-r-----+ 1 root systemd-journal 128M Jan 28 09:13 'system@16ca61f2092a4b948aef42e48d42a204-000000000021e99d-0005b9b0ef1f24bf.journal'
-rw-r-----+ 1 root systemd-journal 128M Jan 31 09:43 'system@16ca61f2092a4b948aef42e48d42a204-00000000002512a1-0005b9ec6d5a71fd.journal'
-rw-r-----+ 1 root systemd-journal 128M Feb  3 08:59 'system@16ca61f2092a4b948aef42e48d42a204-0000000000284669-0005ba2935649832.journal'
-rw-r-----+ 1 root systemd-journal 128M Feb  6 09:26 'system@16ca61f2092a4b948aef42e48d42a204-00000000002b714f-0005ba64eef8ba89.journal'
-rw-r-----+ 1 root systemd-journal 128M Feb  9 10:04 'system@16ca61f2092a4b948aef42e48d42a204-00000000002ea4a7-0005baa1a94c7b25.journal'
-rw-r-----+ 1 root systemd-journal 128M Feb 12 10:41 'system@16ca61f2092a4b948aef42e48d42a204-000000000031d940-0005bade8af14a24.journal'
-rw-r-----+ 1 root systemd-journal 128M Feb 15 11:28 'system@16ca61f2092a4b948aef42e48d42a204-0000000000350db4-0005bb1b67cc8363.journal'
-rw-r-----+ 1 root systemd-journal 128M Feb 18 12:12 'system@16ca61f2092a4b948aef42e48d42a204-0000000000384357-0005bb586b233c8e.journal'
-rw-r-----+ 1 root systemd-journal 128M Feb 21 12:51 'system@16ca61f2092a4b948aef42e48d42a204-00000000003b7884-0005bb9561602aa0.journal'
-rw-r-----+ 1 root systemd-journal 128M Feb 24 13:24 'system@16ca61f2092a4b948aef42e48d42a204-00000000003ead3f-0005bbd2472c1033.journal'
-rw-r-----+ 1 root systemd-journal 128M Feb 27 14:00 'system@16ca61f2092a4b948aef42e48d42a204-000000000041e12c-0005bc0f151bf192.journal'
-rw-r-----+ 1 root systemd-journal 128M Mar  2 14:22 'system@16ca61f2092a4b948aef42e48d42a204-00000000004516a6-0005bc4befd2240e.journal'
-rw-r-----+ 1 root systemd-journal 128M Mar  5 15:01 'system@16ca61f2092a4b948aef42e48d42a204-0000000000484968-0005bc8897dc0e69.journal'
-rw-r-----+ 1 root systemd-journal 128M Mar  8 15:52 'system@16ca61f2092a4b948aef42e48d42a204-00000000004b7dfa-0005bcc57c237e46.journal'
-rw-r-----+ 1 root systemd-journal 128M Mar 11 16:31 'system@16ca61f2092a4b948aef42e48d42a204-00000000004eb422-0005bd028f33fd7d.journal'
-rw-r-----+ 1 root systemd-journal 128M Mar 14 17:15 'system@16ca61f2092a4b948aef42e48d42a204-000000000051e8c9-0005bd3f71effd5c.journal'
-rw-r-----+ 1 root systemd-journal 128M Mar 17 17:27 'system@16ca61f2092a4b948aef42e48d42a204-0000000000551e1c-0005bd7c6ab93047.journal'
-rw-r-----+ 1 root systemd-journal 128M Mar 20 12:30 'system@16ca61f2092a4b948aef42e48d42a204-0000000000584ff3-0005bdb8ef2a619b.journal'
-rw-r-----+ 1 root systemd-journal 128M Mar 23 11:36 'system@16ca61f2092a4b948aef42e48d42a204-00000000005b5d6c-0005bdf1212af3ec.journal'
-rw-r-----+ 1 root systemd-journal 128M Mar 26 11:00 'system@16ca61f2092a4b948aef42e48d42a204-00000000005e8698-0005be2cbb27a4e8.journal'
-rw-r-----+ 1 root systemd-journal 128M Mar 29 10:58 'system@16ca61f2092a4b948aef42e48d42a204-000000000061b1d7-0005be68910b83e8.journal'
-rw-r-----+ 1 root systemd-journal 128M Apr  1 10:57 'system@16ca61f2092a4b948aef42e48d42a204-000000000064e13a-0005bea4e5b125de.journal'
-rw-r-----+ 1 root systemd-journal 128M Apr  4 10:49 'system@16ca61f2092a4b948aef42e48d42a204-000000000068105c-0005bee13c8b5363.journal'
-rw-r-----+ 1 root systemd-journal 128M Apr  7 10:36 'system@16ca61f2092a4b948aef42e48d42a204-00000000006b3e96-0005bf1d7697c73e.journal'
-rw-r-----+ 1 root systemd-journal 128M Apr 10 10:26 'system@16ca61f2092a4b948aef42e48d42a204-00000000006e6c4d-0005bf59a16d76d4.journal'
-rw-r-----+ 1 root systemd-journal 128M Apr 13 10:27 'system@16ca61f2092a4b948aef42e48d42a204-0000000000719a63-0005bf95d9ad57ee.journal'
-rw-r-----+ 1 root systemd-journal 128M Apr 16 08:25 'system@16ca61f2092a4b948aef42e48d42a204-000000000074ca08-0005bfd237815e30.journal'
-rw-r-----+ 1 root systemd-journal 128M Apr 19 09:04 'system@16ca61f2092a4b948aef42e48d42a204-000000000077ec2e-0005c00cdc182970.journal'
-rw-r-----+ 1 root systemd-journal  32M Apr 19 20:13  system.journal
root@mefin-ntl-rke-03:/var/log/journal/c27b494019ba448580a9cc1dce75e9c6#

Những log  này do systemd sinh ra, có thể được đọc bởi journalctl, Mỗi khi có sự kiện gì xảy ra, systemd sẽ ghi lại nhật ký vào đây, phòng khi thằng quản trị rảnh háng muốn tìm hiểu. Tuy nhiên, mọi tiện ích đều phải trả giá, cái giá phải trả cho việc này là tốn ổ cứng vcl. Không phải máy chủ nào cũng rảnh rang vài trăm GB hay vài TB để thoải mái lưu trữ bất cứ thứ gì mình thích, lúc này, mấy thằng SA nghèo khổ lại phải vắt óc ra mà cấu hình tối ưu lại cho tiết kiệm, tiền ít thì đừng hít cái gì thơm quá.

Cách xử lý folder này như sau:
– Với những ông không có nhu cầu đọc cái này, xử lý nhanh thì có thể xoá sạch file trong folder này đi, tuy nhiên đừng xoá thư mục.
– Với những ông thích cấu hình tối ưu, đỡ phải thi thoảng đi xử lý ba cái sự vụ này:
Cấu hình lại file /etc/systemd/journald.conf, nội dung mặc định như này:

#  This file is part of systemd.
# 
#  systemd is free software; you can redistribute it and/or modify it
#  under the terms of the GNU Lesser General Public License as published by
#  the Free Software Foundation; either version 2.1 of the License, or
#  (at your option) any later version.
#
# Entries in this file show the compile time defaults.
# You can change settings by editing this file.
# Defaults can be restored by simply deleting this file.
#
# See journald.conf(5) for details.

[Journal]
#Storage=auto
#Compress=yes
#Seal=yes
#SplitMode=uid
#SyncIntervalSec=5m
#RateLimitIntervalSec=30s
#RateLimitBurst=10000
#SystemMaxUse=
#SystemKeepFree=
#SystemMaxFileSize=
#SystemMaxFiles=100
#RuntimeMaxUse=
#RuntimeKeepFree=
#RuntimeMaxFileSize=
#RuntimeMaxFiles=100
#MaxRetentionSec=
#MaxFileSec=1month
#ForwardToSyslog=yes
#ForwardToKMsg=no
#ForwardToConsole=no
#ForwardToWall=yes
#TTYPath=/dev/console
#MaxLevelStore=debug
#MaxLevelSyslog=debug
#MaxLevelKMsg=notice
#MaxLevelConsole=info
#MaxLevelWall=emerg
#LineMax=48K
#ReadKMsg=yes

Một số ý nghĩa cấu hình

Storage=volatile|persistent|auto|none
#none = tắt lưu trữ journaling log
#volatile = chỉ lưu trữ trong ram, đọc bằng lệnh journalctl
#persistent = lưu trữ vào ổ cứng, thư mục /var/log/journal, nếu thư mục này k có thì systemd sẽ tạo ra để lưu, 
#nếu có rồi nhưng ko ghi đc file thì sẽ ghi vào /run/log/journal
#auto = lưu trữ vào ổ cứng, tuy nhiên nếu /var/log/journal ko tồn tại thì lưu vào /run/log/journal
SplitMode=uid|none
#điều khiển việc systemd tự tách log theo user, user nào xem log của user đó ( mặc định là uuid)
SystemMaxUse=, SystemKeepFree=, SystemMaxFileSize=, SystemMaxFiles=, RuntimeMaxUse=, RuntimeKeepFree=, RuntimeMaxFileSize=, RuntimeMaxFiles=
# con số quan trọng nhất để bảo toàn số dung lượng ổ cứng ít ỏi của bạn
# SystemMaxUse và RuntimeMaxUse điều khiển số dung lượng ổ cứng ví dụ 1G, 2G tối đa dành việc ghi log này
# SystemKeepFree và RuntimeKeepFree quy định số dung lượng ổ chừa lại cho thằng khác
#SystemMaxFileSize dung lượng file lớn nhất của mỗi file log
#SystemMaxFiles số lượng file log được lưu trữ


Note build zabbix từ source

Download zabbix từ trang chủ: https://www.zabbix.com/download_sources

– Giải nén
– Cài đặt gói cần thiết:

yum install gcc mysql-devel libxml2-devel net-snmp-devel curl-devel unixODBC-devel OpenIPMI-devel libssh2-devel iksemel-devel openldap-devel libevent-devel pcre-devel

– Cài đặt java
– configure

./configure --enable-server --enable-agent --enable-proxy --enable-java --with-mysql --enable-ipv6 --with-net-snmp --with-libcurl --with-libxml2 --with-openipmi --with-unixodbc --with-ssh2 --with-ldap --with-libpcre
make install

Output các file build đc nằm ở /sbin/local/

Một số trick:
– Mặc định timeout giữa server và agent, giữa agent và script external check chỉ tối đa 30s. Có thể tăng con số này lên bằng cách sửa lại source của zabbix sau đó thay đè file binary build được vào máy chủ đã cài trước đó:
Timeout server: Sửa timeout trong file server.c

Cài đặt gcc mới nhất từ source trên centos 7

Mặc định cài từ yum của centos 7 chỉ có gcc 4.8.5. Khá là cũ, các software mới như redis yêu cầu tối thiểu phải 4.9 mới buld được. Cách cài đặt gcc mới hơn như sau:

Tìm source từ trang chủ: https://gcc.gnu.org/mirrors.html
Tìm được  1 repo cảm thấy gần mình nhất sau đó truy cập vào, lấy ra link release, wget về là OK, ở đây là link:

wget http://ftp.tsukuba.wide.ad.jp/software/gcc/releases/gcc-10.1.0/gcc-10.1.0.tar.gz

Giải nén sau đó tiến hành cài đặt:

yum -y install bzip2 wget gcc gcc-c++ gmp-devel mpfr-devel libmpc-devel make
wget http://ftp.tsukuba.wide.ad.jp/software/gcc/releases/gcc-10.1.0/gcc-10.1.0.tar.gz
tar xzvf gcc-10.1.0.tar.gz
cd gcc-10.1.0
./configure --enable-languages=c,c++ --disable-multilib
make -j$(nproc)
make install

Sau khi make install tiến hành khai báo

export PATH=/usr/local/bin:$PATH
export LD_LIBRARY_PATH=/usr/local/lib64:$LD_LIBRARY_PATH
cat <<EOF >  /etc/profile.d/gcc10.sh
export PATH=/usr/local/bin:$PATH
export LD_LIBRARY_PATH=/usr/local/lib64:$LD_LIBRARY_PATH
EOF

test lại output thế này là OK

[root@redis1 redis-6.0.1]# gcc -v
Using built-in specs.
COLLECT_GCC=gcc
COLLECT_LTO_WRAPPER=/usr/local/libexec/gcc/x86_64-pc-linux-gnu/10.1.0/lto-wrapper
Target: x86_64-pc-linux-gnu
Configured with: ./configure --enable-languages=c,c++ --disable-multilib
Thread model: posix
Supported LTO compression algorithms: zlib
gcc version 10.1.0 (GCC)
[root@redis1 redis-6.0.1]#


Fix lỗi thời gian bị thay đổi do cài song song ubuntu và windows

Đối với những ai cài song song 2 hệ điều hành windows và ubuntu chắc hẳn đều sẽ gặp lỗi time của máy bị thay đổi sau khi chuyển qua lại giữa 2 hệ điều hành, mỗi lần thế phải tự chỉnh lại rất khó chịu.

Nguyên nhân do Ubuntu maintain hardware clock ở giờ UTC, còn windows cũng maintain hardware clock nhưng với localtime.

Cách fix có 2 cách:

  • Bắt ubuntu sử dụng localtime như windows.
  • Bắt windows sử dụng utc time như ubuntu.

Cách 1 – Bắt ubuntu sử dụng localtime như windows
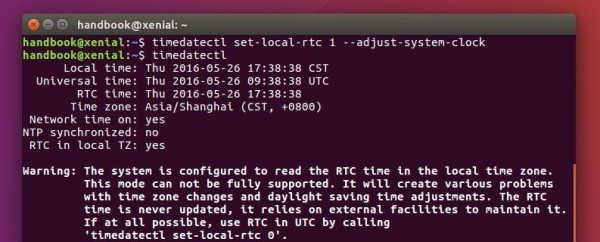
Có thể edit file /etc/default/rcS hoặc chạy lệnh

timedatectl set-local-rtc 1 --adjust-system-clock

Check lại

timedatectl


Cách 2 – Bắt windows sử dụng utc time như ubuntu.

Mở windows CMD với quyền admin:

Reg add HKLM\SYSTEM\CurrentControlSet\Control\TimeZoneInformation /v RealTimeIsUniversal /t REG_DWORD /d 1
Reg add HKLM\SYSTEM\CurrentControlSet\Control\TimeZoneInformation /v RealTimeIsUniversal /t REG_QWORD /d 1


Thêm disk cho LVM

Ngày mua máy chủ, sếp bảo: cty ta nghèo đói rách nát, đợt này mua máy chủ, k đủ tiền mua con ổ to, anh em chịu khó, mai mốt có lãi ta mua thêm ổ nữa cắm vào. Lúc ấy thằng éo nào cũng gật gù, đành chịu chứ làm sao, sếp k có tiền chả lẽ cả lũ thích sếp trừ lương lấy tiền mua ổ cứng.
Dùng được một thời gian, cuối cùng ngày đó cũng tới. Sếp cho thêm con ổ nữa , nhưng khốn nạn là con máy chủ đang chạy, có cách nào nới rộng ra mà không ảnh hưởng gì không?
May thay, hồi xưa cài máy, anh em khôn nên cài lvm, mà mặc định cài centos 7 nó đã có lvm rồi, giờ chỉ add disk vào resize là được. Dưới đây, chúng ta sẽ làm điều đó:

Môi trường gốc:

OS: Centos 7
mount point / dung lượng 5GB
Add thêm ổ mới 10GB
-> mục tiêu có / = 15GB

Layout đĩa ban đầu

[root@localhost ~]# df -h
Filesystem                     Size  Used Avail Use% Mounted on
/dev/mapper/volumegroup1-root  4.5G  1.6G  3.0G  34% /
devtmpfs                       980M     0  980M   0% /dev
tmpfs                          992M     0  992M   0% /dev/shm
tmpfs                          992M  9.6M  982M   1% /run
tmpfs                          992M     0  992M   0% /sys/fs/cgroup
/dev/sda1                      477M  100M  348M  23% /boot
tmpfs                          199M     0  199M   0% /run/user/0
/dev/sdb1                      4.8G   20M  4.6G   1% /data
[root@localhost ~]# lsblk
NAME                  MAJ:MIN RM  SIZE RO TYPE MOUNTPOINT
sda                     8:0    0    5G  0 disk
├─sda1                  8:1    0  500M  0 part /boot
└─sda2                  8:2    0  4.5G  0 part
  └─volumegroup1-root 253:0    0  4.5G  0 lvm  /
sdb                     8:16   0    5G  0 disk
└─sdb1                  8:17   0    5G  0 part /data
sr0                    11:0    1 1024M  0 rom

Thấy thằng / có type lvm.
Những thằng type là part thì chỉ có nước tắt máy, resize bằng các tool như Gparted, ở đây, chúng tôi không làm thế.
Tiến hành cắm thêm đĩa mới vào máy, nếu là máy ảo thì add thêm disk, nếu là máy vật lý thì cắm disk vào rồi tạo raid, cách làm thì mỗi case mỗi khác, nằm ngoài khuôn khổ bài viết này. Chúng ta skip, nhảy tới bước đã cắm ổ vào OK. Tiến hành refresh lại để centos nhận ra ổ đĩa mới:

echo "- - -" > /sys/class/scsi_host/host0/scan
echo "- - -" > /sys/class/scsi_host/host1/scan
echo "- - -" > /sys/class/scsi_host/host2/scan

sau đó check lại ổ đĩa

[root@localhost ~]# fdisk -l

Disk /dev/sda: 5368 MB, 5368709120 bytes, 10485760 sectors
Units = sectors of 1 * 512 = 512 bytes
Sector size (logical/physical): 512 bytes / 512 bytes
I/O size (minimum/optimal): 512 bytes / 512 bytes
Disk label type: dos
Disk identifier: 0x00013f52

   Device Boot      Start         End      Blocks   Id  System
/dev/sda1   *        2048     1026047      512000   83  Linux
/dev/sda2         1026048    10485759     4729856   8e  Linux LVM

Disk /dev/sdb: 5368 MB, 5368709120 bytes, 10485760 sectors
Units = sectors of 1 * 512 = 512 bytes
Sector size (logical/physical): 512 bytes / 512 bytes
I/O size (minimum/optimal): 512 bytes / 512 bytes
Disk label type: dos
Disk identifier: 0x6ed73018

   Device Boot      Start         End      Blocks   Id  System
/dev/sdb1            2048    10485759     5241856   8e  Linux LVM

Disk /dev/mapper/volumegroup1-root: 4840 MB, 4840226816 bytes, 9453568 sectors
Units = sectors of 1 * 512 = 512 bytes
Sector size (logical/physical): 512 bytes / 512 bytes
I/O size (minimum/optimal): 512 bytes / 512 bytes


Disk /dev/sdc: 10.7 GB, 10737418240 bytes, 20971520 sectors
Units = sectors of 1 * 512 = 512 bytes
Sector size (logical/physical): 512 bytes / 512 bytes
I/O size (minimum/optimal): 512 bytes / 512 bytes

Thấy ổ sdc mới xuất hiện. Nếu không xuất hiện thì các bạn check trong /sys/class/scsi_host/ xem còn host nào thì lặp lại bước echo ở trên.
Tiến hành tạo partition mới với type 8e, linux LVM

[root@localhost ~]# fdisk /dev/sdc
Welcome to fdisk (util-linux 2.23.2).

Changes will remain in memory only, until you decide to write them.
Be careful before using the write command.

Device does not contain a recognized partition table
Building a new DOS disklabel with disk identifier 0x03cec27c.

Command (m for help): m
Command action
   a   toggle a bootable flag
   b   edit bsd disklabel
   c   toggle the dos compatibility flag
   d   delete a partition
   g   create a new empty GPT partition table
   G   create an IRIX (SGI) partition table
   l   list known partition types
   m   print this menu
   n   add a new partition
   o   create a new empty DOS partition table
   p   print the partition table
   q   quit without saving changes
   s   create a new empty Sun disklabel
   t   change a partition's system id
   u   change display/entry units
   v   verify the partition table
   w   write table to disk and exit
   x   extra functionality (experts only)

Command (m for help):

Chọn n để add partition mới, sau đó chọn p để tạo primary partition, tiếp theo nhập 1,

Command (m for help): n
Partition type:
   p   primary (0 primary, 0 extended, 4 free)
   e   extended
Select (default p): p
Partition number (1-4, default 1): 1
First sector (2048-20971519, default 2048):
Using default value 2048
Last sector, +sectors or +size{K,M,G} (2048-20971519, default 20971519):
Using default value 20971519
Partition 1 of type Linux and of size 10 GiB is set

Command (m for help): t
Selected partition 1
Hex code (type L to list all codes): 8e
Changed type of partition 'Linux' to 'Linux LVM'

Command (m for help): w
The partition table has been altered!

Calling ioctl() to re-read partition table.
Syncing disks.
[root@localhost ~]#

Fdisk -l lần nữa sẽ thấy sdc mới đã được partition, với phân vùng sdc1

[root@localhost ~]# fdisk -l

Disk /dev/sda: 5368 MB, 5368709120 bytes, 10485760 sectors
Units = sectors of 1 * 512 = 512 bytes
Sector size (logical/physical): 512 bytes / 512 bytes
I/O size (minimum/optimal): 512 bytes / 512 bytes
Disk label type: dos
Disk identifier: 0x00013f52

   Device Boot      Start         End      Blocks   Id  System
/dev/sda1   *        2048     1026047      512000   83  Linux
/dev/sda2         1026048    10485759     4729856   8e  Linux LVM

Disk /dev/sdb: 5368 MB, 5368709120 bytes, 10485760 sectors
Units = sectors of 1 * 512 = 512 bytes
Sector size (logical/physical): 512 bytes / 512 bytes
I/O size (minimum/optimal): 512 bytes / 512 bytes
Disk label type: dos
Disk identifier: 0x6ed73018

   Device Boot      Start         End      Blocks   Id  System
/dev/sdb1            2048    10485759     5241856   8e  Linux LVM

Disk /dev/mapper/volumegroup1-root: 4840 MB, 4840226816 bytes, 9453568 sectors
Units = sectors of 1 * 512 = 512 bytes
Sector size (logical/physical): 512 bytes / 512 bytes
I/O size (minimum/optimal): 512 bytes / 512 bytes


Disk /dev/sdc: 10.7 GB, 10737418240 bytes, 20971520 sectors
Units = sectors of 1 * 512 = 512 bytes
Sector size (logical/physical): 512 bytes / 512 bytes
I/O size (minimum/optimal): 512 bytes / 512 bytes
Disk label type: dos
Disk identifier: 0x03cec27c

   Device Boot      Start         End      Blocks   Id  System
/dev/sdc1            2048    20971519    10484736   8e  Linux LVM
[root@localhost ~]#

Tạo physical volume mới cho sdc1

[root@localhost ~]# pvcreate /dev/sdc1
  Physical volume "/dev/sdc1" successfully created.
[root@localhost ~]#

Check lại thông tin LVM của máy

[root@localhost ~]# vgdisplay
  --- Volume group ---
  VG Name               volumegroup1
  System ID
  Format                lvm2
  Metadata Areas        1
  Metadata Sequence No  2
  VG Access             read/write
  VG Status             resizable
  MAX LV                0
  Cur LV                1
  Open LV               1
  Max PV                0
  Cur PV                1
  Act PV                1
  VG Size               <4.51 GiB
  PE Size               4.00 MiB
  Total PE              1154
  Alloc PE / Size       1154 / <4.51 GiB
  Free  PE / Size       0 / 0
  VG UUID               oRu742-MhoW-MJMV-uS8e-FHXV-yNor-Gb7N85

Quan tâm tới VG Name, ở đây là volumegroup1
Add thêm sdc1 ở trên vào volumegroup1

[root@localhost ~]# vgextend volumegroup1 /dev/sdc1
  Volume group "volumegroup1" successfully extended
[root@localhost ~]#

Chạy pvscan để confirm lại, ta thấy cả 2 ổ cũ và mới

[root@localhost ~]# pvscan
  PV /dev/sda2   VG volumegroup1    lvm2 [<4.51 GiB / 0    free]
  PV /dev/sdc1   VG volumegroup1    lvm2 [<10.00 GiB / <10.00 GiB free]
  Total: 2 [14.50 GiB] / in use: 2 [14.50 GiB] / in no VG: 0 [0   ]
[root@localhost ~]#

Tiếp theo chúng ta check lại thông tin của logical volume

[root@localhost ~]# lvdisplay
  --- Logical volume ---
  LV Path                /dev/volumegroup1/root
  LV Name                root
  VG Name                volumegroup1
  LV UUID                ES1sxH-Fqpj-eVFl-bsNm-6SRg-P7pl-9dOq9P
  LV Write Access        read/write
  LV Creation host, time localhost, 2020-04-08 15:55:13 +0700
  LV Status              available
  # open                 1
  LV Size                <4.51 GiB
  Current LE             1154
  Segments               1
  Allocation             inherit
  Read ahead sectors     auto
  - currently set to     8192
  Block device           253:0

[root@localhost ~]#

Quan tâm tới LV Path và LV Name

Exten logical volume, add sdc1 ở trên vào LV Path.

[root@localhost ~]# lvextend /dev/volumegroup1/root /dev/sdc1
  Size of logical volume volumegroup1/root changed from <4.51 GiB (1154 extents) to 14.50 GiB (3713 extents).
  Logical volume volumegroup1/root successfully resized.
[root@localhost ~]#

Tuy nhiên, nếu df -h, chúng ta sẽ thấy y nguyên, chưa có sự thay đổi nào cả:

[root@localhost ~]# df -h
Filesystem                     Size  Used Avail Use% Mounted on
/dev/mapper/volumegroup1-root  4.5G  1.6G  3.0G  34% /
devtmpfs                       980M     0  980M   0% /dev
tmpfs                          992M     0  992M   0% /dev/shm
tmpfs                          992M  9.6M  982M   1% /run
tmpfs                          992M     0  992M   0% /sys/fs/cgroup
/dev/sda1                      477M  100M  348M  23% /boot
tmpfs                          199M     0  199M   0% /run/user/0
/dev/sdb1                      4.8G   20M  4.6G   1% /data

Việc tiếp theo để có thể sử dụng được phần dung lượng mới thêm vào đó là resize lại file system.
nãy giờ resize cho / nên kiểm tra lại xem thằng này đang được mount dưới định dạng nào. gõ lệnh mount

[root@localhost ~]# mount
sysfs on /sys type sysfs (rw,nosuid,nodev,noexec,relatime,seclabel)
proc on /proc type proc (rw,nosuid,nodev,noexec,relatime)
devtmpfs on /dev type devtmpfs (rw,nosuid,seclabel,size=1002592k,nr_inodes=250648,mode=755)
securityfs on /sys/kernel/security type securityfs (rw,nosuid,nodev,noexec,relatime)
tmpfs on /dev/shm type tmpfs (rw,nosuid,nodev,seclabel)
devpts on /dev/pts type devpts (rw,nosuid,noexec,relatime,seclabel,gid=5,mode=620,ptmxmode=000)
tmpfs on /run type tmpfs (rw,nosuid,nodev,seclabel,mode=755)
tmpfs on /sys/fs/cgroup type tmpfs (ro,nosuid,nodev,noexec,seclabel,mode=755)
cgroup on /sys/fs/cgroup/systemd type cgroup (rw,nosuid,nodev,noexec,relatime,seclabel,xattr,release_agent=/usr/lib/systemd/systemd-cgroups-agent,name=systemd)
pstore on /sys/fs/pstore type pstore (rw,nosuid,nodev,noexec,relatime)
cgroup on /sys/fs/cgroup/devices type cgroup (rw,nosuid,nodev,noexec,relatime,seclabel,devices)
cgroup on /sys/fs/cgroup/cpu,cpuacct type cgroup (rw,nosuid,nodev,noexec,relatime,seclabel,cpuacct,cpu)
cgroup on /sys/fs/cgroup/cpuset type cgroup (rw,nosuid,nodev,noexec,relatime,seclabel,cpuset)
cgroup on /sys/fs/cgroup/hugetlb type cgroup (rw,nosuid,nodev,noexec,relatime,seclabel,hugetlb)
cgroup on /sys/fs/cgroup/blkio type cgroup (rw,nosuid,nodev,noexec,relatime,seclabel,blkio)
cgroup on /sys/fs/cgroup/memory type cgroup (rw,nosuid,nodev,noexec,relatime,seclabel,memory)
cgroup on /sys/fs/cgroup/pids type cgroup (rw,nosuid,nodev,noexec,relatime,seclabel,pids)
cgroup on /sys/fs/cgroup/net_cls,net_prio type cgroup (rw,nosuid,nodev,noexec,relatime,seclabel,net_prio,net_cls)
cgroup on /sys/fs/cgroup/freezer type cgroup (rw,nosuid,nodev,noexec,relatime,seclabel,freezer)
cgroup on /sys/fs/cgroup/perf_event type cgroup (rw,nosuid,nodev,noexec,relatime,seclabel,perf_event)
configfs on /sys/kernel/config type configfs (rw,relatime)
/dev/mapper/volumegroup1-root on / type xfs (rw,relatime,seclabel,attr2,inode64,noquota)
selinuxfs on /sys/fs/selinux type selinuxfs (rw,relatime)
systemd-1 on /proc/sys/fs/binfmt_misc type autofs (rw,relatime,fd=31,pgrp=1,timeout=0,minproto=5,maxproto=5,direct,pipe_ino=14970)
mqueue on /dev/mqueue type mqueue (rw,relatime,seclabel)
debugfs on /sys/kernel/debug type debugfs (rw,relatime)
hugetlbfs on /dev/hugepages type hugetlbfs (rw,relatime,seclabel)
/dev/sda1 on /boot type ext4 (rw,relatime,seclabel,data=ordered)
tmpfs on /run/user/0 type tmpfs (rw,nosuid,nodev,relatime,seclabel,size=203020k,mode=700)
/dev/sdb1 on /data type ext4 (rw,relatime,seclabel,data=ordered)

Để ý thấy dòng
/dev/mapper/volumegroup1-root on / type xfs (rw,relatime,seclabel,attr2,inode64,noquota)
Định dạng là xfs, chúng ta chạy lệnh sau:

[root@localhost ~]# xfs_growfs /dev/volumegroup1/root
meta-data=/dev/mapper/volumegroup1-root isize=512    agcount=4, agsize=295424 blks
         =                       sectsz=512   attr=2, projid32bit=1
         =                       crc=1        finobt=0 spinodes=0
data     =                       bsize=4096   blocks=1181696, imaxpct=25
         =                       sunit=0      swidth=0 blks
naming   =version 2              bsize=4096   ascii-ci=0 ftype=1
log      =internal               bsize=4096   blocks=2560, version=2
         =                       sectsz=512   sunit=0 blks, lazy-count=1
realtime =none                   extsz=4096   blocks=0, rtextents=0
data blocks changed from 1181696 to 3802112

Với /dev/volumegroup1/root chính là LV Path đã extent ở trên.
Nếu / được mount với định dang ext2,3,4 gì đó thì chúng ta chạy lệnh:

resize2fs /dev/volumegroup1/root

Check lại df -h

[root@localhost ~]# df -h
Filesystem                     Size  Used Avail Use% Mounted on
/dev/mapper/volumegroup1-root   15G  1.6G   13G  11% /
devtmpfs                       980M     0  980M   0% /dev
tmpfs                          992M     0  992M   0% /dev/shm
tmpfs                          992M  9.6M  982M   1% /run
tmpfs                          992M     0  992M   0% /sys/fs/cgroup
/dev/sda1                      477M  100M  348M  23% /boot
tmpfs                          199M     0  199M   0% /run/user/0
/dev/sdb1                      4.8G   20M  4.6G   1% /data

Đã thấy thêm được chục GB, ứng dụng vẫn chạy như chưa hề có cuộc chia ly.

Xử lý lỗi crontab truncate command

Case: Nhét 1 đoạn mysqldump vào crontab để backup db hàng đêm. Sáng hôm sau kiểm tra ko thấy file dump đâu.
đoạn command khai báo crontab

0 0 * * * /usr/bin/mysqldump -uzabbixuser -pMikita zabbixdb > /opt/backup/zabbixdb-`date +%F`.sql

Giải quyết ra sao?
chạy bằng crontab nên output lúc chạy sẽ được ném vào /var/mail/<user>
Ở đây chúng ta chạy cron trên user root, check file /var/mail/root

From root@devopsvn.xyz.localdomain  Tue Mar 31 00:00:01 2020
Return-Path: <root@devopsvn.xyz.localdomain>
X-Original-To: root
Delivered-To: root@devopsvn.xyz.localdomain
Received: by devopsvn.xyz.localdomain (Postfix, from userid 0)
        id 1FCA36000345; Tue, 31 Mar 2020 00:00:01 +0700 (+07)
From: root@devopsvn.xyz.localdomain (Cron Daemon)
To: root@devopsvn.xyz.localdomain
Subject: Cron <root@devopsvn.xyz> /usr/bin/mysqldump -uzabbixuser -pMikita zabbixdb > /opt/backup/zabbixdb-`date +
Content-Type: text/plain; charset=UTF-8
Auto-Submitted: auto-generated
X-Cron-Env: <LANG=en_US.UTF-8>
X-Cron-Env: <SHELL=/bin/sh>
X-Cron-Env: <HOME=/root>
X-Cron-Env: <PATH=/usr/bin:/bin>
X-Cron-Env: <LOGNAME=root>
X-Cron-Env: <USER=root>
Message-Id: <20200330170001.1FCA36000345@devopsvn.xyz.localdomain>
Date: Tue, 31 Mar 2020 00:00:01 +0700 (+07)

/bin/sh: -c: line 0: unexpected EOF while looking for matching ``'
/bin/sh: -c: line 1: syntax error: unexpected end of file

Để ý dòng subject, thấy command của chúng ta bị cắt mất còn 1 đoạn ngắn xíu, nguyên nhân do ký tự %

Percent-signs (%) in the command, unless escaped with backslash (\), 
will be changed into newline characters, and all data after the 
first % will be sent to the command as standard input.

tiến hành escape ký tự %, cron thay đổi thành

0 0 * * * /usr/bin/mysqldump -uzabbixuser -pMikita zabbixdb > /opt/backup/zabbixdb-`date +\%F`.sql

lưu lại crontab.

Remove hoàn toàn selinux (centos)

Muốn tắt selinux có thể sửa /etc/selinux/config. hoặc setenfoce 0
Tuy nhiên đôi lúc cần xoá triệt để (vì lý do gì đó trời mới  biết) thì làm như sau

Hướng dẫn xoá hoàn toàn selinux trên centos

sudo yum remove selinux-policy*
sudo rm -rf /etc/selinux/targeted
sudo yum install -y selinux-policy-targeted selinux-policy-devel policycoreutils

Port forwarding với iptables


Đôi khi, cần thực hiện portwarding 1 số máy trong LAN với iptables, với các hệ thống có firewall thì có thể làm điều này dễ dàng, tuy nhiên, đôi lúc giật gấu vá vai, đành phải tạm khắc phục nếu không có firewall, iptables sẽ giúp chúng ta làm việc đó
Bước 1: kiểm tra 2 thông số sau của máy

cat /proc/sys/net/ipv4/conf/ppp0/forwarding 
cat /proc/sys/net/ipv4/conf/eth0/forwarding

ppp0 và eth0 là 2 interface ví dụ. nếu return về 1 là OK, nếu không thì thay đổi 2 thông số đó thành 1. cách làm có thể google

echo '1' | sudo tee /proc/sys/net/ipv4/conf/ppp0/forwarding
echo '1' | sudo tee /proc/sys/net/ipv4/conf/eth0/forwarding

Tiến hành mở port

iptables -A PREROUTING -t nat -p tcp --dport 55555 -j DNAT --to 192.168.9.14:3389
iptables -A FORWARD -p tcp -d 192.168.9.14 --dport 3389 -j ACCEPT

Giải thích:

Dòng 1: iptables publish 5555 ra bên ngoài, mọi traffic tới port 55555 được điều hướng tới 192.168.9.14:3389
Dòng 2: Allow truy cập tới 192.168.9.14 3389

Cài đặt Fail2ban cho zimbra trên centos 7

Cài đặt epel-repo

# yum update
# yum install epel-release

Cài đặt fail2ban

yum install fail2ban

backup các file mặc định của fail2ban

# cp /etc/fail2ban/action.d/iptables-allports.conf /etc/fail2ban/action.d/iptables-allports.conf.backup
# mv /etc/fail2ban/jail.conf /etc/fail2ban/jail.conf.backup

Tạo file /etc/fail2ban/filter.d/zimbra.conf với nội dung sau

vi /etc/fail2ban/filter.d/zimbra.conf
# Fail2Ban configuration file
#
# Author:
#
# $Revision: 1 $
#

[Definition]

# Option: failregex
# Notes.: regex to match the password failures messages in the logfile. The
# host must be matched by a group named "host". The tag "<HOST>" can
# be used for standard IP/hostname matching and is only an alias for
# (?:::f{4,6}:)?(?P<host>[\w\-.^_]+)
# Values: TEXT
#
failregex = \[ip=<HOST>;\] account - authentication failed for .* \(no such account\)$
\[ip=<HOST>;\] security - cmd=Auth; .* error=authentication failed for .*, invalid password;$
;oip=<HOST>;.* security - cmd=Auth; .* protocol=soap; error=authentication failed for .* invalid password;$
\[oip=<HOST>;.* SoapEngine - handler exception: authentication failed for .*, account not found$
WARN .*;ip=<HOST>;ua=ZimbraWebClient .* security - cmd=AdminAuth; .* error=authentication failed for .*;$
NOQUEUE: reject: RCPT from .*\[<HOST>\]: 550 5.1.1 .*: Recipient address rejected:

# .*\[ip=<HOST>;\] .* - authentication failed for .* \(invalid password\)
#
# Option: ignoreregex
# Notes.: regex to ignore. If this regex matches, the line is ignored.
# Values: TEXT
#
ignoreregex =

File này định nghĩa các patten được coi là lỗi, có biểu hiện bất thường trong file log.

Tạo file có nội dung như sau

vi /etc/fail2ban/jail.conf
# Fail2Ban configuration file
#
# Author: Cyril Jaquier
#
# $Revision: 747 $
## The DEFAULT allows a global definition of the options. They can be overridden
# in each jail afterwards.
[DEFAULT]
# "ignoreip" can be an IP address, a CIDR mask or a DNS host. Fail2ban will not
# ban a host which matches an address in this list. Several addresses can be
# defined using space separator.
#ignoreip = 127.0.0.1/8 ip_public/32
ignoreip = 127.0.0.1/8
# "bantime" is the number of seconds that a host is banned.
bantime = 600
# A host is banned if it has generated "maxretry" during the last "findtime"
# seconds.
findtime = 600

# "maxretry" is the number of failures before a host get banned.
maxretry = 3

# "backend" specifies the backend used to get files modification. Available
# options are "gamin", "polling" and "auto". This option can be overridden in
# each jail too (use "gamin" for a jail and "polling" for another).
#
# gamin: requires Gamin (a file alteration monitor) to be installed. If Gamin
# is not installed, Fail2ban will use polling.
# polling: uses a polling algorithm which does not require external libraries.
# auto: will choose Gamin if available and polling otherwise.
backend = auto

# This jail corresponds to the standard configuration in Fail2ban 0.6.
# The mail-whois action send a notification e-mail with a whois request
# in the body.

[ssh-iptables]

enabled = false
filter = sshd
action = iptables[name=SSH, port=ssh, protocol=tcp]
sendmail-whois[name=SSH, dest=yourmail1@company.loc;yourmail2@company.loc]
logpath = /var/log/messages
maxretry = 5

# This jail forces the backend to "polling".

[sasl-iptables]

enabled = false
filter = sasl
backend = polling
action = iptables[name=sasl, port=smtp, protocol=tcp]
sendmail-whois[name=sasl, dest=yourmail1@company.loc;yourmail2@company.loc]
logpath = /var/log/zimbra.log

# Here we use TCP-Wrappers instead of Netfilter/Iptables. "ignoreregex" is
# used to avoid banning the user "myuser".

[ssh-tcpwrapper]

enabled = false
filter = sshd
action = hostsdeny
sendmail-whois[name=SSH, dest=yourmail1@company.loc;yourmail2@company.loc]
ignoreregex = for myuser from
logpath = /var/log/messages

# This jail uses ipfw, the standard firewall on FreeBSD. The "ignoreip"
# option is overridden in this jail. Moreover, the action "mail-whois" defines
# the variable "name" which contains a comma using "". The characters '' are
# valid too.

[zimbra-account]
enabled = true
filter = zimbra
action = iptables-allports[name=zimbra-account]
sendmail[name=zimbra-account, dest=yourmail1@company.loc;yourmail2@company.loc]
logpath = /opt/zimbra/log/mailbox.log
bantime = 600
maxretry = 5

[zimbra-audit]
enabled = true
filter = zimbra
action = iptables-allports[name=zimbra-audit]
sendmail[name=Zimbra-audit, dest=yourmail1@company.loc;yourmail2@company.loc]
logpath = /opt/zimbra/log/audit.log
bantime = 600
maxretry = 5

[zimbra-recipient]
enabled = true
filter = zimbra
action = iptables-allports[name=zimbra-recipient]
sendmail[name=Zimbra-recipient, dest=yourmail1@company.loc;yourmail2@company.loc]
logpath = /var/log/zimbra.log
#findtime = 604800
bantime = 172800
maxretry = 5

[postfix]
enabled = true
filter = postfix
action = iptables-multiport[name=postfix, port=smtp, protocol=tcp]
sendmail-buffered[name=Postfix, dest=yourmail1@company.loc;yourmail2@company.loc]
logpath = /var/log/zimbra.log
bantime = -1
maxretry = 5

#[sasl]
#enabled = true
#port = smtp,ssmtp,imap2,imap3,imaps,pop3,pop3s
#filter = sasl
# You might consider monitoring /var/log/warn.log instead
# if you are running postfix. See http://bugs.debian.org/507990
#logpath = /var/log/zimbra.log

Nhớ thay đổi thông tin yourmail1@company.loc, yourmail2@company.loc thành địa chỉ của mình và thêm IP của mình vào ignoreip =  nhé

Tiếp tục, sửa file sau:
/etc/fail2ban/action.d/sendmail.conf
thay đổi dòng Fail2Ban” | /usr/sbin/sendmail -f <sender> <dest> thành:

Fail2Ban" | /opt/zimbra/postfix/sbin/sendmail -f <sender> <dest>

Cuối cùng là bật fail2ban lên

# systemctl start fail2ban

# systemctl enable fail2ban

Monitor fail2ban

fail2ban-client status


Notice: ob_end_flush(): failed to send buffer of zlib output compression (0) in /home/devopsvn/public_html/wp-includes/functions.php on line 5427