Hướng dẫn thêm ổ đĩa mới vào máy chủ centos – How to add new hard disk to Centos server

Môi trường thực hiện: Centos 7
ổ cứng mới = 80GB
mount point = /net

kiểm tra ổ đĩa mới thêm bằng fdisk -l

[root@localhost ~]# fdisk -l

Disk /dev/sda: 21.5 GB, 21474836480 bytes, 41943040 sectors
Units = sectors of 1 * 512 = 512 bytes
Sector size (logical/physical): 512 bytes / 512 bytes
I/O size (minimum/optimal): 512 bytes / 512 bytes
Disk label type: dos
Disk identifier: 0x000b1107

   Device Boot      Start         End      Blocks   Id  System
/dev/sda1   *        2048     2099199     1048576   83  Linux
/dev/sda2         2099200    41943039    19921920   8e  Linux LVM

Disk /dev/sdb: 85.9 GB, 85899345920 bytes, 167772160 sectors
Units = sectors of 1 * 512 = 512 bytes
Sector size (logical/physical): 512 bytes / 512 bytes
I/O size (minimum/optimal): 512 bytes / 512 bytes


Disk /dev/mapper/centos-root: 18.2 GB, 18249416704 bytes, 35643392 sectors
Units = sectors of 1 * 512 = 512 bytes
Sector size (logical/physical): 512 bytes / 512 bytes
I/O size (minimum/optimal): 512 bytes / 512 bytes


Disk /dev/mapper/centos-swap: 2147 MB, 2147483648 bytes, 4194304 sectors
Units = sectors of 1 * 512 = 512 bytes
Sector size (logical/physical): 512 bytes / 512 bytes
I/O size (minimum/optimal): 512 bytes / 512 bytes

[root@localhost ~]#

Thấy phần ổ đĩa mới: Disk /dev/sdb: 85.9 GB, 85899345920 bytes, 167772160 sectors
gõ: fdisk /dev/sdb

[root@localhost ~]# fdisk /dev/sdb
Welcome to fdisk (util-linux 2.23.2).

Changes will remain in memory only, until you decide to write them.
Be careful before using the write command.

Device does not contain a recognized partition table
Building a new DOS disklabel with disk identifier 0xa07e2d9e.

Command (m for help): m
Command action
   a   toggle a bootable flag
   b   edit bsd disklabel
   c   toggle the dos compatibility flag
   d   delete a partition
   g   create a new empty GPT partition table
   G   create an IRIX (SGI) partition table
   l   list known partition types
   m   print this menu
   n   add a new partition
   o   create a new empty DOS partition table
   p   print the partition table
   q   quit without saving changes
   s   create a new empty Sun disklabel
   t   change a partition's system id
   u   change display/entry units
   v   verify the partition table
   w   write table to disk and exit
   x   extra functionality (experts only)

Command (m for help): n
Partition type:
   p   primary (0 primary, 0 extended, 4 free)
   e   extended
Select (default p): p
Partition number (1-4, default 1):
First sector (2048-167772159, default 2048):
Using default value 2048
Last sector, +sectors or +size{K,M,G} (2048-167772159, default 167772159):
Using default value 167772159
Partition 1 of type Linux and of size 80 GiB is set

Command (m for help): w
The partition table has been altered!

Calling ioctl() to re-read partition table.
Syncing disks.
[root@localhost ~]#

Đã tạo xong phân vùng, tiến hành format sang định dạng ext4, lưu ý, phân vùng mới tạo từ sdb ở trên giờ là sdb1

[root@localhost ~]# mkfs -t ext4 /dev/sdb1
mke2fs 1.42.9 (28-Dec-2013)
Filesystem label=
OS type: Linux
Block size=4096 (log=2)
Fragment size=4096 (log=2)
Stride=0 blocks, Stripe width=0 blocks
5242880 inodes, 20971264 blocks
1048563 blocks (5.00%) reserved for the super user
First data block=0
Maximum filesystem blocks=2168455168
640 block groups
32768 blocks per group, 32768 fragments per group
8192 inodes per group
Superblock backups stored on blocks:
        32768, 98304, 163840, 229376, 294912, 819200, 884736, 1605632, 2654208,
        4096000, 7962624, 11239424, 20480000

Allocating group tables: done
Writing inode tables: done
Creating journal (32768 blocks): done
Writing superblocks and filesystem accounting information: done

Giờ ổ đĩa đã sẵn sàng, chỉ cần mount vào đâu đó thì chúng đã sẵn sàng sử dụng, ví dụ mount vào /net1

[root@localhost ~]# mount /dev/sdb1 /net1/
[root@localhost ~]#
[root@localhost ~]#
[root@localhost ~]# df -h
Filesystem               Size  Used Avail Use% Mounted on
/dev/mapper/centos-root   17G  1.5G   16G   9% /
devtmpfs                 478M     0  478M   0% /dev
tmpfs                    489M     0  489M   0% /dev/shm
tmpfs                    489M  6.7M  482M   2% /run
tmpfs                    489M     0  489M   0% /sys/fs/cgroup
/dev/sda1               1014M  125M  890M  13% /boot
tmpfs                     98M     0   98M   0% /run/user/0
/dev/sdb1                 79G   57M   75G   1% /net1

Đã thêm thành công

Để tự động mount ổ khi reboot, có thể thao tác bằng nhiều cách:
– Chạy tự động lệnh mount /dev/sdb1 /net1/ mỗi lần khởi động
– thêm vào /etc/fstab

/dev/sdb1 /net1                       ext4     noauto        0 0


Hướng dẫn cài đặt mapr cluster 3 node – How to install cluster mapr 3 nodes

Thông tin hệ thống:
Gồm 3 node:
c2s-mapr-01 10.0.0.117
c2s-mapr-02 10.0.0.118
c2s-mapr-03 10.0.0.119
OS: centos 6
mapr version: 5.0

Hướng dẫn phân vùng ổ đĩa để thực hiện việc cài đặt:
Trên mỗi máy centos, thực hiện phân vùng ổ đĩa như hình dưới, phần dung lượng không được mount vào đâu cả trong lvm sẽ được sử dụng bởi mapr trong quá trình cài đặt.
Lưu ý: Volume Group Name phải đặt tên giống nhau trên cả 3 máy.

Đi vào cài đặt:
Thao tác trên máy c2s-mapr-01.
1. Tạo /etc/hosts hoặc đăng ký DNS

vi /etc/hosts
10.0.0.117 c2s-mapr-01
10.0.0.118 c2s-mapr-02
10.0.0.119 c2s-mapr-03
127.0.0.1 localhost localhost.localdomain

2.Cấu hình kết nối bằng SSH key
#Chạy lần lượt từng lệnh dưới đây , nếu được hỏi password thì điền password

ssh-keygen
ssh-copy-id c2s-mapr-01
ssh-copy-id c2s-mapr-02
ssh-copy-id c2s-mapr-03

3. Cài clustershell để đồng thời chạy command trên tất cả các máy
#chỉ chạy trên con mapr1

yum install -y epel-release && yum install -y clustershell
echo 'all: c2s-mapr-0[1-3]' > /etc/clustershell/groups

4. Đồng bộ file host tới toàn bộ các máy

clush -a --copy /etc/hosts

5. Cài đặt service đồng bộ thời gian với timeserver

clush -a yum install -y chrony
clush -a service chronyd start
clush -a chkconfig chronyd on

6. Tắt tường lửa

clush -a service iptables stop
clush -a chkconfig iptables off

7. Tạo thư mục làm việc và người dùng cho mapr

clush -a mkdir /root/work
clush -a groupadd -g 1003 mapr
clush -a useradd -u 1003 -g mapr mapr
clush -a 'echo mapr:mapr | chpasswd'
clush -a useradd -u 1004 -g mapr mruser
clush -a 'echo mruser:mruser | chpasswd'

8.Đặt SSH key cho người quản lý mapr

su - mapr
ssh-keygen
ssh-copy-id c2s-mapr-01
ssh-copy-id c2s-mapr-02
ssh-copy-id c2s-mapr-03
exit

9. Cài đặt jdk cho tất cả các máy

http://www.oracle.com/technetwork/java/javase/downloads/jdk8-downloads-2133151.html
Download file jdk linux x64.rpm
Sau khi download xong copy lên máy 01, chạy lệnh cài đặt bên dưới, đường dẫn, tên file tự thay đổi lại cho phù hợp
clush -a --copy /root/work/jdk-8u102-linux-x64.rpm
clush -a rpm -ivh /root/work/jdk-8u102-linux-x64.rpm

10. Cài repo MapR 5.0

#Run on c2s-mapr-01

vi /etc/yum.repos.d/mapr.repo
[maprtech]
name=MapR Technologies
baseurl=http://package.mapr.com/releases/v5.0.0/redhat/
enabled=1
gpgcheck=1
protect=1

[maprecosystem]
name=MapR Technologies
baseurl=http://package.mapr.com/releases/ecosystem-all/redhat
enabled=1
gpgcheck=1
protect=1
clush -a --copy /etc/yum.repos.d/mapr.repo
clush -a rpm --import http://package.mapr.com/releases/pub/maprgpg.key

11. Cài các gói MapR

clush -a yum install -y mapr-fileserver mapr-zookeeper mapr-webserver mapr-resourcemanager mapr-nodemanager mapr-gateway
clush -w c2s-mapr-02 yum install -y mapr-cldb mapr-nfs
clush -w c2s-mapr-03 yum install -y mapr-historyserver

12. Cấu hình cluster ban đầu

clush -a /opt/mapr/server/configure.sh -N c2s-MapR -C c2s-mapr-02 -Z c2s-mapr-01,c2s-mapr-02,c2s-mapr-03 -RM c2s-mapr-01,c2s-mapr-02,c2s-mapr-03 -HS c2s-mapr-03

13. Định dạng đĩa

clush -a lvdisplay
clush -a lsblk
clush -a lvcreate -L 349G -n MaprVol vg_c2smapr
clush -a lsblk
echo /dev/vg_c2smapr/MaprVol > /root/work/disks.txt
clush -a --copy /root/work/disks.txt
clush -a /opt/mapr/server/disksetup -W 4 -F /root/work/disks.txt

dòng vg_c2smapr giống như dòng VG Name khi chạy lệnh “lvdisplay” trên từng máy
clush -a lvcreate -L 136G -n MaprVol vg_c2smapr –> số 349GB là số dung lượng trống còn lại của ổ đĩa, Con số 349GB ở trên thay đổi lại theo tình hình thực tế.

14. Thiết lập các biến môi trường
Thêm 2 dòng sau vào file /opt/mapr/conf/env.sh

export JAVA_HOME=/usr/java/latest
export MAPR_SUBNETS=10.0.0.0/23

Thay đổi lại subnet cho đúng, sau đó đồng bộ file vừa sửa sang 2 máy còn lại

clush -a --copy /opt/mapr/conf/env.sh

15. Thiết lập mapr fstab
Mounting NFS to MapR-FS on a Cluster Node
Để tự động mount NFS vào MapR-FS trên cluster

echo "localhost:/mapr /mapr hard,intr,nolock,actimeo=1,noatime" >> /opt/mapr/conf/mapr_fstab
clush -a --copy /opt/mapr/conf/mapr_fstab
clush -a mkdir /mapr

16. Bật dịch vụ trên các máy, kiểm tra dịch vụ CLDB

clush -a service mapr-zookeeper start
clush -a service mapr-zookeeper qstatus
clush -a service mapr-warden start
clush -a "jps | grep CLDB"
maprcli node cldbmaster
maprcli license showid -cluster c2s-MapR

Bước “clush -a “jps | grep CLDB”” có thể mất 1 lúc CLDB mới có thể khởi động, chịu khó đợi 1 chút.
Sau khi chạy showid, sẽ có ID hiện ra, ghi lại thông tin này, để đăng ký license

17. Đăng ký license
Truy cập: https://www.mapr.com/user
Đăng ký tài khoản, nhập ID ở bước 16, ghi lại nội dung license được cấp vào file license.txt
Tiến hành add vào cluster

maprcli license add -cluster c2s-MapR -license /root/work/license.txt -is_file true
clush -a service mapr-warden restart

18. Tạo phân vùng hadoop

hadoop fs -mkdir /user/mapr
hadoop fs -chown mapr:mapr /user/mapr
hadoop fs -mkdir /user/mruser
hadoop fs -chown mruser:mapr /user/mruser

19.

su - mapr
$ hadoop fs -mkdir -p /user/hive/warehouse
$ hadoop fs -chmod 1777 /user/hive/warehouse
$ hadoop fs -mkdir /apps/spark
$ hadoop fs -chmod 777 /apps/spark
$ exit

20.

clush -a service mapr-warden stop
clush -a service mapr-zookeeper stop

21. Cài ứng dụng Spark

clush -a rpm -ivh http://archive.mapr.com/releases/ecosystem-all/redhat/mapr-hbase-0.98.12.201507081709-1.noarch.rpm
clush -a rpm -ivh http://archive.mapr.com/releases/ecosystem-all/redhat/mapr-hive-0.13.201511180922-1.noarch.rpm
clush -a rpm -ivh http://archive.mapr.com/releases/ecosystem-all/redhat/mapr-spark-1.4.1.201509021818-1.noarch.rpm

22.

clush -w c2s-mapr-01 rpm -ivh http://archive.mapr.com/releases/ecosystem-all/redhat/mapr-hivemetastore-0.13.201511180922-1.noarch.rpm
clush -w c2s-mapr-01 rpm -ivh http://archive.mapr.com/releases/ecosystem-all/redhat/mapr-hiveserver2-0.13.201511180922-1.noarch.rpm

23.

clush -w c2s-mapr-03 yum install -y http://archive.mapr.com/releases/ecosystem-all/redhat/mapr-spark-historyserver-1.4.1.201509021818-1.noarch.rpm
clush -a /opt/mapr/server/configure.sh -N c2s-MapR -C c2s-mapr-02 -Z c2s-mapr-01,c2s-mapr-02,c2s-mapr-03 -RM c2s-mapr-01,c2s-mapr-02,c2s-mapr-03 -HS c2s-mapr-03 -R

24. Cài MySQL cho Hive.

vi /etc/yum.repos.d/mysql-community.repo
# Enable to use MySQL 5.6
[mysql56-community]
name=MySQL 5.6 Community Server
baseurl=http://repo.mysql.com/yum/mysql-5.6-community/el/6/$basearch/
enabled=1
gpgcheck=0
gpgkey=file:///etc/pki/rpm-gpg/RPM-GPG-KEY-mysql

[mysql57-community]
name=MySQL 5.7 Community Server
baseurl=http://repo.mysql.com/yum/mysql-5.7-community/el/6/$basearch/
enabled=0
gpgcheck=1
gpgkey=file:///etc/pki/rpm-gpg/RPM-GPG-KEY-mysql
clush -a --copy /etc/yum.repos.d/mysql-community.repo
yum install -y mysql-community-server-5.6.25 mysql-community-common-5.6.25 mysql-community-client-5.6.25 mysql-community-libs-5.6.25 mysql-community-libs-compat-5.6.25
vim /etc/my.cnf
# add "user=mysql" after line 'socket=/var/lib/mysql/mysql.sock'
service mysqld start
chkconfig mysqld on
mysql_secure_installation
mysql -u root -p
Enter password:*******
mysql> CREATE USER hivemetastore IDENTIFIED BY 'c2shive';
mysql> CREATE DATABASE hive DEFAULT CHARACTER SET 'latin1';
mysql> GRANT ALL PRIVILEGES ON *.* TO 'hivemetastore'@'%' IDENTIFIED BY 'c2shive';
mysql> GRANT ALL PRIVILEGES ON *.* TO 'hivemetastore'@'localhost' IDENTIFIED BY 'c2shive';
mysql> show grants for 'hivemetastore'@'%';
mysql> show grants for 'hivemetastore'@'localhost';
mysql> exit

23.

ln -s /opt/mapr/lib/mysql-connector-java-5.1.25-bin.jar /opt/mapr/hive/hive-0.13/lib/mysql-connector-java-5.1.25-bin.jar

Thêm cấu hình sau cho /opt/mapr/hive/hive-0.13/conf/hive-site.xml

# vim /opt/mapr/hive/hive-0.13/conf/hive-site.xml
<!--## <configure></configure>内に Sheet19-2 の内容を追記する ##-->
<property>
  <name>javax.jdo.option.ConnectionURL</name>
  <value>jdbc:mysql://c2s-mapr-01:3306/hive?createDatabaseIfNotExist=true</value>
  <description>JDBC connect string for a JDBC metastore</description>
</property>
<property>
  <name>javax.jdo.option.ConnectionDriverName</name>
  <value>com.mysql.jdbc.Driver</value>
  <description>Driver class name for a JDBC metastore</description>
</property>
<property>
  <name>javax.jdo.option.ConnectionUserName</name>
  <value>hivemetastore</value>
  <description>username to use against metastore database</description>
</property>
<property>
  <name>javax.jdo.option.ConnectionPassword</name>
  <value>c2shive</value>
  <description>password to use against metastore database</description>
</property>
<property>
  <name>hive.metastore.uris</name>
  <value>thrift://c2s-mapr-01:9083</value>
</property>
<property>
  <name>hive.server2.enable.doAs</name>
  <value>true</value>
</property>
<property>
  <name>hive.metastore.execute.setugi</name>
  <value>true</value>
</property>
<property>
  <name>hive.server2.authentication</name>
  <value>NOSASL</value>
</property>

<!-- Hive - MapR-DB Integration -->
<property>
  <name>hive.aux.jars.path</name>
  <value>file:///opt/mapr/hive/hive-0.13/lib/hive-hbase-handler-0.13.0-mapr-1510.jar,file:///opt/mapr/hbase/hbase-0.98.12/lib/hbase-common-0.98.12-mapr-1506.jar,file:///opt/mapr/hbase/hbase-0.98.12/lib/zookeeper-3.4.5-mapr-1406.jar</value>
  <description>A comma separated list (with no spaces) of the jar files required for Hive-HBase integration</description>
</property>

<property>
  <name>hbase.zookeeper.quorum</name>
  <value>c2s-mapr-01,c2s-mapr-02,c2s-mapr-03</value>
  <description>A comma separated list (with no spaces) of the IP addresses of all ZooKeeper servers in the cluster.</description>
</property>

<property>
  <name>hbase.zookeeper.property.clientPort</name>
  <value>5181</value>
  <description>The Zookeeper client port. The MapR default clientPort is 5181.</description>
</property>

Đồng bộ sang các máy khác:

clush -a --copy /opt/mapr/hive/hive-0.13/conf/hive-site.xml

25. Làm tương tự đối với /opt/mapr/hadoop/hadoop-2.7.0/etc/hadoop/core-site.xml

# vim /opt/mapr/hadoop/hadoop-2.7.0/etc/hadoop/core-site.xml
<!--## <configure></configure>内に以下を追記する ##-->
<property>
  <name>hadoop.proxyuser.mapr.hosts</name>
  <value>*</value>
  <description>The superuser can connect from any host to impersonate a user</description>
</property>

<property>
  <name>hadoop.proxyuser.mapr.groups</name>
  <value>*</value>
  <description>Allow the superuser mapr to impersonate any member of any group</description>
</property>
# clush -a --copy /opt/mapr/hadoop/hadoop-2.7.0/etc/hadoop/core-site.xml
# clush -a touch /opt/mapr/conf/proxy/mruser

26.

# echo "spark.serializer        org.apache.spark.serializer.KryoSerializer" >> /opt/mapr/spark/spark-1.4.1/conf/spark-defaults.conf
# clush -a --copy /opt/mapr/spark/spark-1.4.1/conf/spark-defaults.conf

27.

# cp /opt/mapr/hive/hive-0.13/conf/hive-site.xml /opt/mapr/spark/spark-1.4.1/conf/
# clush -a --copy /opt/mapr/spark/spark-1.4.1/conf/hive-site.xml

29. Thay đổi thông tin /opt/mapr/spark/spark-1.4.1/mapr-util/compatibility.version

hive_versions=0.13.1
hbase_versions=0.98.12
clush -a --copy /opt/mapr/spark/spark-1.4.1/mapr-util/compatibility.version

30.

# vim /opt/mapr/hadoop/hadoop-2.7.0/etc/hadoop/yarn-site.xml
<!--## <configure></configure>内に以下を追記する ##-->
<property>
  <name>yarn.resourcemanager.connect.retry-interval.ms</name>
  <value>1000</value>
</property>
<property>
  <name>yarn.resourcemanager.am.max-attempts</name>
  <value>3</value>
</property>
<property>
  <name>yarn.log-aggregation-enable</name>
  <value>true</value>
</property>

31.

# clush -a --copy /opt/mapr/hadoop/hadoop-2.7.0/etc/hadoop/yarn-site.xml
# clush -a yum install -y rpcbind
# clush -a chkconfig rpcbind on
# clush -a service rpcbind start

32. Cài patch

clush -a yum install -y http://archive.mapr.com/patches/archives/v5.0.0/redhat/mapr-patch-5.0.0.32987.GA-39045.x86_64.rpm

33. Bật mọi thứ lên:

# clush -a service mapr-zookeeper start
# clush -a service mapr-warden start

34. Đã xong, trang quản trị mapr:
https://10.0.0.117:8443
user/pass = mapr/mapr

Simple monitoring – Chương trình monitor mạng đơn giản.

Chương trình được viết bằng python

Hướng dẫn cài đặt:

Cài đặt python3, và các gói cần thiết
yum install epel-release -y & yum install python36 python36-pip.noarch -y && pip3 install requests

Cách chạy app, sau khi thay cấu hình trong file config.py
cd <đường dẫn thư mục app>
python3 monitor_simple.py

Cách thiết lập chạy mỗi phút 1 lần:
crontab -l
Thêm vào dòng sau:
* * * * * /usr/bin/python3 <đường dẫn file monitor_simple.py>

Download:

https://github.com/khachuy2705/monitor_simple

Thêm custom rule firewall cho ESXi

Tương tự ufw, iptable của centos, ubuntu, ESXi cũng có firewall của riêng mình. Mặc định ESXi đã tạo sẵn 1 số rule, chúng ta có thể thao tác với các rule này trên web quản trị 
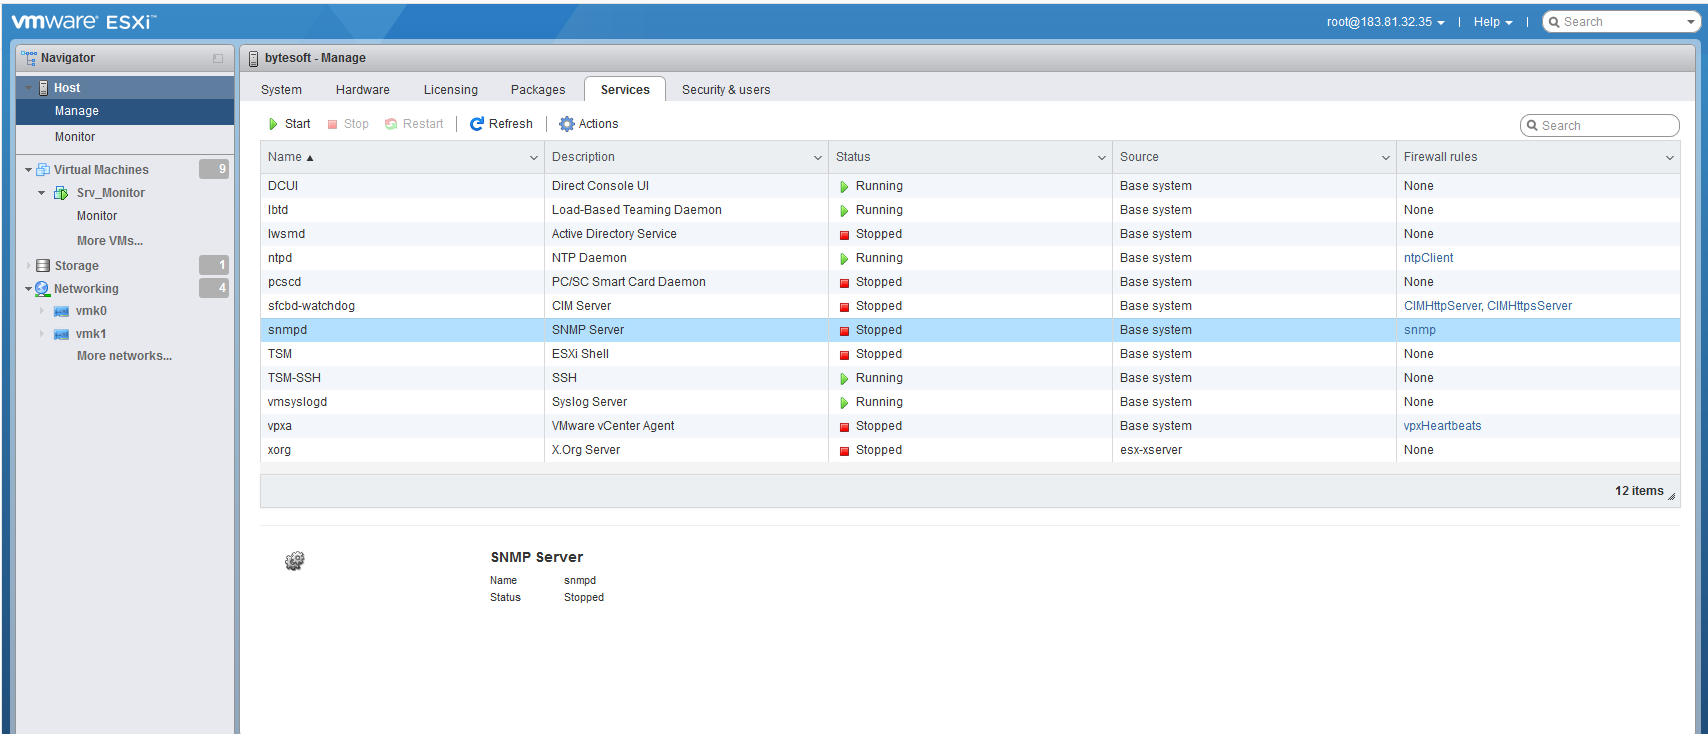
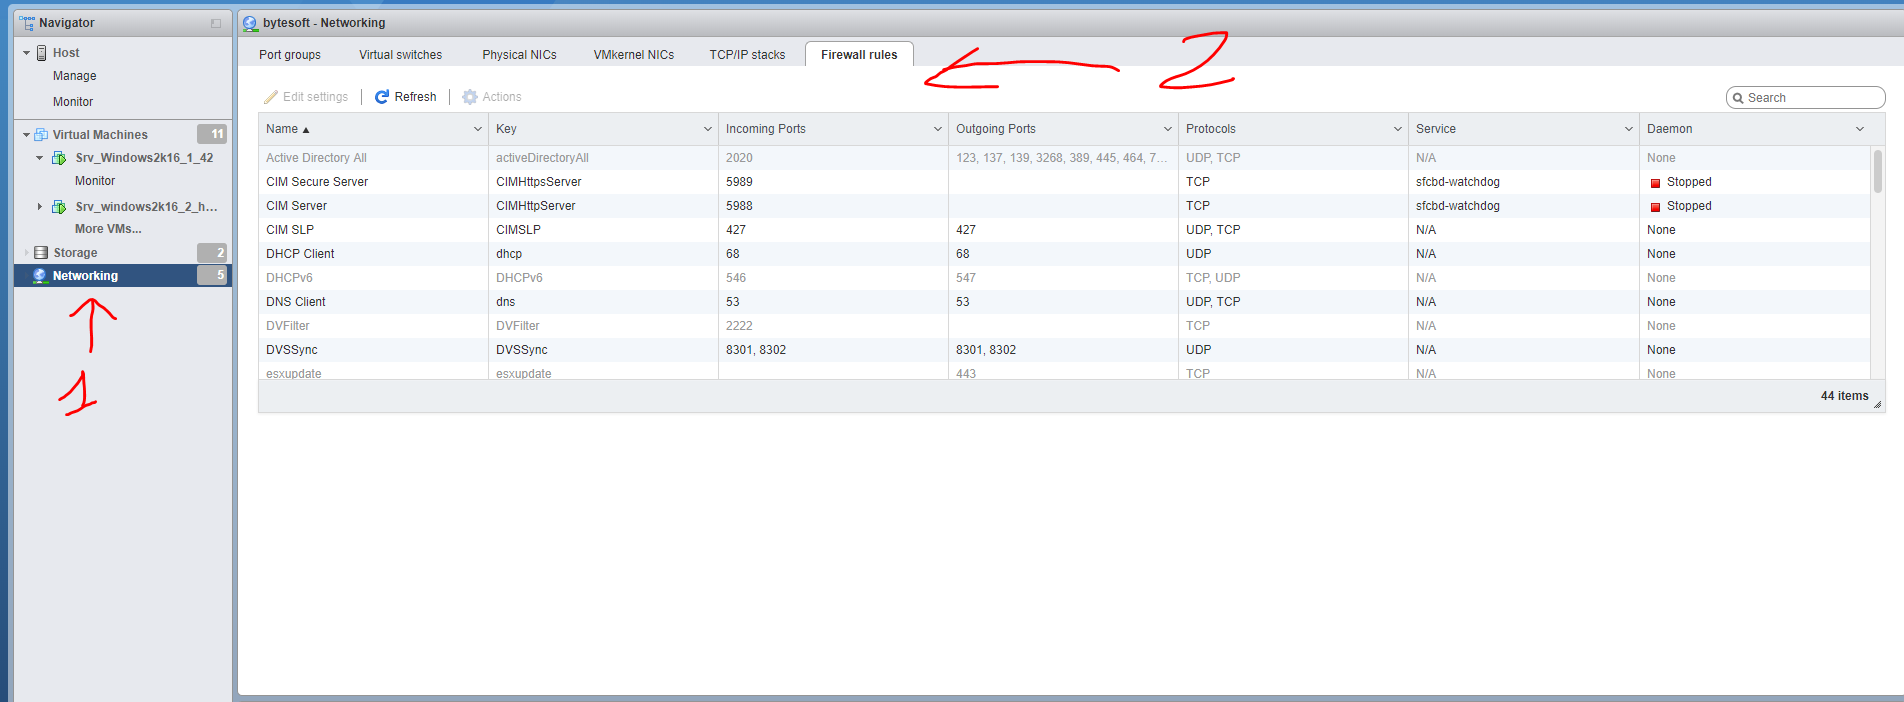
Tuy nhiên một có một số hạn chế như: chỉ đi ra ngoài qua outgoing port mặc định: 80, 22, 443.v.v Khi đó cần tạo thêm rule mới cho nhu cầu của mình. Cách mở thêm rule như sau: SSH vào máy chủ ESXi, sửa file /etc/vmware/firewall/custom.xml nếu không có thì tạo mới. Thêm rule vào theo định dạng sau:
<ConfigRoot>
  <service id='0100'>
    <id>sshClient-2222</id>
    <rule>
      <direction>outbound</direction>
      <protocol>tcp</protocol>
      <porttype>dst</porttype>
      <port>2222</port>
    </rule>
    <enabled>true</enabled>
    <required>false</required>
  </service>

  <service id='0101'>
    <id>NFSClient-2049</id>
    <rule>
      <direction>outbound</direction>
      <protocol>tcp</protocol>
      <porttype>dst</porttype>
      <port>2049</port>
    </rule>
    <enabled>true</enabled>
    <required>false</required>
  </service>

</ConfigRoot>
Sau đó refresh lại firewall
esxcli network firewall refresh
 

Regular Expressions cơ bản

Cú pháp cơ bản:

.             1 ký tự bất kỳ, ngoại trừ xuống dòng
\.            dấu chấm (\ thể hiện escape)
\d            Một ký tự số
\D            Một ký tự không phải là số
\w            Một chữ hoặc số
\W            Một ký tự không phải là chữ
\s            một Dấu cách
\S            Một ký tự không phải dấu cách
\b            1 từ nguyên vẹn
\n            Xuống dòng
\t            Tab

Modifiers

$             Bắt đầu chuỗi
^             bắt đầu chuỗi
ab|cd         Matches ab hoặc cd.
[ab-d]	      Match a và match các ký tự từ b --> d = bcd
[^ab-d]	      One character except: a, b, c, d
()            Items within parenthesis are retrieved
(a(bc))       Items within the sub-parenthesis are retrieved

Repetitions

[ab]{2}       Exactly 2 continuous occurrences of a or b
[ab]{2,5}     2 to 5 continuous occurrences of a or b
[ab]{2,}      2 or more continuous occurrences of a or b
+             One or more
*             Zero or more
?             0 or 1


Hướng dẫn cài đặt centos 7 qua network PXE

PXE (Preboot eXecution Environment) Server cho phép cài đặt OS qua network, có thể thiết lập tự động chọn các cấu hình ban đầu khi cài đặt OS. Lợi ích chính của việc này đó là chúng ta có thể cài đặt server 1 lần, sau đó sử dụng để cài đặt một cách tự động cho hàng chục, thậm chí hàng trăm máy khác nhau mà không cần phải mất công burn file ISO sang USB hay DVD như trước đây.

Trong bài viết dưới đây chúng ta sẽ cài đặt 1 PXE server, phục vụ cài centos 7 cho máy khác.

Chi tiết:

  • Server IP = 192.168.150.11
  • Host name = pxe.example.com
  • OS = CentOS 7.x
  • SELinux = enabled
  • Firewall = disabled

Step:1 Cài đặt các gói cần thiết cho PXE

Các gói cần thiết: “dhcp, tftp-server, ftp server(vsftpd), xinted”.

[root@pxe ~]# yum install dhcp tftp tftp-server syslinux vsftpd xinetd vim -y

Step:2 Cấu hình DHCP

Sau khi cài đặt gói dhcp ở trên, chúng ta tạo file cấu hình cho  nó có nội dung dưới đây, các bạn có thể thay thế IP tương ứng vủa nhà mình vào.

[root@pxe ~]# vi /etc/dhcp/dhcpd.conf
# DHCP Server Configuration file.
ddns-update-style interim;
ignore client-updates;
authoritative;
allow booting;
allow bootp;
allow unknown-clients;
# internal subnet for my DHCP Server
subnet 192.168.150.0 netmask 255.255.255.0 {
range 192.168.150.21 192.168.150.151;
option domain-name-servers 192.168.150.11;
option domain-name "pxe.example.com";
option routers 192.168.150.11;
option broadcast-address 192.168.150.255;
default-lease-time 600;
max-lease-time 7200;
# IP of PXE Server
next-server 192.168.150.11;
filename "pxelinux.0";
}


Step:3 Cấu hình tftp server (/etc/xinetd.d/tftp)

TFTP (Trivial File Transfer Protocol ) is được sử dụng để tranfer file qua network mà không cần xác thực. Với PXE server, tftp được sử dụng cho bootstrap loading. Để cấu hình tftp server, sửa file ‘ /etc/xinetd.d/tftp’, thay đổi thông số ‘disable = yes‘ -> ‘disable = no’ và để nguyên đám còn lại mặc định, nội dung của nó sẽ tương tự như sau:

[root@pxe ~]# vi /etc/xinetd.d/tftp
service tftp
{
 socket_type = dgram
 protocol    = udp
 wait        = yes
 user        = root
 server      = /usr/sbin/in.tftpd
 server_args = -s /var/lib/tftpboot
 disable     = no
 per_source  = 11
 cps         = 100 2
 flags       = IPv4
}

Toàn bộ các file phục vụ cho việc boot qua network được đặt trong thư mục tftp root “/var/lib/tftpboot

Chạy các câu lênh sau để chép các file cần thiết vào ‘/var/lib/tftpboot/’

[root@pxe ~]# cp -v /usr/share/syslinux/pxelinux.0 /var/lib/tftpboot
[root@pxe ~]# cp -v /usr/share/syslinux/menu.c32 /var/lib/tftpboot
[root@pxe ~]# cp -v /usr/share/syslinux/memdisk /var/lib/tftpboot
[root@pxe ~]# cp -v /usr/share/syslinux/mboot.c32 /var/lib/tftpboot
[root@pxe ~]# cp -v /usr/share/syslinux/chain.c32 /var/lib/tftpboot
[root@pxe ~]#
[root@pxe ~]# mkdir /var/lib/tftpboot/pxelinux.cfg
[root@pxe ~]# mkdir /var/lib/tftpboot/networkboot
root@pxe ~]#

Step:4 Mount ISO Centos 7 và copy tới thực mụcftp

Download file iso trên mạng, mount vào và copy cả folder vào thư mục sau ‘/var/ftp/pub

[root@pxe ~]# mount -o loop CentOS-7-x86_64-DVD-1511.iso /mnt/
mount: /dev/loop0 is write-protected, mounting read-only
[root@pxe ~]# cd /mnt/
[root@pxe mnt]# cp -av * /var/ftp/pub/

Copy Kernel file (vmlimz) và initrd file từ thư mục đã mount ở trên vào thư mục ‘/var/lib/tftpboot/networkboot/

[root@pxe ~]# cp /mnt/images/pxeboot/vmlinuz /var/lib/tftpboot/networkboot/
[root@pxe ~]# cp /mnt/images/pxeboot/initrd.img /var/lib/tftpboot/networkboot/
[root@pxe ~]#

Step:5 Create kickStart & PXE menu file.

Tạo 1 password được mã hoá, sẽ sử dụng sau này bằng lệnh dưới, thay cái 123@123a bằng pass của mình. Xong copy output lại, có việc cần tới.

[root@pxe ~]# openssl passwd -1 123@123a
$1$qwUUn.B3$Da8qxnXqxwh6zwBWrnE7/. 
[root@pxe ~]#

Default kickstart file được đặt tại /root với tên ‘anaconda-ks.cfg’. chúng ta sẽ tạo file kickstart mới tại  /var/ftp/pub với tên ‘centos7.cfg

Copy nội dung dưới ném vào file /var/ftp/pub/centos7.cfg

Thay thế cấu hình dòng rootpw –iscrypted bằng chuỗi pass mã hoá đã thực hiện ở trên.

[root@pxe ~]# vi /var/ftp/pub/centos7.cfg

#platform=x86, AMD64, or Intel EM64T
#version=DEVEL
# Firewall configuration
firewall --disabled
# Install OS instead of upgrade
install
# Use FTP installation media
url --url="ftp://192.168.150.11/pub/"
# Root password
rootpw --iscrypted $1$e2wrcGGX$tZPQKPsXVhNmbiGg53MN41
# System authorization information
auth useshadow passalgo=sha512
# Use graphical install
graphical
firstboot disable
# System keyboard
keyboard us
# System language
lang en_US
# SELinux configuration
selinux disabled
# Installation logging level
logging level=info
# System timezone
timezone Europe/Amsterdam
# System bootloader configuration
bootloader location=mbr
clearpart --all --initlabel
part swap --asprimary --fstype="swap" --size=1024
part /boot --fstype xfs --size=300
part pv.01 --size=1 --grow
volgroup root_vg01 pv.01
logvol / --fstype xfs --name=lv_01 --vgname=root_vg01 --size=1 --grow
%packages
@^minimal
@core
%end
%addon com_redhat_kdump --disable --reserve-mb='auto'
%end

Tạo PXE menu file (/var/lib/tftpboot/pxelinux.cfg/default), Copy nội dung bên dưới bỏ vào

[root@pxe ~]# vi /var/lib/tftpboot/pxelinux.cfg/default

[root@pxe ~]# vi /var/lib/tftpboot/pxelinux.cfg/default

default menu.c32
prompt 0
timeout 30
MENU TITLE LinuxTechi.com PXE Menu
LABEL centos7_x64
MENU LABEL CentOS 7_X64
KERNEL /networkboot/vmlinuz
APPEND initrd=/networkboot/initrd.img inst.repo=ftp://192.168.150.11/pub ks=ftp://192.168.150.11/pub/centos7.cfg

Step:6 Bật các dịch vụ

Sử dụng các lệnh dưới đây

[root@pxe ~]# systemctl start xinetd
[root@pxe ~]# systemctl enable xinetd
[root@pxe ~]# systemctl start dhcpd.service
[root@pxe ~]# systemctl enable dhcpd.service
Created symlink from /etc/systemd/system/multi-user.target.wants/dhcpd.service to /usr/lib/systemd/system/dhcpd.service.
[root@pxe ~]# 
[root@pxe ~]# systemctl start vsftpd
[root@pxe ~]# systemctl enable vsftpd
Created symlink from /etc/systemd/system/multi-user.target.wants/vsftpd.service to /usr/lib/systemd/system/vsftpd.service.
[root@pxe ~]#
[root@pxe ~]# setsebool -P allow_ftpd_full_access 1
[root@pxe ~]#


Mở port cho firewall

[root@pxe ~]# firewall-cmd --add-service=ftp --permanent
success
[root@pxe ~]# firewall-cmd --add-service=dhcp --permanent
success
[root@pxe ~]# firewall-cmd --add-port=69/tcp --permanent 
success
[root@pxe ~]# firewall-cmd --add-port=69/udp --permanent 
success
[root@pxe ~]# firewall-cmd --add-port=4011/udp --permanent
success
[root@pxe ~]# firewall-cmd --reload
success
[root@pxe ~]#


Nếu lười quá, thì cứ stop firewall lại là xong, cho đỡ rách việc

systemctl disable –now firewalld

Step:7 Boot the clients with pxe boot option.

Dưới đây là video hướng dẫn thực hiện

bật SNMP trên esxi 6.5

Có thể làm nhiều thứ trên GUI của ESXI tuy nhiên, không thể bật snmp từ trang quản trị, do mặc định snmpd không có cấu hình nên không start được

Dưới đây là cách xử lý:
Truy cập SSH vào máy chủ ESXi (nếu chưa bật SSH thì enable lên trong màn hình service ở hình trên là được)
Sau khi SSH, làm theo dưới đây:

[root@r220:~] esxcli system snmp set --communities communitystring
[root@r220:~] esxcli system snmp set --enable true
[root@r220:~] esxcli network firewall ruleset set --ruleset-id snmp --allowed-all true
Already allowed all ip
[root@r220:~] esxcli network firewall ruleset set --ruleset-id snmp --enabled true
[root@r220:~] /etc/init.d/snmpd restart
root: snmpd Running from interactive shell, running command: esxcli system snmp set -e false.
root: snmpd setting up resource reservations.
root: snmpd opening firewall port(s) for notifications.
root: snmpd watchdog for snmpd started.
[root@r220:~]

Đã xong, tiến hành add đối tượng ESXi vào các tool monitor

Cấu hình SSH cho switch cisco


Tạo mật khẩu enable:

#enable
#enable secret <PASSWORD>
#conf t

Gán địa chỉ IP quản trị và VLAN quản trị

config#ip default-gateway <FIREWALL INTERFACE IP ADDRESS>
config#interface vlan <MANAGEMENT VLAN ID>
config(int vlan id)#ip address <IP MANAGEMENT> <SUBNET MASK>

Cấu hình hostname và domain name.

config#hostname <HOSTNAME>
config#domain-name <tên gì đó ví dụ hostname.com>

gen key RSA cho SSH

ByteSoft(config)# crypto key generate rsa

  The name for the keys will be: OTGswitch.OTG.com
   Choose the size of the key modulus in the range of 360 to 2048 for your
     General Purpose Keys. Choosing a key modulus greater than 512 may take
     a few minutes.
  
  How many bits in the modulus [512]: 

mặc định 512, Chọn 1024 nếu thích bảo mật hơn

Bật SSH

ByteSoft(config)# line vty 0 4
ByteSoft(config-line)# login local
ByteSoft(config-line)# transport input ssh
ByteSoft(config-line)# exit

Tạo user để truy cập

ByteSoft(config)# username <Account name> privilege 15 secret <PASSWORD>

Lưu lại cấu hình

ByteSoft(config)# do wr


Active office 2019 không cần dùng phần mềm

Bước 1: Mở notepad, paste nội dung sau và lưu lại dưới tên active.cmd

@echo off
title Kich hoat Microsoft Office 2019 ALL versions mienphi!&cls&echo ============================================================================&echo #Kich hoat Microsoft Office 2019 hop phap - Khong su dung phan mem&echo ============================================================================&echo.&echo #San pham ho tro:&echo - Microsoft Office Standard 2019&echo - Microsoft Office Professional Plus 2019&echo.&echo.&(if exist "%ProgramFiles%\Microsoft Office\Office16\ospp.vbs" cd /d "%ProgramFiles%\Microsoft Office\Office16")&(if exist "%ProgramFiles(x86)%\Microsoft Office\Office16\ospp.vbs" cd /d "%ProgramFiles(x86)%\Microsoft Office\Office16")&(for /f %%x in ('dir /b ..\root\Licenses16\ProPlus2019VL*.xrm-ms') do cscript ospp.vbs /inslic:"..\root\Licenses16\%%x" >nul)&(for /f %%x in ('dir /b ..\root\Licenses16\ProPlus2019VL*.xrm-ms') do cscript ospp.vbs /inslic:"..\root\Licenses16\%%x" >nul)&echo.&echo ============================================================================&echo Activating your Office...&cscript //nologo ospp.vbs /unpkey:6MWKP >nul&cscript //nologo ospp.vbs /inpkey:NMMKJ-6RK4F-KMJVX-8D9MJ-6MWKP >nul&set i=1
:server
if %i%==1 set KMS_Sev=kms7.MSGuides.com
if %i%==2 set KMS_Sev=kms8.MSGuides.com
if %i%==3 set KMS_Sev=kms9.MSGuides.com
if %i%==4 set KMS_Sev=kms.digiboy.ir
if %i%==5 goto notsupported
cscript //nologo ospp.vbs /sethst:%KMS_Sev% >nul&echo ============================================================================&echo.&echo.
cscript //nologo ospp.vbs /act | find /i "successful" && (echo.&echo ============================================================================&choice /n /c YN /m "Truy cap devopsvn.xyz: [Y,N]?" & if errorlevel 2 exit) || (echo Ket noi voi may chu KMS khong thanh cong! Dang ket noi lai... & echo Vui long cho... & echo. & echo. & set /a i+=1 & goto server)
explorer "https://devopsvn.xyz"&goto halt
:notsupported
echo.&echo ============================================================================&echo Phien ban Office cua ban khong duoc ho tro.&echo Download phien ban moi nhat tai day: http://devopsvn.xyz/:halt
pause >nul

Bước 2: mở file active.cmd vừa tạo dưới quyền administrator và ngồi chờ. Thành công sẽ báo


Notice: ob_end_flush(): failed to send buffer of zlib output compression (0) in /home/devopsvn/public_html/wp-includes/functions.php on line 5427