Rsync : Công cụ đồng bộ, copy dữ liệu tuyệt vời cho linux

Rsync (Remote Sync) là một công cụ mạng để sao lưu vào đồng bộ dữ liệu trên linux. Rsync có khả năng đồng bộ file giữa:
– 2 thư mục trong 1 máy chủ local
– 2 thư mục giữa máy chủ local và máy chủ remote
So sánh với scp truyền thống, rsync có những ưu điểm nổi trội:
– Hỗ trợ sao chép link, permission, .v.
– Nhanh hơn, do sử dụng cơ chế nén khi copy
– Có những tính năng như giới hạn băng thông truyền tải, bảo tồn được mốc thời gian, permission nguyên vẹn khi chuyển đi.
Syntax cơ bản:
rsync options source destination
Trong đó:
-v : verbose
-r : sao chép dữ liệu theo cách đệ quy ( không bảo tồn mốc thời gian và permission trong quá trình truyền dữ liệu)
-a :chế độ lưu trữ cho phép sao chép các tệp đệ quy và giữ các liên kết, quyền sở hữu, nhóm và mốc thời gian
-z : nén dữ liệu
-h : định dạng số

Cài đặt:
#Đối với họ redhat
yum install rsync
#Đối với họ debian
apt-get install rsync

Sao lưu, đồng bộ file trên local:
[root@devopsvn.xyz]# rsync -zvh backup.tar /tmp/backups/
created directory /tmp/backups
backup.tar
sent 12.31M bytes received 51 bytes 9.27M bytes/sec
total size is 21.49M speedup is 2.10

Nếu thư mục đích chưa tồn tại, thì rsync sẽ tự tạo folder
Ví dụ về đồng bộ folder 1 và folder 2
[root@devopsvn.xyz]# rsync -avzh /folder1 /folder2/

Đồng bộ dữ liệu giữa local và remote server, hoặc ngược lại:
Ví dụ 1: sao chép folder /tmp/vidu lên thư mục /opt của server 1.2.3.4
[root@devopsvn.xyz]$ rsync -avz /tmp/vidu/ root@1.2.3.4:/opt/
Ví dụ 2: Sao chép /opt/sex/ trên 1.2.3.4 về /opt/sex_backup của local
[root@devopsvn.xyz]# rsync -avzh root@1.2.3.4:/opt/sex/ /opt/sex_backup/

Các tham số khác khi sử dụng rsync:
--progress Hiển thị dung lượng và thời gian còn lại trong quá trình truyền.
--delete nếu file/folder có tồn tại ở thư mục đích nhưng không có ở thư mục nguồn thì xoá ở thư mục đích.
--max-size='200k' Giới hạn chỉ truyền file dung lượng tối đa là 200k (thích 200k thành gì thì sửa)
--remove-source-files Truyền xong thì xoá thư mục/file cũ
--bwlimit=100 Giới hạn băng thông truyền tải.

Cấu hình firewalld và ipset (tạo country blacklist cho firewalld)

Case: bọn trung quốc scan nhiều quá, nên mong muốn block hết IP từ trung quốc lại. Với các hệ thống chuyên nghiệp, FW đời mới hiện nay có thể làm một cách dễ dàng với tính năng GeoIP. Vậy còn các webmaster cá nhân, đơn vị nhỏ chỉ với 1 server public ra ngoài? Họ có thể lựa chọn các giải pháp của cloudflare, akamai, .v. Hoặc cây nhà lá vườn hơn là tận dụng firewalld của centos 7 để làm việc này. Dưới dây là hướng dẫn cách thực hiện:

Bước 1: tạo blacklist cho firewalld
firewall-cmd --permanent --new-ipset=blacklist --type=hash:net --option=family=inet --option=hashsize=4096 --option=maxelem=200000


–permanent : lưu cấu hình vĩnh viễn vào firewalld, nếu không có, sau khi khởi động lại firewall thì lệnh này sẽ mất hiệu lực
–new-ipset : tên của danh sách IP, ở đây chúng ta đặt là blacklist cho dễ quản lý, k thích có thể dùng tên khác như là danhsachden chẳng hạn
–type : kiểu lưu trữ, net dành cho subnet, nếu là 1 IP đơn lẻ thì dùng ip (–type=hash:ip)
–option=family : IPv4 or IPv6 network, inet is for IPv4
–option=hashsize : the initial hash size of the list
–option=maxelem : Số lượng phần tử tối đa của list, ở đây để 200k

Bước 2: tiếp theo chúng ta cần danh sách cái subnet tương ứng với đám IP cần block, ở đây là danh sách các subnet tương ứng với vùng Trung Quốc (CN)_
May thay, trên mạng có sẵn rồi, ở trang ipdeny có đủ toàn bộ thông tin này cho chúng ta. Download về mà xài thôi
wget http://www.ipdeny.com/ipblocks/data/countries/all-zones.tar.gz
tar -vxzf all-zones.tar.gz

cd vào thư mục vừa giải nén, sẽ thấy cả loạt các file text .zone tương ứng với từng quốc gia. Add file của Trung Quốc vào list đã tạo ở trên:
firewall-cmd --permanent --ipset=blacklist --add-entries-from-file=./cn.zone
Chỗ đường dẫn file cn.zone nhớ sửa cho đúng, mình đang đứng trong folder chứa nó nên chỉ là ./ thôi

Bước 3: Chuyển cái list đã add IP ở 2 bước trên sang vùng drop của firewalld
firewall-cmd --permanent --zone=drop --add-source=ipset:blacklist
firewall-cmd --reload

Như vậy, IP source tương ứng với ipset:blacklist sẽ bị firwalld drop 1 cách tự động.
Muốn thêm vùng cần chặn vào thì chỉ cần cho các subnet vào file text theo format của đám .zone đã download ở trên. sau đó
firewall-cmd --permanent --ipset=blacklist --add-entries-from-file=đường dẫn file
Muốn remove 1 số ông khỏi cái list đen đó, thì cũng chỉ add hết subnet cần remove vào 1 file text, ví dụ /tmp/remove_ip.txt
Sau đó chạy:
firewall-cmd --permanent --ipset=test --remove-entries-from-file=/tmp/remove_ip.txt
firewall-cmd --reload

—–

Trick:
Đôi khi cần chặn gấp 1 subnet nào đó. Ngoài cách dùng file như trên, có thể sử dụng script:
firewall-cmd --permanent --ipset=blacklist --add-entry=$1
firewall-cmd --ipset=blacklist --add-entry=$1
firewall-cmd --reload

Lưu lại dưới tên /bin/ban (nhớ chmod +x cho nó nhé)
Mỗi lần cần chặn ai đó, ví dụ chặn khẩn cấp thằng 10.0.5.0/24
Chỉ cần gõ lệnh:
ban 10.0.5.0/24
Nhanh và gọn
Chúc các bạn thành công! (k thành công cũng thành nhân)

Sửa lại chuột logitech bị mất đầu thu

Chuột logitech bị mất đầu thu, có thể fix bằng 2 cách:
– Mua 1 đầu thu unify mới và kết nối lại với chuột bằng phần mềm UNIFYING SOFTWARE
Link download từ logitech
https://support.logitech.com/en_us/software/unifying
Hoặc
https://app.box.com/s/wfkgrgtuozzefrl86s3izzpdccp0vfb1
Phần lớn chuột của logitech đều hỗ trợ unify, tuy nhiên đầu thu loại này đắt, có khi hơn cả tiền chuột mới.
– Cách 2: kiếm 1 cái đầu thu của chuột logitech khác, sử dụng app ConnectUtility của Logitech để nối lại. Chỉ cần cắm đầu thu vào máy tính, bật app lên và làm theo hướng dẫn
https://app.box.com/s/79cotp6vwa3if1vj64zca1xd8kl23akj
Mình đã thử test: sử dụng đầu thu của logitech B175 thành công cho M221 silent
Chúc các bạn thànhcoong

Mount google drive, onedrive vào folder của linux

Case study: Cần giải pháp backup file rẻ tiền cho cái blog devopsvn.xyz

Hàng ngày source code và database được dump ra file à đồng bộ file đó lên google drive

Tiến hành:

Để mount folder sử dụng rclone

curl https://rclone.org/install.sh | sudo bash

  • Cấu hình với goole drive: cần chuẩn bị các thông tin dưới đây:
    • https://developers.google.com/identity/sign-in/web/sign-in?refresh=1 truy cập trang này và tạo 1 project, sau đó làm theo hướng dẫn. sẽ thu được client id và client_secret
      • client_secret
      • client_id
    • Trong quá trình chạy thử sẽ thấy không đăng nhập được, trên màn hình console sẽ hướng dẫn truy cập các đường link để xác thực và cấp quyền. Lưu ý theo dõi

rclone config
No remotes found - make a new one
n) New remote
r) Rename remote
c) Copy remote
s) Set configuration password
q) Quit config
n/r/c/s/q> n
name> remote
Type of storage to configure.
Choose a number from below, or type in your own value
[snip]
10 / Google Drive
\ "drive"
[snip]
Storage> drive
Google Application Client Id - leave blank normally.
client_id>
Google Application Client Secret - leave blank normally.
client_secret>
Scope that rclone should use when requesting access from drive.
Choose a number from below, or type in your own value
1 / Full access all files, excluding Application Data Folder.
\ "drive"
2 / Read-only access to file metadata and file contents.
\ "drive.readonly"
/ Access to files created by rclone only.
3 | These are visible in the drive website.
| File authorization is revoked when the user deauthorizes the app.
\ "drive.file"
/ Allows read and write access to the Application Data folder.
4 | This is not visible in the drive website.
\ "drive.appfolder"
/ Allows read-only access to file metadata but
5 | does not allow any access to read or download file content.
\ "drive.metadata.readonly"
scope> 1
ID of the root folder - leave blank normally. Fill in to access "Computers" folders. (see docs).
root_folder_id>
Service Account Credentials JSON file path - needed only if you want use SA instead of interactive login.
service_account_file>
Remote config
Use auto config?
* Say Y if not sure
* Say N if you are working on a remote or headless machine or Y didn't work
y) Yes
n) No
y/n> y
If your browser doesn't open automatically go to the following link: http://127.0.0.1:53682/auth
Log in and authorize rclone for access
Waiting for code...
Got code
Configure this as a team drive?
y) Yes
n) No
y/n> n
--------------------
[remote]
client_id =
client_secret =
scope = drive
root_folder_id =
service_account_file =
token = {"access_token":"XXX","token_type":"Bearer","refresh_token":"XXX","expiry":"2014-03-16T13:57:58.955387075Z"}
--------------------
y) Yes this is OK
e) Edit this remote
d) Delete this remote
y/e/d> y

Chú ý: trong quá trình config có thông tin scope, ở trên thông tin này là drive

Thông tin này sử dụng để thao tác sau này:

Cú pháp mount

rclone mount <scope>:<đường dẫn trên google drive> <đường dẫn thư mục local> --daemon
					

ví dụ

rclone mount  homthucuatao1:backup-rclone/ /opt/homthucuatao1/ --daemon

Tham số –daemon thể hiện tiến trình mount chạy ẩn dưới background.    

TÌm tin nhắn trong skype với nhiều điều kiện

Skype lưu đường dẫn profile của mỗi user trong folder C:\Users\<user name>\AppData\Roaming\Skype\<Skype name, tên đăng nhập>\main.db

Mở file này bằng sqlite brower, bảng lưu tin nhắn thuộc bảng Messages, một số trường chính:

  • body_xml: trường lưu nội dung message
  • timestamp: thời gian tin nhắn, hiển thi dưới dạng unixtime
  • author: người gửi

Một số câu truy vẫn

select date(timestamp, ‘unixepoch’, ‘localtime’), body_xml from Messages where

timestamp >= 1540479600 and

body_xml like ‘%【アロー価格取込バッチログ確認】%’

  • lọc ra các message có thời gian sau thời gian cần tìm (convert thời gian cần tìm sang unixtime để truy vấn) chưa từ khoá 【アロー価格取込バッチログ確認】

Kill zombie process linux

[root@abc-kvm93 123_redmine_alert]# ps aux | grep phantom

root 23858 0.1 0.0 0 0 pts/2 Z 11:09 0:01 [phantomjs] <defunct>

root 25464 0.1 0.0 0 0 pts/2 Z 11:16 0:01 [phantomjs] <defunct>

root 27425 0.2 0.0 0 0 pts/2 Z 11:24 0:01 [phantomjs] <defunct>

root 29398 4.4 0.3 2640400 53688 pts/2 Sl 11:32 0:01 /home/huybk/chip1stop_redmine_alert/phantomjs –cookies-file=/tmp/tmp48bddbr7 –webdriver=37998

root 29434 6.4 0.3 2640440 53456 pts/2 Sl 11:32 0:01 /home/huybk/chip1stop_redmine_alert/phantomjs –cookies-file=/tmp/tmpi3guirm8 –webdriver=53345

root 29475 17.7 0.3 2641020 53296 pts/2 Sl 11:32 0:01 /home/huybk/chip1stop_redmine_alert/phantomjs –cookies-file=/tmp/tmprgkv3jhr –webdriver=53106

root 29520 0.0 0.0 103332 876 pts/3 S+ 11:32 0:00 grep phantom

Các process defunct luôn ko mất, gọi là zombie. Do các process này đã ngừng xử lý nhưng vẫn không biến mất khỏi process entry.

Để kill các process này cần giết tiến trình bố của nó. Tìm thằng bố bằng cách chạy
ps -xal

Trường thứ 4 chính là PID của thằng bố nó, kill -9 là xong

Thủ thuật Notepad++

Xóa các dòng chứa từ khóa biết trước

Ví dụ: Muốn xóa các dòng có từ “tukhoa”

1. Menu => Search => Mark (hoặc Ctrl + F, chọn Tab Mark

)

2. Nhập từ cần xóa: “tukhoa”

3. Check ô Mark line và Wrap aroud => Chọn Find All

4. Search => Bookmark => Remove Bookmarked Lines. (Xóa dòng đã đánh dấu)

Xóa dòng không chứa từ khóa

Ví dụ: Muốn xóa các dòng không có từ “tukhoa”

1,2,3 Lặp lại như trên.

4. Chọn Remove Unmarked Lines.

Xóa dòng trắng (không có gì)

Edit => Line Operations => Remove Empty Lines (Containing Black Character)

Thêm từ khóa vào đầu dòng

1. Ctrl + F => Replace

2. Tích ô Regular expression và Wrap around

3. Find what gõ: ^

4. Replace with gõ từ khóa cần thêm: tukhoa

5. Replace All.

Thêm từ khóa vào cuối dòng

Như trên chỉ khác tìm từ $

Xóa từ khóa cuối dòng

Ví dụ xóa từ tukhoa ở cuối

Như trên.


Find what gõ

: tukhoa$


Replace with: để trống.

Xóa từ khóa đầu dòng

Như trên.


Find what gõ: ^tukhoa

Xóa mọi thứ sau từ khóa

Find what: tukhoa.*

Xóa mọi thứ trước một từ khóa

Find what: ^.+tukhoa

Xóa mọi số (number)

Find what: [0-9] +

Ở phần tiếp theo, mình sẽ giới thiệu thêm một số thủ thuật nội dung, quản lý notepad ++.

Tìm hiểu về resume download

Mình sẽ nói sơ qua flow làm việc của IDM khi bắt đầu tải một file nhé (ý kiến và hiểu biết của cá nhân mình, nên có thể không chính xác lắm):

  1. IDM sẽ request lên server đó với đường dẫn của file cần tải.
  2. Sau khi nhận được response từ server. Nó kiểm tra xem có header Accept-Ranges: bytes hay không.
  3. Nếu có, thì server đó hỗ trợ resume. Và lần sau (nếu bạn đã tạm dừng và tải tiếp) nó sẽ gửi kèm một header Range: bytes=<Số lượng bytes đã tải được>- lên. Server sẽ trả về một status code là 206 Partial Content kèm header Content-Range: bytes <Số bytes bạn gửi lên>-<Số bytes của file – 1>/<Số bytes của file>

Để có thể dễ tưởng tượng hơn. Bây giờ chúng ta cùng đi thực nghiệm nhé. Mình dùng Ubuntu, nên chúng ta có thể sử dụng luôn package Wget với tùy chọn -c (–continue) để thử (không cần phải IDM). Phần chuẩn bị, chúng ta sẽ cài đặt NginX hoặc Apache2. Sau đó cho một file nặng nặng vào thư mục public của NginX (hoặc Apache – thường là /var/www/html). Do tốc độ truyền dữ liệu trong mạng local là rất nhanh nên chúng ta khó có thể xem chính xác được. Rất may là Wget có hỗ trợ limit rate (chúng ta sẽ sử dụng nó để giả lập tốc độ mạng).

Đầu tiên, chúng ta tải file với lệnh:

$ wget http://localhost/file.mp3 -c –limit-rate 500K

Rồi trong quá trình nó download, bạn bấm tổ hợp phím Ctrl+C để dừng. Rồi tiếp tục chạy lại lệnh trên để xem kết quả 

$ wget http://localhost/file.mp3 -c –limit-rate 500K

–2018-09-16 11:03:19– http://localhost/file.mp3

Resolving localhost (localhost)… 127.0.0.1

Connecting to localhost (localhost)|127.0.0.1|:80… connected.

HTTP request sent, awaiting response… 200 OK

Length: 10266423 (9.8M)


Saving to: ‘file.mp3’

13% [=====> ] 1,386,970 500KB/s ^C

$ wget http://localhost/file.mp3 -c –limit-rate 500K

–2018-09-16 11:03:24– http://localhost/file.mp3

Resolving localhost (localhost)… 127.0.0.1

Connecting to localhost (localhost)|127.0.0.1|:80… connected.

HTTP request sent, awaiting response… 206 Partial Content

Length: 10266423 (9.8M), 8772957 (8.4M) remaining


Saving to: ‘file.mp3’

29% [+++++++======> ] 2,984,410 500KB/s ^C

Để có thể xem chi tiết thằng Wget này nó làm việc như thế nào. Bạn có thể sử dụng thêm tùy chọn -d (–debug):

$ wget http://localhost/file.mp3 -c -d –limit-rate 500K

Setting –limit-rate (limitrate) to 500K

DEBUG output created by Wget 1.15 on linux-gnu.

URI encoding = ‘UTF-8’

–2018-09-16 11:16:03– http://localhost/file.mp3

Resolving localhost (localhost)… 127.0.0.1

Caching localhost => 127.0.0.1

Connecting to localhost (localhost)|127.0.0.1|:80… connected.

Created socket 3.

Releasing 0x000000000174c820 (new refcount 1).

—request begin—

GET /file.mp3 HTTP/1.1

User-Agent: Wget/1.15 (linux-gnu)

Accept: */*

Host: localhost

Connection: Keep-Alive

—request end—

HTTP request sent, awaiting response…

—response begin—

HTTP/1.1 200 OK

Server: nginx/1.12.1

Date: Sun, 16 Sep 2018 04:16:03 GMT

Content-Type: audio/mpeg

Content-Length: 10266423

Last-Modified: Sun, 24 Jul 2016 08:34:00 GMT

Connection: keep-alive

ETag: “57947d78-9ca737”

Accept-Ranges: bytes

—response end—

200 OK

Registered socket 3 for persistent reuse.

Length: 10266423 (9.8M)


Saving to: ‘file.mp3’

0% [ ] 0 –.-K/s

$ wget http://localhost/file.mp3 -c -d –limit-rate 500K

Setting –limit-rate (limitrate) to 500K

DEBUG output created by Wget 1.15 on linux-gnu.

URI encoding = ‘UTF-8’

–2018-09-16 11:17:08– http://localhost/file.mp3

Resolving localhost (localhost)… 127.0.0.1

Caching localhost => 127.0.0.1

Connecting to localhost (localhost)|127.0.0.1|:80… connected.

Created socket 3.

Releasing 0x00000000023b8670 (new refcount 1).

—request begin—

GET /file.mp3 HTTP/1.1

Range: bytes=212992-

User-Agent: Wget/1.15 (linux-gnu)

Accept: */*

Host: localhost

Connection: Keep-Alive

—request end—

HTTP request sent, awaiting response…

—response begin—

HTTP/1.1 206 Partial Content

Server: nginx/1.12.1

Date: Sun, 16 Sep 2018 04:17:08 GMT

Content-Type: audio/mpeg

Content-Length: 10053431

Last-Modified: Sun, 24 Jul 2016 08:34:00 GMT

Connection: keep-alive

ETag: “57947d78-9ca737”

Content-Range: bytes 212992-10266422/10266423

—response end—

206 Partial Content

Registered socket 3 for persistent reuse.

Length: 10266423 (9.8M), 10053431 (9.6M) remaining


Saving to: ‘file.mp3’

2% [++ ] 212,992 –.-K/s

Giờ chúng ta muốn vô hiệu hóa việc resume thì làm như thế nào? Vâng, từ NginX v1.1.2 thì chúng ta có directive max_ranges. Bạn hãy set nó về 0 rồi restart lại NginX để vô hiệu hóa việc resume và thử lại:

server {

listen 80;

listen [::]:80;

server_name localhost;

location / {

# …

max_ranges 0;

# …

}

}

Kết quả:

$ wget http://localhost/file.mp3 -c –limit-rate 500K

–2018-09-16 11:23:21– http://localhost/file.mp3

Resolving localhost (localhost)… 127.0.0.1

Connecting to localhost (localhost)|127.0.0.1|:80… connected.

HTTP request sent, awaiting response… 200 OK

Length: 10266423 (9.8M)


Saving to: ‘file.mp3’

6% [=======> ] 638,976 500KB/s ^C

$ wget http://localhost/file.mp3 -c –limit-rate 500K

–2018-09-16 11:23:23– http://localhost/file.mp3

Resolving localhost (localhost)… 127.0.0.1

Connecting to localhost (localhost)|127.0.0.1|:80… connected.

HTTP request sent, awaiting response… 200 OK

Length: 10266423 (9.8M)


Saving to: ‘file.mp3’

5% [======> ] 532,480 500KB/s ^C

Với tùy chọn -d (–debug):

$ wget http://localhost/file.mp3 -c -d –limit-rate 500K

Setting –debug (debug) to 1

Setting –limit-rate (limitrate) to 500K

DEBUG output created by Wget 1.15 on linux-gnu.

URI encoding = ‘UTF-8’

–2018-09-16 11:24:41– http://localhost/file.mp3

Resolving localhost (localhost)… 127.0.0.1

Caching localhost => 127.0.0.1

Connecting to localhost (localhost)|127.0.0.1|:80… connected.

Created socket 3.

Releasing 0x00000000006bf820 (new refcount 1).

—request begin—

GET /file.mp3 HTTP/1.1

User-Agent: Wget/1.15 (linux-gnu)

Accept: */*

Host: localhost

Connection: Keep-Alive

—request end—

HTTP request sent, awaiting response…

—response begin—

HTTP/1.1 200 OK

Server: nginx/1.12.1

Date: Sun, 16 Sep 2018 04:24:41 GMT

Content-Type: audio/mpeg

Content-Length: 10266423

Last-Modified: Sun, 24 Jul 2016 08:34:00 GMT

Connection: keep-alive

ETag: “57947d78-9ca737”

—response end—

200 OK

Registered socket 3 for persistent reuse.

Length: 10266423 (9.8M)


Saving to: ‘file.mp3’

0% [ ] 0 –.-K/s

$ wget http://localhost/file.mp3 -c -d –limit-rate 500K

Setting –debug (debug) to 1

Setting –limit-rate (limitrate) to 500K

DEBUG output created by Wget 1.15 on linux-gnu.

URI encoding = ‘UTF-8’

–2018-09-16 11:25:26– http://localhost/file.mp3

Resolving localhost (localhost)… 127.0.0.1

Caching localhost => 127.0.0.1

Connecting to localhost (localhost)|127.0.0.1|:80… connected.

Created socket 3.

Releasing 0x0000000002114670 (new refcount 1).

—request begin—

GET /file.mp3 HTTP/1.1

Range: bytes=212992-

User-Agent: Wget/1.15 (linux-gnu)

Accept: */*

Host: localhost

Connection: Keep-Alive

—request end—

HTTP request sent, awaiting response…

—response begin—

HTTP/1.1 200 OK

Server: nginx/1.12.1

Date: Sun, 16 Sep 2018 04:25:26 GMT

Content-Type: audio/mpeg

Content-Length: 10266423

Last-Modified: Sun, 24 Jul 2016 08:34:00 GMT

Connection: keep-alive

ETag: “57947d78-9ca737”

—response end—

200 OK

Registered socket 3 for persistent reuse.

Length: 10266423 (9.8M)


Saving to: ‘file.mp3’

0% [ ] 0 –.-K/s

Vâng, bạn sẽ để ý thấy rằng client chúng ta gửi header Range: nhưng server vẫn lạnh lùng trả về status code là 200 và không kèm theo header Content-Range. Vậy là phải tải lại từ đầu thôi .

Đối với Apache (từ version 2.2.21) thì bạn có thể thêm tùy chọn MaxRanges none.

<VirtualHost *:80>

DocumentRoot /var/www

# …

MaxRanges none

# …

</VirtualHost>

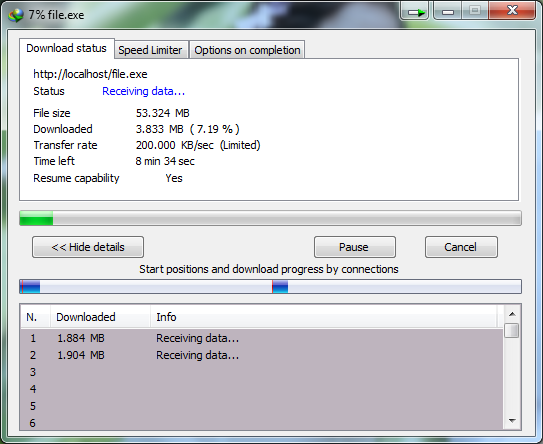
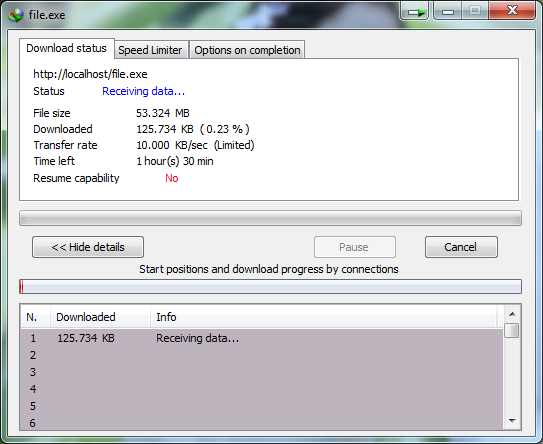
Mình có thử cài NginX trên Windows và thử nghiệm với IDM và chụp ảnh lại. Các bạn có thể xem kết quả:


Đây là chúng ta đang nói về server riêng, do chúng ta cài đặt. Còn trong trường hợp bạn sử dụng shared hosting, và nhà cung cấp lại vô hiệu hóa việc resume download. Vậy chúng ta có thể làm được không? Câu trả lời là có thể. Chúng ta sẽ xử lý bằng code theo flow như sau:

  1. Trả file về kèm với header Accept-Ranges: bytes
  2. Kiểm tra xem trong header request có HTTP_RANGE không? Nếu có, lấy thông tin rồi đọc và trả lại cho client status code 206 kèm các bytes kế tiếp cùng header Content-Range: bytes

Đấy là lý thuyết. Còn thực tế, bạn có thể Google với ngôn ngữ tương ứng bạn đang sử dụng, sẽ có khá nhiều mẫu code giúp chúng ta thực hiện việc này trong trường hợp server vô hiệu hóa việc resume. Với PHP thì bạn có thể tham khảo tại https://github.com/pomle/php-serveFilePartial

Lời kết

Khi server đã hỗ trợ việc resume, công việc của client sẽ thực hiện giống với flow của IDM mình đã viết ở trên. Và mình chia sẻ một phần nhỏ nữa, là việc download đa luồng giống IDM (với điều kiện server hỗ trợ resume, các bạn có thể xem ảnh dưới mình chụp IDM với cài đặt 8 luồng và download file không hỗ trợ resume rồi so sánh với ảnh hỗ trợ resume ở trên) đơn giản chỉ là tạo nhiều process. Mỗi process một phần với header gửi lên là Range: bytes=<Byte bắt đầu>-<Byte kết thúc>, sau khi hoàn thành các phần khác nhau sẽ thực hiện ghép lại thành một file cuối cùng. Đó cũng là lý do vì sao chúng ta nên kiểm tra mã checksum MD5 (hoặc SHA1) của file sau khi đã tải so với trang chủ của file cung cấp tránh trường hợp file tải về bị lỗi ở một luồng nào đó dẫn đến file làm việc không đúng.


Bài viết của mình đến đây là kết thúc. Hy vọng với bài viết đơn giản này sẽ giúp bạn trong một tương lai không xa. See you !

Thêm tự xuống dòng trong công thức Excel

Xuống dòng trong excel chỉ cần Alt Enter là xong. Tuy nhiên, khi viết các hàm ghép chuỗi thì không thể Alt Enter được. Để làm việc này, chúng ta sử dụng hàm CHAR(10), Trong đó 10 là mã của ký tự xuống dòng (line break)

=”abc”&CHAR(10)&”def”

Tuy nhiên, chúng ta vẫn không thấy kết quả xuống dòng, bởi gì mặc định Wrapper cho cell đó k được bật, chỉ cần bấm vào Wrapper text là xong.

Active các bản windows và Office thông qua KMS lậu

Mở cmd với quyền admin và chạy các lệnh tương ứng

Windows Server 2016 Datacenter:
slmgr /ipk CB7KF-BWN84-R7R2Y-793K2-8XDDG
slmgr /skms kms.digiboy.ir
slmgr /ato
Windows Server 2016 Standard:
<pre>slmgr /ipk WC2BQ-8NRM3-FDDYY-2BFGV-KHKQY
slmgr /skms kms.digiboy.ir
slmgr /ato
Active windows 10:
Windows 10 Home: TX9XD-98N7V-6WMQ6-BX7FG-H8Q99
Windows 10 Home N: 3KHY7-WNT83-DGQKR-F7HPR-844BM
Windows 10 Home Single Language: 7HNRX-D7KGG-3K4RQ-4WPJ4-YTDFH
Windows 10 Home Country Specific: PVMJN-6DFY6-9CCP6-7BKTT-D3WVR
Windows10 Professional: W269N-WFGWX-YVC9B-4J6C9-T83GX
Windows10 Professional N: MH37W-N47XK-V7XM9-C7227-GCQG9
Windows10 Enterprise: NPPR9-FWDCX-D2C8J-H872K-2YT43
Windows10 Enterprise N: DPH2V-TTNVB-4X9Q3-TJR4H-KHJW4
Windows10 Education: NW6C2-QMPVW-D7KKK-3GKT6-VCFB2
Windows10 Education N: 2WH4N-8QGBV-H22JP-CT43Q-MDWWJ
Windows10 Enterprise2015 LTSB: WNMTR-4C88C-JK8YV-HQ7T2-76DF9
Windows10 Enterprise2015 LTSB: 2F77B-TNFGY-69QQF-B8YKP-D69TJ
Thay vào dòng dưới
slmgr /ipk W269N-WFGWX-YVC9B-4J6C9-T83GX
slmgr /skms kms.digiboy.ir
slmgr /ato

Windows Server 2022

Win Server 2022 Datacenter: WX4NM-KYWYW-QJJR4-XV3QB-6VM33
Win Server 2022 Standard: VDYBN-27WPP-V4HQT-9VMD4-VMK7H

Active Office:

Chỉ áp dụng cho bản Office 2016 VL, nếu đang bản retail thì phải convert sang, cách convert bằng cách chạy Script tương ứng dưới quyền administrator sẽ được hướng dẫn ở cuối bài.

Sau khi convert

Tiếp theo là active bằng cách dưới:
cd C:\Program Files (x86)\Microsoft Office\Office16
cscript OSPP.VBS /inpkey:XQNVK-8JYDB-WJ9W3-YJ8YR-WFG99
cscript OSPP.VBS /sethst:kms.digiboy.ir
cscript OSPP.VBS /act
cscript OSPP.VBS /dstatus
Đối với office 64bit
cd C:\Program Files\Microsoft Office\Office16
cscript OSPP.VBS /inpkey:XQNVK-8JYDB-WJ9W3-YJ8YR-WFG99
cscript OSPP.VBS /sethst:kms.digiboy.ir
cscript OSPP.VBS /act
cscript OSPP.VBS /dstatus
Trong đó:
XQNVK-8JYDB-WJ9W3-YJ8YR-WFG99 là key Office 2016 Pro Plus. Nếu các bạn sử dụng các phiên bản Office như Visio, Project… thì thay key dưới đây vào:
Office Professional Plus 2016: XQNVK-8JYDB-WJ9W3-YJ8YR-WFG99
Office Standard 2016 : JNRGM-WHDWX-FJJG3-K47QV-DRTFM
Project Professional 2016: YG9NW-3K39V-2T3HJ-93F3Q-G83KT
Project Standard 2016: GNFHQ-F6YQM-KQDGJ-327XX-KQBVC
Visio Professional 2016: PD3PC-RHNGV-FXJ29-8JK7D-RJRJK
Visio Standard 2016: 7WHWN-4T7MP-G96JF-G33KR-W8GF4
Access 2016: GNH9Y-D2J4T-FJHGG-QRVH7-QPFDW
Excel 2016: 9C2PK-NWTVB-JMPW8-BFT28-7FTBF
OneNote 2016: DR92N-9HTF2-97XKM-XW2WJ-XW3J6
Outlook 2016: R69KK-NTPKF-7M3Q4-QYBHW-6MT9B
PowerPoint 2016: J7MQP-HNJ4Y-WJ7YM-PFYGF-BY6C6
Publisher 2016: F47MM-N3XJP-TQXJ9-BP99D-8K837
Skype for Business 2016: 869NQ-FJ69K-466HW-QYCP2-DDBV6
Word 2016: WXY84-JN2Q9-RBCCQ-3Q3J3-3PFJ6
========================

Hướng dẫn convert sang bản VL:

Chạy script tương ứng với Office 64 bit hoặc 32 bit

Office 32 bit, Lưu đoạn dưới đây thành file name.cmd rồi chạy
@echo off
:ADMIN
openfiles >nul 2>nul ||(
echo Set UAC = CreateObject^(“Shell.Application”^) > “%temp%\getadmin.vbs”
echo UAC.ShellExecute “%~s0”, “”, “”, “runas”, 1 >> “%temp%\getadmin.vbs”
“%temp%\getadmin.vbs” >nul 2>&1
goto:eof

)

del /f /q “%temp%\getadmin.vbs” >nul 2>nul

for /f “tokens=6 delims=[]. ” %%G in (‘ver’) do set win=%%G

pushd “%~dp0”

Title Office 2016 Retail to Volume License Converter

echo Press Enter to start VL-Conversion…

echo.

pause

echo.

cd /D “%SystemRoot%\System32”

if %win% GEQ 9200 (

cscript slmgr.vbs /ilc “%ProgramFiles(x86)%\Microsoft Office\root\Licenses16\ProPlusVL_KMS_Client-ppd.xrm-ms”

cscript slmgr.vbs /ilc “%ProgramFiles(x86)%\Microsoft Office\root\Licenses16\ProPlusVL_KMS_Client-ul.xrm-ms”

cscript slmgr.vbs /ilc “%ProgramFiles(x86)%\Microsoft Office\root\Licenses16\ProPlusVL_KMS_Client-ul-oob.xrm-ms”

cscript slmgr.vbs /ilc “%ProgramFiles(x86)%\Microsoft Office\root\Licenses16\ProjectProVL_KMS_Client-ppd.xrm-ms”

cscript slmgr.vbs /ilc “%ProgramFiles(x86)%\Microsoft Office\root\Licenses16\ProjectProVL_KMS_Client-ul-oob.xrm-ms”

cscript slmgr.vbs /ilc “%ProgramFiles(x86)%\Microsoft Office\root\Licenses16\ProjectProVL_KMS_Client-ul.xrm-ms”

cscript slmgr.vbs /ilc “%ProgramFiles(x86)%\Microsoft Office\root\Licenses16\VisioProVL_KMS_Client-ppd.xrm-ms”

cscript slmgr.vbs /ilc “%ProgramFiles(x86)%\Microsoft Office\root\Licenses16\VisioProVL_KMS_Client-ul-oob.xrm-ms”

cscript slmgr.vbs /ilc “%ProgramFiles(x86)%\Microsoft Office\root\Licenses16\VisioProVL_KMS_Client-ul.xrm-ms”

cscript slmgr.vbs /ilc “%ProgramFiles(x86)%\Microsoft Office\root\Licenses16\client-issuance-bridge-office.xrm-ms

cscript slmgr.vbs /ilc “%ProgramFiles(x86)%\Microsoft Office\root\Licenses16\client-issuance-root.xrm-ms

cscript slmgr.vbs /ilc “%ProgramFiles(x86)%\Microsoft Office\root\Licenses16\client-issuance-root-bridge-test.xrm-ms

cscript slmgr.vbs /ilc “%ProgramFiles(x86)%\Microsoft Office\root\Licenses16\client-issuance-stil.xrm-ms

cscript slmgr.vbs /ilc “%ProgramFiles(x86)%\Microsoft Office\root\Licenses16\client-issuance-ul.xrm-ms

cscript slmgr.vbs /ilc “%ProgramFiles(x86)%\Microsoft Office\root\Licenses16\client-issuance-ul-oob.xrm-ms

cscript slmgr.vbs /ilc “%ProgramFiles(x86)%\Microsoft Office\root\Licenses16\pkeyconfig-office.xrm-ms

)

if %win% LSS 9200 (

cscript “%ProgramFiles(x86)%\Microsoft Office\Office16\ospp.vbs” /inslic:”%ProgramFiles(x86)%\Microsoft Office\root\Licenses16\ProPlusVL_KMS_Client-ppd.xrm-ms”

cscript “%ProgramFiles(x86)%\Microsoft Office\Office16\ospp.vbs” /inslic:”%ProgramFiles(x86)%\Microsoft Office\root\Licenses16\ProPlusVL_KMS_Client-ul.xrm-ms”

cscript “%ProgramFiles(x86)%\Microsoft Office\Office16\ospp.vbs” /inslic:”%ProgramFiles(x86)%\Microsoft Office\root\Licenses16\ProPlusVL_KMS_Client-ul-oob.xrm-ms”

cscript “%ProgramFiles(x86)%\Microsoft Office\Office16\ospp.vbs” /inslic:”%ProgramFiles(x86)%\Microsoft Office\root\Licenses16\ProjectProVL_KMS_Client-ppd.xrm-ms”

cscript “%ProgramFiles(x86)%\Microsoft Office\Office16\ospp.vbs” /inslic:”%ProgramFiles(x86)%\Microsoft Office\root\Licenses16\ProjectProVL_KMS_Client-ul-oob.xrm-ms”

cscript “%ProgramFiles(x86)%\Microsoft Office\Office16\ospp.vbs” /inslic:”%ProgramFiles(x86)%\Microsoft Office\root\Licenses16\ProjectProVL_KMS_Client-ul.xrm-ms”

cscript “%ProgramFiles(x86)%\Microsoft Office\Office16\ospp.vbs” /inslic:”%ProgramFiles(x86)%\Microsoft Office\root\Licenses16\VisioProVL_KMS_Client-ppd.xrm-ms”

cscript “%ProgramFiles(x86)%\Microsoft Office\Office16\ospp.vbs” /inslic:”%ProgramFiles(x86)%\Microsoft Office\root\Licenses16\VisioProVL_KMS_Client-ul-oob.xrm-ms”

cscript “%ProgramFiles(x86)%\Microsoft Office\Office16\ospp.vbs” /inslic:”%ProgramFiles(x86)%\Microsoft Office\root\Licenses16\VisioProVL_KMS_Client-ul.xrm-ms”

cscript “%ProgramFiles(x86)%\Microsoft Office\Office16\ospp.vbs” /inslic:”%ProgramFiles(x86)%\Microsoft Office\root\Licenses16\client-issuance-bridge-office.xrm-ms

cscript “%ProgramFiles(x86)%\Microsoft Office\Office16\ospp.vbs” /inslic:”%ProgramFiles(x86)%\Microsoft Office\root\Licenses16\client-issuance-root.xrm-ms

cscript “%ProgramFiles(x86)%\Microsoft Office\Office16\ospp.vbs” /inslic:”%ProgramFiles(x86)%\Microsoft Office\root\Licenses16\client-issuance-root-bridge-test.xrm-ms

cscript “%ProgramFiles(x86)%\Microsoft Office\Office16\ospp.vbs” /inslic:”%ProgramFiles(x86)%\Microsoft Office\root\Licenses16\client-issuance-stil.xrm-ms

cscript “%ProgramFiles(x86)%\Microsoft Office\Office16\ospp.vbs” /inslic:”%ProgramFiles(x86)%\Microsoft Office\root\Licenses16\client-issuance-ul.xrm-ms

cscript “%ProgramFiles(x86)%\Microsoft Office\Office16\ospp.vbs” /inslic:”%ProgramFiles(x86)%\Microsoft Office\root\Licenses16\client-issuance-ul-oob.xrm-ms

cscript “%ProgramFiles(x86)%\Microsoft Office\Office16\ospp.vbs” /inslic:”%ProgramFiles(x86)%\Microsoft Office\root\Licenses16\pkeyconfig-office.xrm-ms

)

echo.

echo Retail to Volume License conversion finished.

echo.

pause

Đối với office 64 bit

Office 64 bit, Lưu đoạn dưới đây thành file name.cmd rồi chạy
@echo off
:ADMIN
openfiles >nul 2>nul ||(
echo Set UAC = CreateObject^(“Shell.Application”^) > “%temp%\getadmin.vbs”
echo UAC.ShellExecute “%~s0”, “”, “”, “runas”, 1 >> “%temp%\getadmin.vbs”
“%temp%\getadmin.vbs” >nul 2>&1
goto:eof

)

del /f /q “%temp%\getadmin.vbs” >nul 2>nul

for /f “tokens=6 delims=[]. ” %%G in (‘ver’) do set win=%%G

pushd “%~dp0”

Title Office 2016 Retail to Volume License Converter

echo Press Enter to start VL-Conversion…

echo.

pause

echo.

cd /D “%SystemRoot%\System32”

if %win% GEQ 9200 (

cscript slmgr.vbs /ilc “%ProgramFiles%\Microsoft Office\root\Licenses16\ProPlusVL_KMS_Client-ppd.xrm-ms”

cscript slmgr.vbs /ilc “%ProgramFiles%\Microsoft Office\root\Licenses16\ProPlusVL_KMS_Client-ul.xrm-ms”

cscript slmgr.vbs /ilc “%ProgramFiles%\Microsoft Office\root\Licenses16\ProPlusVL_KMS_Client-ul-oob.xrm-ms”

cscript slmgr.vbs /ilc “%ProgramFiles%\Microsoft Office\root\Licenses16\ProjectProVL_KMS_Client-ppd.xrm-ms”

cscript slmgr.vbs /ilc “%ProgramFiles%\Microsoft Office\root\Licenses16\ProjectProVL_KMS_Client-ul-oob.xrm-ms”

cscript slmgr.vbs /ilc “%ProgramFiles%\Microsoft Office\root\Licenses16\ProjectProVL_KMS_Client-ul.xrm-ms”

cscript slmgr.vbs /ilc “%ProgramFiles%\Microsoft Office\root\Licenses16\VisioProVL_KMS_Client-ppd.xrm-ms”

cscript slmgr.vbs /ilc “%ProgramFiles%\Microsoft Office\root\Licenses16\VisioProVL_KMS_Client-ul-oob.xrm-ms”

cscript slmgr.vbs /ilc “%ProgramFiles%\Microsoft Office\root\Licenses16\VisioProVL_KMS_Client-ul.xrm-ms”

cscript slmgr.vbs /ilc “%ProgramFiles%\Microsoft Office\root\Licenses16\client-issuance-bridge-office.xrm-ms

cscript slmgr.vbs /ilc “%ProgramFiles%\Microsoft Office\root\Licenses16\client-issuance-root.xrm-ms

cscript slmgr.vbs /ilc “%ProgramFiles%\Microsoft Office\root\Licenses16\client-issuance-root-bridge-test.xrm-ms

cscript slmgr.vbs /ilc “%ProgramFiles%\Microsoft Office\root\Licenses16\client-issuance-stil.xrm-ms

cscript slmgr.vbs /ilc “%ProgramFiles%\Microsoft Office\root\Licenses16\client-issuance-ul.xrm-ms

cscript slmgr.vbs /ilc “%ProgramFiles%\Microsoft Office\root\Licenses16\client-issuance-ul-oob.xrm-ms

cscript slmgr.vbs /ilc “%ProgramFiles%\Microsoft Office\root\Licenses16\pkeyconfig-office.xrm-ms

)

if %win% LSS 9200 (

cscript “%ProgramFiles%\Microsoft Office\Office16\ospp.vbs” /inslic:”%ProgramFiles%\Microsoft Office\root\Licenses16\ProPlusVL_KMS_Client-ppd.xrm-ms”

cscript “%ProgramFiles%\Microsoft Office\Office16\ospp.vbs” /inslic:”%ProgramFiles%\Microsoft Office\root\Licenses16\ProPlusVL_KMS_Client-ul.xrm-ms”

cscript “%ProgramFiles%\Microsoft Office\Office16\ospp.vbs” /inslic:”%ProgramFiles%\Microsoft Office\root\Licenses16\ProPlusVL_KMS_Client-ul-oob.xrm-ms”

cscript “%ProgramFiles%\Microsoft Office\Office16\ospp.vbs” /inslic:”%ProgramFiles%\Microsoft Office\root\Licenses16\ProjectProVL_KMS_Client-ppd.xrm-ms”

cscript “%ProgramFiles%\Microsoft Office\Office16\ospp.vbs” /inslic:”%ProgramFiles%\Microsoft Office\root\Licenses16\ProjectProVL_KMS_Client-ul-oob.xrm-ms”

cscript “%ProgramFiles%\Microsoft Office\Office16\ospp.vbs” /inslic:”%ProgramFiles%\Microsoft Office\root\Licenses16\ProjectProVL_KMS_Client-ul.xrm-ms”

cscript “%ProgramFiles%\Microsoft Office\Office16\ospp.vbs” /inslic:”%ProgramFiles%\Microsoft Office\root\Licenses16\VisioProVL_KMS_Client-ppd.xrm-ms”

cscript “%ProgramFiles%\Microsoft Office\Office16\ospp.vbs” /inslic:”%ProgramFiles%\Microsoft Office\root\Licenses16\VisioProVL_KMS_Client-ul-oob.xrm-ms”

cscript “%ProgramFiles%\Microsoft Office\Office16\ospp.vbs” /inslic:”%ProgramFiles%\Microsoft Office\root\Licenses16\VisioProVL_KMS_Client-ul.xrm-ms”

cscript “%ProgramFiles%\Microsoft Office\Office16\ospp.vbs” /inslic:”%ProgramFiles%\Microsoft Office\root\Licenses16\client-issuance-bridge-office.xrm-ms

cscript “%ProgramFiles%\Microsoft Office\Office16\ospp.vbs” /inslic:”%ProgramFiles%\Microsoft Office\root\Licenses16\client-issuance-root.xrm-ms

cscript “%ProgramFiles%\Microsoft Office\Office16\ospp.vbs” /inslic:”%ProgramFiles%\Microsoft Office\root\Licenses16\client-issuance-root-bridge-test.xrm-ms

cscript “%ProgramFiles%\Microsoft Office\Office16\ospp.vbs” /inslic:”%ProgramFiles%\Microsoft Office\root\Licenses16\client-issuance-stil.xrm-ms

cscript “%ProgramFiles%\Microsoft Office\Office16\ospp.vbs” /inslic:”%ProgramFiles%\Microsoft Office\root\Licenses16\client-issuance-ul.xrm-ms

cscript “%ProgramFiles%\Microsoft Office\Office16\ospp.vbs” /inslic:”%ProgramFiles%\Microsoft Office\root\Licenses16\client-issuance-ul-oob.xrm-ms

cscript “%ProgramFiles%\Microsoft Office\Office16\ospp.vbs” /inslic:”%ProgramFiles%\Microsoft Office\root\Licenses16\pkeyconfig-office.xrm-ms

)

echo.

echo Retail to Volume License conversion finished.

echo.

pause

Đọc tiếp Active các bản windows và Office thông qua KMS lậu


Notice: ob_end_flush(): failed to send buffer of zlib output compression (0) in /home/devopsvn/public_html/wp-includes/functions.php on line 5427