hpssacli – HP Smart array CLI commands and download link

HP Smart array CLI commands

Download HP Smart array CLI

HP Smart array CLI commands (these should apply to any system with the CLI installed)

Show configuration

/opt/hp/hpssacli/bin/hpssacli ctrl all show config

Controller status

/opt/hp/hpssacli/bin/hpssacli ctrl all show status

Show detailed controller information for all controllers

/opt/hp/hpssacli/bin/hpssacli ctrl all show detail

Show detailed controller information for controller in slot 0

/opt/hp/hpssacli/bin/hpssacli ctrl slot=0 show detail

Rescan for New Devices

/opt/hp/hpssacli/bin/hpssacli rescan

Physical disk status

/opt/hp/hpssacli/bin/hpssacli ctrl slot=0 pd all show status

Show detailed physical disk information

/opt/hp/hpssacli/bin/hpssacli ctrl slot=0 pd all show detail

Logical disk status

/opt/hp/hpssacli/bin/hpssacli ctrl slot=0 ld all show status

View Detailed Logical Drive Status

/opt/hp/hpssacli/bin/hpssacli ctrl slot=0 ld 2 show

Create New RAID 0 Logical Drive

/opt/hp/hpssacli/bin/hpssacli ctrl slot=0 create type=ld drives=1I:1:2 raid=0

Create New RAID 1 Logical Drive

/opt/hp/hpssacli/bin/hpssacli ctrl slot=0 create type=ld drives=1I:1:1,1I:1:2 raid=1

Create New RAID 5 Logical Drive

/opt/hp/hpssacli/bin/hpssacli ctrl slot=0 create type=ld drives=1I:1:1,1I:1:2,2I:1:6,2I:1:7,2I:1:8 raid=5

Delete Logical Drive

/opt/hp/hpssacli/bin/hpssacli ctrl slot=0 ld 2 delete

Add New Physical Drive to Logical Volume

/opt/hp/hpssacli/bin/hpssacli ctrl slot=0 ld 2 add drives=2I:1:6,2I:1:7

Add Spare Disks

/opt/hp/hpssacli/bin/hpssacli ctrl slot=0 array all add spares=2I:1:6,2I:1:7

Enable Drive Write Cache

/opt/hp/hpssacli/bin/hpssacli ctrl slot=0 modify dwc=enable

Disable Drive Write Cache

/opt/hp/hpssacli/bin/hpssacli ctrl slot=0 modify dwc=disable

Erase Physical Drive

/opt/hp/hpssacli/bin/hpssacli ctrl slot=0 pd 2I:1:6 modify erase

Turn on Blink Physical Disk LED

/opt/hp/hpssacli/bin/hpssacli ctrl slot=0 ld 2 modify led=on

Turn off Blink Physical Disk LED

/opt/hp/hpssacli/bin/hpssacli ctrl slot=0 ld 2 modify led=off

Modify smart array cache read and write ratio (cacheratio=readratio/writeratio)

/opt/hp/hpssacli/bin/hpssacli ctrl slot=0 modify cacheratio=100/0

Enable smart array write cache when no battery is present (No-Battery Write Cache option)

/opt/hp/hpssacli/bin/hpssacli ctrl slot=0 modify nbwc=enable

Disable smart array cache for certain Logical Volume

/opt/hp/hpssacli/bin/hpssacli ctrl slot=0 logicaldrive 1 modify arrayaccelerator=disable

Enable smart array cache for certain Logical Volume

/opt/hp/hpssacli/bin/hpssacli ctrl slot=0 logicaldrive 1 modify arrayaccelerator=enable

Enable SSD Smart Path

/opt/hp/hpssacli/bin/hpssacli ctrl slot=0 array a modify ssdsmartpath=enable

Disable SSD Smart Path

/opt/hp/hpssacli/bin/hpssacli ctrl slot=0 array a modify ssdsmartpath=disable

Triển khai Network loadbalancing trên windows server

Mô hình:

10.144.139.17 và 10.144.139.18 là 2 máy windows (Chạy active directory). Mong muốn cần tạo IP VIP cho 2 con này, IP VIP là 10.144.139.25

Thử nghiệm với máy windows 10.144.141.190 kết nối tới VIP, firewall sử dụng là Juniper SRX 4100

Tiến hành cấu hình:

Tạo loadbalancing giữa 2 máy windows, cài đặt features: Network Load Balancing trên cả 2 máy

image003

image005

Đứng trên máy 10.144.139.17, Sau khi cài đặt, mở màn hình Network Load Balancing, nháy phải vào chọn new Cluster

image009

Nhập 10.144.139.17, bấm connect -> next -> Nhập VIP IP giữa 2 con: 10.144.139.25 và subnet tương ứng, kiểu  như này
image016
Internetname có thể ko cần, Cluster operation mode thì để Multicast. Nếu chọn unicast thì máy bị đứt kết nối khỏi mạng luôn. Sau đó next next tới hết

Quay lại màn hình Network Load Balancing, nháy phải vào cluster, chọn add Host, nhập thêm host 10.144.139.18 và làm tương tự.

Quay sang màn hình của Máy 10.144.139.18, Nháy phải, chọn connect to Existing

image009

Sau đó nhập IP 10.144.139.17 là xong.

Ping thử IP 10.144.139.25 trên cả 2 máy 17, 18 và 1 máy trong cùng mạng LAN đó thấy đã OK.

Tuy nhiên từ 10.144.141.190 vẫn chưa Ping được IP ảo mới tạo do SRX không học Mac của 10.144.139.25 này. Tiến hành cấu hình trên firewall SRX:

– ĐỨng từ 10.144.141.190 ping tới 10.144.139.25 thấy chưa thông, show trên firewall:

# run monitor traffic interface reth0.1561
verbose output suppressed, use <detail> or <extensive> for full protocol decode
Address resolution is ON. Use <no-resolve> to avoid any reverse lookup delay.
Address resolution timeout is 4s.
Listening on reth0.1561, capture size 96 bytes
01:54:24.337022  In arp who-has 10.144.139.25 tell 10.144.139.1
01:54:24.337254  In arp reply 10.144.139.25 (03:bf:0a:90:8b:19) is-at 03:bf:0a:90:8b:19
01:54:24.337256  In arp reply 10.144.139.25 (03:bf:0a:90:8b:19) is-at 03:bf:0a:90:8b:19

trong đó reth0.1561 là interface của dải 10.144.139.xxx, ta thấy MAC ảo của IP 25 là 03:bf:0a:90:8b:19
Khai báo trên SRX:

# set interfaces reth0.1561 family inet address 10.144.139.1/26 arp 10.144.139.25 multicast-mac 03:bf:0a:90:8b:19
# commit

Ping thử thấy  từ 190 đã thông tới 25
Done


Tổng hợp key vmware các thể loại

Key Vsphere hypervisor 6.7: Không giới hạn

JV425-4h100-vzhh8-q23np-3a9pp

Key VMware workstation 15

UZ3J8-D8F5M-M84LZ-W6WZZ-WP8T6
AZ5NK-4TGEJ-088PZ-96X5X-ZL2T4
VV510-AWYE1-M85QZ-NMYZG-QA8W6
ZG75A-4DY8K-489TQ-YQNZV-Y2UWA
CY7JA-2LZE4-480CQ-TDM7V-ZK8DF
YA75U-89XE4-08EQY-45WNT-NC890
YV5XR-0AG93-H845Q-DDZQC-M2KWF
AA1JR-0TX86-4847Y-JDQGV-YQKF8
ZA35K-FHX4Q-0848P-MGW5G-N28FD
YZ192-86X1N-H884Q-GWXEC-N7HV0
FZ5XU-40X0H-48EXP-DPYGT-MZKYA
YY3T0-42DEN-H88MZ-RDPEG-Y6RR0
AU75H-2EWE2-M85QQ-JXXNZ-MCHA4
FG3N0-FFD0P-0895Z-64P7C-XQRA2
GG1D8-4QXE1-481NY-C6XQX-Y3U9D
FU58K-2YX9J-M8ETZ-DWNEG-X7KAA
FF788-A1X86-08E9Q-5YN79-XV0YD
FC51U-43Z0L-H85TZ-NZQ5G-PZUW6

Key VMWare Workstation 16 Pro

ZF3R0-FHED2-M80TY-8QYGC-NPKYF
YF390-0HF8P-M81RQ-2DXQE-M2UT6
ZF71R-DMX85-08DQY-8YMNC-PPHV8

Key VMware Workstation 17 Pro

4U612-DN31H-MJEJ0-0V0Z4-978HD
5G44H-ACH50-0J4C9-1VC5P-CY0QD
JC000-8G047-MJDF1-0H3E6-8QR5F
JV2NU-0XL5N-0J4Q8-0T0E6-8GH56
JZ6E0-4R1E0-HJ1Q0-1R8NH-3AK28
0Z48K-4X29Q-MJE80-113GK-C7K3A
HF4H0-46K80-MJ8D9-1KAZP-CKK12
NY69H-2N05P-HJ170-1V1ZM-CG222
4C45A-D8J0H-HJ5T0-1T25H-92A76
0Z4H2-0WK9K-4JE10-0T9G6-9C8M4
5F0TK-A5J05-MJDU9-103ZP-2GUL0
HY0W0-8NK11-HJ4D8-02AE2-1GH54
JV4RK-4Y29N-MJ5F8-12CXP-8L836
5F4RU-D5351-4J8V1-0U2X2-06078
1Y2R0-AHJ9P-4J8L0-1997P-C3056
HZ0TA-DX280-0J0D0-00AZ2-8FA56
0Z4WU-AZ04L-0J919-1C9EK-9QALD
4U4JR-6ML9Q-4JDT0-0CAZ2-8CHQ8
HY492-4Q217-0JD48-021E0-8PH46
5U4HH-2Q053-MJE20-108ZP-CZ8Q6


Key Vcenter 6 standard

0F6PF-20K5L-9ZT01-7K956-03Q5V
HF61K-6511M-PZ8H0-2R270-13E7R
1V4T6-8R21Q-HZYF0-P1250-A2LLD
JY2D7-6904K-7ZA38-Y39G2-3344P


HF6MN-AHH83-7Z4Z0-8R8N0-C2KMU
HC2MT-4H3DH-9Z8R9-TV0Q4-9AT4Y
0C4XW-6N250-ZZWD0-ER056-CC0PQ
NY0GT-8W395-HZD89-AU050-0AAL6
JY2K5-8MJ9P-CZPZ1-8AA5K-934KG

J563P-FC15L-6839A-0T8H0-8RA44

VMware vSphere ESXi 7.0 Enterprise Plus key

JJ2WR-25L9P-H71A8-6J20P-C0K3F
HN2X0-0DH5M-M78Q1-780HH-CN214
JH09A-2YL84-M7EC8-FL0K2-3N2J2

VMware vCenter 7.0 Standard

104HH-D4343-07879-MV08K-2D2H2
410NA-DW28H-H74K1-ZK882-948L4
406DK-FWHEH-075K8-XAC06-0JH08

VMware vSphere 7 Enterprise Plus

JH09A-2YL84-M7EC8-FL0K2-3N2J2
JJ2WR-25L9P-H71A8-6J20P-C0K3F
HN2X0-0DH5M-M78Q1-780HH-CN214
5F64H-4PLD6-488D9-1J07M-0Q266

VMware vSphere 7 Enterprise Plus with Add-on for Kubernetes

4Y28A-FV213-488Q8-202E6-1P024
0G0X0-DL29M-489T1-0C3GK-1Z2J6

=======================================

Key vSphere 8 Enterprise Plus, ESXi 8:

HG00K-03H8K-48929-8K1NP-3LUJ4
4F40H-4ML1K-M89U0-0C2N4-1AKL4


VYLWZ-ZHZPX-D1WAT-FAJTN-YLQ9X
VKZQV-CFZYX-D1VWH-ZZVZZ-ZPXXV
N5ZP8-G4WLZ-K1RH4-HY6QX-RGQNX
NNEWR-62WQE-D1VZH-XVYLX-VC7EZ

Key vCenter 8 Standard:

4F282-0MLD2-M8869-T89G0-CF240
0F41K-0MJ4H-M88U1-0C3N0-0A214
ZF3R0-FHED2-M80TY-8QYGC-NPKYF
YF390-0HF8P-M81RQ-2DXQE-M2UT6
ZF71R-DMX85-08DQY-8YMNC-PPHV8

vSAN 8 Enterprise Plus:

MG292-08L9K-48078-KJ372-27K20

vSphere 8 Enterprise Plus with Add-on for Kubernetes

NZ49H-001D2-080C0-R2272-96H10

Tanzu Standard (Subscription):

MC682-4JK00-M8908-0LAN4-068J0
NSX Firewall with Advanced Threat Prevention:
NC69K-4L040-M81T0-W98ZK-AFA40
HG40K-0Y1E0-M80D0-0J9ZM-8UH60

NSX Data Center Distributed Threat Prevention:
FV3E0-2WF1N-488NP-XFXN9-ZU0R2

NSX Advanced Threat Prevention:
HG40K-0Y1E0-M80D0-0J9ZM-8UH6


Cấu hình portchannel giữa switch cisco và Esxi 6.7

Mô hình:
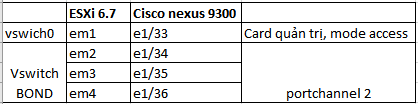
Cấu hình trên swich:

conf t
interface port-channel2
switchport
switchport mode trunk
conf t
int e1/34-36
switchport
switchport mode trunk
channel-group 2 mode on

Cấu hình trên ESXi, tạo Vswitch mới tên BOND, add 3 uplink em2-4 cho vswitch này
Bấm chọn networking ->Virtual switches -> Add standard virtual switch

vSwitch Name = BOND
security policy:
Allow promiscuous mode Yes
Allow forged transmits Yes
Allow MAC changes Yes

NIC teaming policy:
Notify switches Yes
Policy Route based on IP hash
Reverse policy Yes
Failback Yes


Khai báo portgroup cho mỗi vlan cần sử dụng, ví dụ ở đây khai báo vlan 1583. Chúng ta truy cập tab portgroup, add portgroup
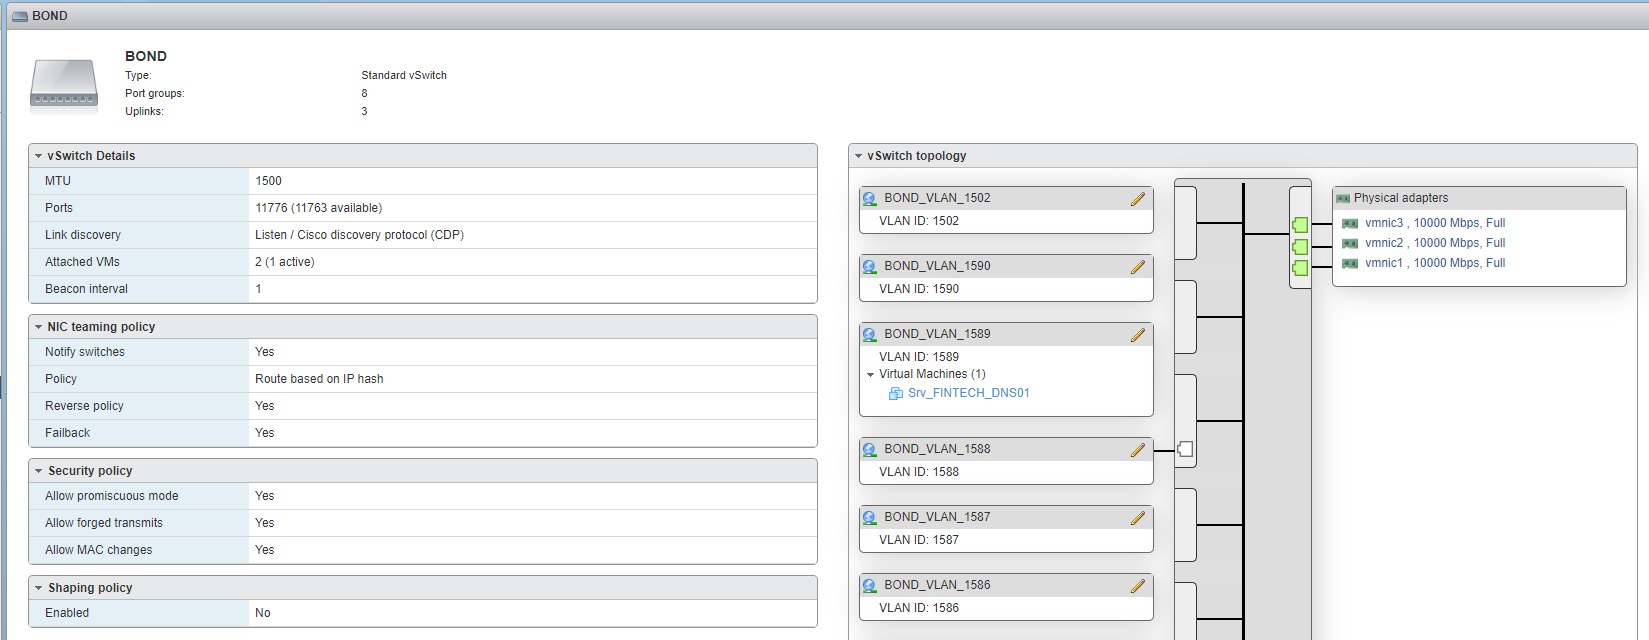
Sau đó sử dụng portgroup này trong các giao diện thêm, sửa network card của máy ảo.

Bên lề: etherchannel của switch cisco có hỗ trợ các giao thức như LACP , PAgP . Tuy nhiên ESXI ko tương thích với 2 món đó, dòng channel-group 2 mode on trên switch để khai báo giao thức động, kệ 2 thằng device thương lượng với nhau. Theo vmware, họ chỉ hỗ trợ LACP khi kết nối với Distributed switch.

Note build zabbix từ source

Download zabbix từ trang chủ: https://www.zabbix.com/download_sources

– Giải nén
– Cài đặt gói cần thiết:

yum install gcc mysql-devel libxml2-devel net-snmp-devel curl-devel unixODBC-devel OpenIPMI-devel libssh2-devel iksemel-devel openldap-devel libevent-devel pcre-devel

– Cài đặt java
– configure

./configure --enable-server --enable-agent --enable-proxy --enable-java --with-mysql --enable-ipv6 --with-net-snmp --with-libcurl --with-libxml2 --with-openipmi --with-unixodbc --with-ssh2 --with-ldap --with-libpcre
make install

Output các file build đc nằm ở /sbin/local/

Một số trick:
– Mặc định timeout giữa server và agent, giữa agent và script external check chỉ tối đa 30s. Có thể tăng con số này lên bằng cách sửa lại source của zabbix sau đó thay đè file binary build được vào máy chủ đã cài trước đó:
Timeout server: Sửa timeout trong file server.c

Cài đặt gcc mới nhất từ source trên centos 7

Mặc định cài từ yum của centos 7 chỉ có gcc 4.8.5. Khá là cũ, các software mới như redis yêu cầu tối thiểu phải 4.9 mới buld được. Cách cài đặt gcc mới hơn như sau:

Tìm source từ trang chủ: https://gcc.gnu.org/mirrors.html
Tìm được  1 repo cảm thấy gần mình nhất sau đó truy cập vào, lấy ra link release, wget về là OK, ở đây là link:

wget http://ftp.tsukuba.wide.ad.jp/software/gcc/releases/gcc-10.1.0/gcc-10.1.0.tar.gz

Giải nén sau đó tiến hành cài đặt:

yum -y install bzip2 wget gcc gcc-c++ gmp-devel mpfr-devel libmpc-devel make
wget http://ftp.tsukuba.wide.ad.jp/software/gcc/releases/gcc-10.1.0/gcc-10.1.0.tar.gz
tar xzvf gcc-10.1.0.tar.gz
cd gcc-10.1.0
./configure --enable-languages=c,c++ --disable-multilib
make -j$(nproc)
make install

Sau khi make install tiến hành khai báo

export PATH=/usr/local/bin:$PATH
export LD_LIBRARY_PATH=/usr/local/lib64:$LD_LIBRARY_PATH
cat <<EOF >  /etc/profile.d/gcc10.sh
export PATH=/usr/local/bin:$PATH
export LD_LIBRARY_PATH=/usr/local/lib64:$LD_LIBRARY_PATH
EOF

test lại output thế này là OK

[root@redis1 redis-6.0.1]# gcc -v
Using built-in specs.
COLLECT_GCC=gcc
COLLECT_LTO_WRAPPER=/usr/local/libexec/gcc/x86_64-pc-linux-gnu/10.1.0/lto-wrapper
Target: x86_64-pc-linux-gnu
Configured with: ./configure --enable-languages=c,c++ --disable-multilib
Thread model: posix
Supported LTO compression algorithms: zlib
gcc version 10.1.0 (GCC)
[root@redis1 redis-6.0.1]#


Xử lý lỗi Memory limit doesn’t accept the negative value trên giao diện web vmware vsphere

Screen Shot 2017-08-17 at 01.04.34.png

Khi sử dụng vmware vsphere trên firefox thường có những lỗi vặt  như thế này rất khó chịu. Nguyên  nhân do bug của bản ESXi Embedded Host Client 1.8.0
Để khắc phục cần update patch cho thằng này.
Cách làm như sau:
– Download vib patch về.
– Sử dụng winscp, copy file vừa down lên host ESXi (ESXi sẽ cần enable SSH để làm được việc này)
– Cài đặt:

esxcli software vib install -v esxui-signed-12086396.vib

nếu báo lỗi xung đột với ghettovcb thì remove ghettovcb

[root@nola:/tmp] esxcli software vib install -v esxui-signed-12086396.vib
 [DependencyError]
 VIB virtuallyGhetto_bootbank_ghettoVCB_1.0.0-0.0.0's acceptance level is community, which is not compliant with the ImageProfile acceptance level partner
 VIB virtuallyGhetto_bootbank_ghettoVCB_1.0.0-0.0.0 violates extensibility rule checks: ['(line 24: col 0) Element vib failed to validate content']
 To change the host acceptance level, use the 'esxcli software acceptance set' command.
 Please refer to the log file for more details.
[root@nola:/tmp]  esxcli software vib remove -n ghettoVCB
Removal Result
   Message: Operation finished successfully.
   Reboot Required: false
   VIBs Installed:
   VIBs Removed: virtuallyGhetto_bootbank_ghettoVCB_1.0.0-0.0.0
   VIBs Skipped:
[root@nola:/tmp] esxcli software acceptance set --level=CommunitySupported
Host acceptance level changed to 'CommunitySupported'.
[root@nola:/tmp] esxcli software vib install -v esxui-signed-12086396.vib
Installation Result
   Message: Operation finished successfully.
   Reboot Required: false
   VIBs Installed: VMware_bootbank_esx-ui_1.33.1-12086396
   VIBs Removed: VMware_bootbank_esx-ui_1.8.0-4516221
   VIBs Skipped:
[root@nola:/tmp]


Fix lỗi thời gian bị thay đổi do cài song song ubuntu và windows

Đối với những ai cài song song 2 hệ điều hành windows và ubuntu chắc hẳn đều sẽ gặp lỗi time của máy bị thay đổi sau khi chuyển qua lại giữa 2 hệ điều hành, mỗi lần thế phải tự chỉnh lại rất khó chịu.

Nguyên nhân do Ubuntu maintain hardware clock ở giờ UTC, còn windows cũng maintain hardware clock nhưng với localtime.

Cách fix có 2 cách:

  • Bắt ubuntu sử dụng localtime như windows.
  • Bắt windows sử dụng utc time như ubuntu.

Cách 1 – Bắt ubuntu sử dụng localtime như windows
Có thể edit file /etc/default/rcS hoặc chạy lệnh

timedatectl set-local-rtc 1 --adjust-system-clock

Check lại

timedatectl


Cách 2 – Bắt windows sử dụng utc time như ubuntu.

Mở windows CMD với quyền admin:

Reg add HKLM\SYSTEM\CurrentControlSet\Control\TimeZoneInformation /v RealTimeIsUniversal /t REG_DWORD /d 1
Reg add HKLM\SYSTEM\CurrentControlSet\Control\TimeZoneInformation /v RealTimeIsUniversal /t REG_QWORD /d 1


Thêm disk cho LVM

Ngày mua máy chủ, sếp bảo: cty ta nghèo đói rách nát, đợt này mua máy chủ, k đủ tiền mua con ổ to, anh em chịu khó, mai mốt có lãi ta mua thêm ổ nữa cắm vào. Lúc ấy thằng éo nào cũng gật gù, đành chịu chứ làm sao, sếp k có tiền chả lẽ cả lũ thích sếp trừ lương lấy tiền mua ổ cứng.
Dùng được một thời gian, cuối cùng ngày đó cũng tới. Sếp cho thêm con ổ nữa , nhưng khốn nạn là con máy chủ đang chạy, có cách nào nới rộng ra mà không ảnh hưởng gì không?
May thay, hồi xưa cài máy, anh em khôn nên cài lvm, mà mặc định cài centos 7 nó đã có lvm rồi, giờ chỉ add disk vào resize là được. Dưới đây, chúng ta sẽ làm điều đó:

Môi trường gốc:

OS: Centos 7
mount point / dung lượng 5GB
Add thêm ổ mới 10GB
-> mục tiêu có / = 15GB

Layout đĩa ban đầu

[root@localhost ~]# df -h
Filesystem                     Size  Used Avail Use% Mounted on
/dev/mapper/volumegroup1-root  4.5G  1.6G  3.0G  34% /
devtmpfs                       980M     0  980M   0% /dev
tmpfs                          992M     0  992M   0% /dev/shm
tmpfs                          992M  9.6M  982M   1% /run
tmpfs                          992M     0  992M   0% /sys/fs/cgroup
/dev/sda1                      477M  100M  348M  23% /boot
tmpfs                          199M     0  199M   0% /run/user/0
/dev/sdb1                      4.8G   20M  4.6G   1% /data
[root@localhost ~]# lsblk
NAME                  MAJ:MIN RM  SIZE RO TYPE MOUNTPOINT
sda                     8:0    0    5G  0 disk
├─sda1                  8:1    0  500M  0 part /boot
└─sda2                  8:2    0  4.5G  0 part
  └─volumegroup1-root 253:0    0  4.5G  0 lvm  /
sdb                     8:16   0    5G  0 disk
└─sdb1                  8:17   0    5G  0 part /data
sr0                    11:0    1 1024M  0 rom

Thấy thằng / có type lvm.
Những thằng type là part thì chỉ có nước tắt máy, resize bằng các tool như Gparted, ở đây, chúng tôi không làm thế.
Tiến hành cắm thêm đĩa mới vào máy, nếu là máy ảo thì add thêm disk, nếu là máy vật lý thì cắm disk vào rồi tạo raid, cách làm thì mỗi case mỗi khác, nằm ngoài khuôn khổ bài viết này. Chúng ta skip, nhảy tới bước đã cắm ổ vào OK. Tiến hành refresh lại để centos nhận ra ổ đĩa mới:

echo "- - -" > /sys/class/scsi_host/host0/scan
echo "- - -" > /sys/class/scsi_host/host1/scan
echo "- - -" > /sys/class/scsi_host/host2/scan

sau đó check lại ổ đĩa

[root@localhost ~]# fdisk -l

Disk /dev/sda: 5368 MB, 5368709120 bytes, 10485760 sectors
Units = sectors of 1 * 512 = 512 bytes
Sector size (logical/physical): 512 bytes / 512 bytes
I/O size (minimum/optimal): 512 bytes / 512 bytes
Disk label type: dos
Disk identifier: 0x00013f52

   Device Boot      Start         End      Blocks   Id  System
/dev/sda1   *        2048     1026047      512000   83  Linux
/dev/sda2         1026048    10485759     4729856   8e  Linux LVM

Disk /dev/sdb: 5368 MB, 5368709120 bytes, 10485760 sectors
Units = sectors of 1 * 512 = 512 bytes
Sector size (logical/physical): 512 bytes / 512 bytes
I/O size (minimum/optimal): 512 bytes / 512 bytes
Disk label type: dos
Disk identifier: 0x6ed73018

   Device Boot      Start         End      Blocks   Id  System
/dev/sdb1            2048    10485759     5241856   8e  Linux LVM

Disk /dev/mapper/volumegroup1-root: 4840 MB, 4840226816 bytes, 9453568 sectors
Units = sectors of 1 * 512 = 512 bytes
Sector size (logical/physical): 512 bytes / 512 bytes
I/O size (minimum/optimal): 512 bytes / 512 bytes


Disk /dev/sdc: 10.7 GB, 10737418240 bytes, 20971520 sectors
Units = sectors of 1 * 512 = 512 bytes
Sector size (logical/physical): 512 bytes / 512 bytes
I/O size (minimum/optimal): 512 bytes / 512 bytes

Thấy ổ sdc mới xuất hiện. Nếu không xuất hiện thì các bạn check trong /sys/class/scsi_host/ xem còn host nào thì lặp lại bước echo ở trên.
Tiến hành tạo partition mới với type 8e, linux LVM

[root@localhost ~]# fdisk /dev/sdc
Welcome to fdisk (util-linux 2.23.2).

Changes will remain in memory only, until you decide to write them.
Be careful before using the write command.

Device does not contain a recognized partition table
Building a new DOS disklabel with disk identifier 0x03cec27c.

Command (m for help): m
Command action
   a   toggle a bootable flag
   b   edit bsd disklabel
   c   toggle the dos compatibility flag
   d   delete a partition
   g   create a new empty GPT partition table
   G   create an IRIX (SGI) partition table
   l   list known partition types
   m   print this menu
   n   add a new partition
   o   create a new empty DOS partition table
   p   print the partition table
   q   quit without saving changes
   s   create a new empty Sun disklabel
   t   change a partition's system id
   u   change display/entry units
   v   verify the partition table
   w   write table to disk and exit
   x   extra functionality (experts only)

Command (m for help):

Chọn n để add partition mới, sau đó chọn p để tạo primary partition, tiếp theo nhập 1,

Command (m for help): n
Partition type:
   p   primary (0 primary, 0 extended, 4 free)
   e   extended
Select (default p): p
Partition number (1-4, default 1): 1
First sector (2048-20971519, default 2048):
Using default value 2048
Last sector, +sectors or +size{K,M,G} (2048-20971519, default 20971519):
Using default value 20971519
Partition 1 of type Linux and of size 10 GiB is set

Command (m for help): t
Selected partition 1
Hex code (type L to list all codes): 8e
Changed type of partition 'Linux' to 'Linux LVM'

Command (m for help): w
The partition table has been altered!

Calling ioctl() to re-read partition table.
Syncing disks.
[root@localhost ~]#

Fdisk -l lần nữa sẽ thấy sdc mới đã được partition, với phân vùng sdc1

[root@localhost ~]# fdisk -l

Disk /dev/sda: 5368 MB, 5368709120 bytes, 10485760 sectors
Units = sectors of 1 * 512 = 512 bytes
Sector size (logical/physical): 512 bytes / 512 bytes
I/O size (minimum/optimal): 512 bytes / 512 bytes
Disk label type: dos
Disk identifier: 0x00013f52

   Device Boot      Start         End      Blocks   Id  System
/dev/sda1   *        2048     1026047      512000   83  Linux
/dev/sda2         1026048    10485759     4729856   8e  Linux LVM

Disk /dev/sdb: 5368 MB, 5368709120 bytes, 10485760 sectors
Units = sectors of 1 * 512 = 512 bytes
Sector size (logical/physical): 512 bytes / 512 bytes
I/O size (minimum/optimal): 512 bytes / 512 bytes
Disk label type: dos
Disk identifier: 0x6ed73018

   Device Boot      Start         End      Blocks   Id  System
/dev/sdb1            2048    10485759     5241856   8e  Linux LVM

Disk /dev/mapper/volumegroup1-root: 4840 MB, 4840226816 bytes, 9453568 sectors
Units = sectors of 1 * 512 = 512 bytes
Sector size (logical/physical): 512 bytes / 512 bytes
I/O size (minimum/optimal): 512 bytes / 512 bytes


Disk /dev/sdc: 10.7 GB, 10737418240 bytes, 20971520 sectors
Units = sectors of 1 * 512 = 512 bytes
Sector size (logical/physical): 512 bytes / 512 bytes
I/O size (minimum/optimal): 512 bytes / 512 bytes
Disk label type: dos
Disk identifier: 0x03cec27c

   Device Boot      Start         End      Blocks   Id  System
/dev/sdc1            2048    20971519    10484736   8e  Linux LVM
[root@localhost ~]#

Tạo physical volume mới cho sdc1

[root@localhost ~]# pvcreate /dev/sdc1
  Physical volume "/dev/sdc1" successfully created.
[root@localhost ~]#

Check lại thông tin LVM của máy

[root@localhost ~]# vgdisplay
  --- Volume group ---
  VG Name               volumegroup1
  System ID
  Format                lvm2
  Metadata Areas        1
  Metadata Sequence No  2
  VG Access             read/write
  VG Status             resizable
  MAX LV                0
  Cur LV                1
  Open LV               1
  Max PV                0
  Cur PV                1
  Act PV                1
  VG Size               <4.51 GiB
  PE Size               4.00 MiB
  Total PE              1154
  Alloc PE / Size       1154 / <4.51 GiB
  Free  PE / Size       0 / 0
  VG UUID               oRu742-MhoW-MJMV-uS8e-FHXV-yNor-Gb7N85

Quan tâm tới VG Name, ở đây là volumegroup1
Add thêm sdc1 ở trên vào volumegroup1

[root@localhost ~]# vgextend volumegroup1 /dev/sdc1
  Volume group "volumegroup1" successfully extended
[root@localhost ~]#

Chạy pvscan để confirm lại, ta thấy cả 2 ổ cũ và mới

[root@localhost ~]# pvscan
  PV /dev/sda2   VG volumegroup1    lvm2 [<4.51 GiB / 0    free]
  PV /dev/sdc1   VG volumegroup1    lvm2 [<10.00 GiB / <10.00 GiB free]
  Total: 2 [14.50 GiB] / in use: 2 [14.50 GiB] / in no VG: 0 [0   ]
[root@localhost ~]#

Tiếp theo chúng ta check lại thông tin của logical volume

[root@localhost ~]# lvdisplay
  --- Logical volume ---
  LV Path                /dev/volumegroup1/root
  LV Name                root
  VG Name                volumegroup1
  LV UUID                ES1sxH-Fqpj-eVFl-bsNm-6SRg-P7pl-9dOq9P
  LV Write Access        read/write
  LV Creation host, time localhost, 2020-04-08 15:55:13 +0700
  LV Status              available
  # open                 1
  LV Size                <4.51 GiB
  Current LE             1154
  Segments               1
  Allocation             inherit
  Read ahead sectors     auto
  - currently set to     8192
  Block device           253:0

[root@localhost ~]#

Quan tâm tới LV Path và LV Name

Exten logical volume, add sdc1 ở trên vào LV Path.

[root@localhost ~]# lvextend /dev/volumegroup1/root /dev/sdc1
  Size of logical volume volumegroup1/root changed from <4.51 GiB (1154 extents) to 14.50 GiB (3713 extents).
  Logical volume volumegroup1/root successfully resized.
[root@localhost ~]#

Tuy nhiên, nếu df -h, chúng ta sẽ thấy y nguyên, chưa có sự thay đổi nào cả:

[root@localhost ~]# df -h
Filesystem                     Size  Used Avail Use% Mounted on
/dev/mapper/volumegroup1-root  4.5G  1.6G  3.0G  34% /
devtmpfs                       980M     0  980M   0% /dev
tmpfs                          992M     0  992M   0% /dev/shm
tmpfs                          992M  9.6M  982M   1% /run
tmpfs                          992M     0  992M   0% /sys/fs/cgroup
/dev/sda1                      477M  100M  348M  23% /boot
tmpfs                          199M     0  199M   0% /run/user/0
/dev/sdb1                      4.8G   20M  4.6G   1% /data

Việc tiếp theo để có thể sử dụng được phần dung lượng mới thêm vào đó là resize lại file system.
nãy giờ resize cho / nên kiểm tra lại xem thằng này đang được mount dưới định dạng nào. gõ lệnh mount

[root@localhost ~]# mount
sysfs on /sys type sysfs (rw,nosuid,nodev,noexec,relatime,seclabel)
proc on /proc type proc (rw,nosuid,nodev,noexec,relatime)
devtmpfs on /dev type devtmpfs (rw,nosuid,seclabel,size=1002592k,nr_inodes=250648,mode=755)
securityfs on /sys/kernel/security type securityfs (rw,nosuid,nodev,noexec,relatime)
tmpfs on /dev/shm type tmpfs (rw,nosuid,nodev,seclabel)
devpts on /dev/pts type devpts (rw,nosuid,noexec,relatime,seclabel,gid=5,mode=620,ptmxmode=000)
tmpfs on /run type tmpfs (rw,nosuid,nodev,seclabel,mode=755)
tmpfs on /sys/fs/cgroup type tmpfs (ro,nosuid,nodev,noexec,seclabel,mode=755)
cgroup on /sys/fs/cgroup/systemd type cgroup (rw,nosuid,nodev,noexec,relatime,seclabel,xattr,release_agent=/usr/lib/systemd/systemd-cgroups-agent,name=systemd)
pstore on /sys/fs/pstore type pstore (rw,nosuid,nodev,noexec,relatime)
cgroup on /sys/fs/cgroup/devices type cgroup (rw,nosuid,nodev,noexec,relatime,seclabel,devices)
cgroup on /sys/fs/cgroup/cpu,cpuacct type cgroup (rw,nosuid,nodev,noexec,relatime,seclabel,cpuacct,cpu)
cgroup on /sys/fs/cgroup/cpuset type cgroup (rw,nosuid,nodev,noexec,relatime,seclabel,cpuset)
cgroup on /sys/fs/cgroup/hugetlb type cgroup (rw,nosuid,nodev,noexec,relatime,seclabel,hugetlb)
cgroup on /sys/fs/cgroup/blkio type cgroup (rw,nosuid,nodev,noexec,relatime,seclabel,blkio)
cgroup on /sys/fs/cgroup/memory type cgroup (rw,nosuid,nodev,noexec,relatime,seclabel,memory)
cgroup on /sys/fs/cgroup/pids type cgroup (rw,nosuid,nodev,noexec,relatime,seclabel,pids)
cgroup on /sys/fs/cgroup/net_cls,net_prio type cgroup (rw,nosuid,nodev,noexec,relatime,seclabel,net_prio,net_cls)
cgroup on /sys/fs/cgroup/freezer type cgroup (rw,nosuid,nodev,noexec,relatime,seclabel,freezer)
cgroup on /sys/fs/cgroup/perf_event type cgroup (rw,nosuid,nodev,noexec,relatime,seclabel,perf_event)
configfs on /sys/kernel/config type configfs (rw,relatime)
/dev/mapper/volumegroup1-root on / type xfs (rw,relatime,seclabel,attr2,inode64,noquota)
selinuxfs on /sys/fs/selinux type selinuxfs (rw,relatime)
systemd-1 on /proc/sys/fs/binfmt_misc type autofs (rw,relatime,fd=31,pgrp=1,timeout=0,minproto=5,maxproto=5,direct,pipe_ino=14970)
mqueue on /dev/mqueue type mqueue (rw,relatime,seclabel)
debugfs on /sys/kernel/debug type debugfs (rw,relatime)
hugetlbfs on /dev/hugepages type hugetlbfs (rw,relatime,seclabel)
/dev/sda1 on /boot type ext4 (rw,relatime,seclabel,data=ordered)
tmpfs on /run/user/0 type tmpfs (rw,nosuid,nodev,relatime,seclabel,size=203020k,mode=700)
/dev/sdb1 on /data type ext4 (rw,relatime,seclabel,data=ordered)

Để ý thấy dòng
/dev/mapper/volumegroup1-root on / type xfs (rw,relatime,seclabel,attr2,inode64,noquota)
Định dạng là xfs, chúng ta chạy lệnh sau:

[root@localhost ~]# xfs_growfs /dev/volumegroup1/root
meta-data=/dev/mapper/volumegroup1-root isize=512    agcount=4, agsize=295424 blks
         =                       sectsz=512   attr=2, projid32bit=1
         =                       crc=1        finobt=0 spinodes=0
data     =                       bsize=4096   blocks=1181696, imaxpct=25
         =                       sunit=0      swidth=0 blks
naming   =version 2              bsize=4096   ascii-ci=0 ftype=1
log      =internal               bsize=4096   blocks=2560, version=2
         =                       sectsz=512   sunit=0 blks, lazy-count=1
realtime =none                   extsz=4096   blocks=0, rtextents=0
data blocks changed from 1181696 to 3802112

Với /dev/volumegroup1/root chính là LV Path đã extent ở trên.
Nếu / được mount với định dang ext2,3,4 gì đó thì chúng ta chạy lệnh:

resize2fs /dev/volumegroup1/root

Check lại df -h

[root@localhost ~]# df -h
Filesystem                     Size  Used Avail Use% Mounted on
/dev/mapper/volumegroup1-root   15G  1.6G   13G  11% /
devtmpfs                       980M     0  980M   0% /dev
tmpfs                          992M     0  992M   0% /dev/shm
tmpfs                          992M  9.6M  982M   1% /run
tmpfs                          992M     0  992M   0% /sys/fs/cgroup
/dev/sda1                      477M  100M  348M  23% /boot
tmpfs                          199M     0  199M   0% /run/user/0
/dev/sdb1                      4.8G   20M  4.6G   1% /data

Đã thấy thêm được chục GB, ứng dụng vẫn chạy như chưa hề có cuộc chia ly.


Notice: ob_end_flush(): failed to send buffer of zlib output compression (0) in /home/devopsvn/public_html/wp-includes/functions.php on line 5427