Xử lý lỗi trên ubuntu dh key too small

Khi gọi http request trên ubuntu, ở đây là ubuntu 20 thì hay gặp lỗi
curl: (35) error:141A318A:SSL routines:tls_process_ske_dhe:dh key too small
(các ngôn ngữ khác như java, python báo lỗi tương tự)
Cách fix:
Sửa file /etc/ssl/openssl.cnf
Thêm vào đầu file

openssl_conf = default_conf

Thêm vào cuối file

[default_conf]
ssl_conf = ssl_sect

[ssl_sect]
system_default = system_default_sect

[system_default_sect]
CipherString = DEFAULT:@SECLEVEL=1

Thế là xong

[Ubuntu 20.04] Xử lý /var/log/journal/ quá lớn

Một ngày đẹp trời rà soát máy chủ, hệ điều hành ubuntu 20 và thấy thư mục /var/log/journal/ to tổ chảng

root@mefin-ntl-rke-03:/var/log/journal/c27b494019ba448580a9cc1dce75e9c6# ll -h
total 4.1G
drwxr-sr-x+ 2 root systemd-journal 4.0K Apr 19 09:04  ./
drwxr-sr-x+ 3 root systemd-journal 4.0K Dec 25 03:57  ../
-rw-r-----+ 1 root systemd-journal 128M Jan 17 18:59 'system@16ca61f2092a4b948aef42e48d42a204-000000000016a25b-0005b8db6105890b.journal'
-rw-r-----+ 1 root systemd-journal 128M Jan 20 19:41 'system@16ca61f2092a4b948aef42e48d42a204-000000000019cff5-0005b91758244858.journal'
-rw-r-----+ 1 root systemd-journal  96M Jan 22 10:13 'system@16ca61f2092a4b948aef42e48d42a204-00000000001d04e2-0005b954467d0756.journal'
-rw-r-----+ 1 root systemd-journal 128M Jan 25 10:14 'system@16ca61f2092a4b948aef42e48d42a204-00000000001eb945-0005b97492f226fb.journal'
-rw-r-----+ 1 root systemd-journal 128M Jan 28 09:13 'system@16ca61f2092a4b948aef42e48d42a204-000000000021e99d-0005b9b0ef1f24bf.journal'
-rw-r-----+ 1 root systemd-journal 128M Jan 31 09:43 'system@16ca61f2092a4b948aef42e48d42a204-00000000002512a1-0005b9ec6d5a71fd.journal'
-rw-r-----+ 1 root systemd-journal 128M Feb  3 08:59 'system@16ca61f2092a4b948aef42e48d42a204-0000000000284669-0005ba2935649832.journal'
-rw-r-----+ 1 root systemd-journal 128M Feb  6 09:26 'system@16ca61f2092a4b948aef42e48d42a204-00000000002b714f-0005ba64eef8ba89.journal'
-rw-r-----+ 1 root systemd-journal 128M Feb  9 10:04 'system@16ca61f2092a4b948aef42e48d42a204-00000000002ea4a7-0005baa1a94c7b25.journal'
-rw-r-----+ 1 root systemd-journal 128M Feb 12 10:41 'system@16ca61f2092a4b948aef42e48d42a204-000000000031d940-0005bade8af14a24.journal'
-rw-r-----+ 1 root systemd-journal 128M Feb 15 11:28 'system@16ca61f2092a4b948aef42e48d42a204-0000000000350db4-0005bb1b67cc8363.journal'
-rw-r-----+ 1 root systemd-journal 128M Feb 18 12:12 'system@16ca61f2092a4b948aef42e48d42a204-0000000000384357-0005bb586b233c8e.journal'
-rw-r-----+ 1 root systemd-journal 128M Feb 21 12:51 'system@16ca61f2092a4b948aef42e48d42a204-00000000003b7884-0005bb9561602aa0.journal'
-rw-r-----+ 1 root systemd-journal 128M Feb 24 13:24 'system@16ca61f2092a4b948aef42e48d42a204-00000000003ead3f-0005bbd2472c1033.journal'
-rw-r-----+ 1 root systemd-journal 128M Feb 27 14:00 'system@16ca61f2092a4b948aef42e48d42a204-000000000041e12c-0005bc0f151bf192.journal'
-rw-r-----+ 1 root systemd-journal 128M Mar  2 14:22 'system@16ca61f2092a4b948aef42e48d42a204-00000000004516a6-0005bc4befd2240e.journal'
-rw-r-----+ 1 root systemd-journal 128M Mar  5 15:01 'system@16ca61f2092a4b948aef42e48d42a204-0000000000484968-0005bc8897dc0e69.journal'
-rw-r-----+ 1 root systemd-journal 128M Mar  8 15:52 'system@16ca61f2092a4b948aef42e48d42a204-00000000004b7dfa-0005bcc57c237e46.journal'
-rw-r-----+ 1 root systemd-journal 128M Mar 11 16:31 'system@16ca61f2092a4b948aef42e48d42a204-00000000004eb422-0005bd028f33fd7d.journal'
-rw-r-----+ 1 root systemd-journal 128M Mar 14 17:15 'system@16ca61f2092a4b948aef42e48d42a204-000000000051e8c9-0005bd3f71effd5c.journal'
-rw-r-----+ 1 root systemd-journal 128M Mar 17 17:27 'system@16ca61f2092a4b948aef42e48d42a204-0000000000551e1c-0005bd7c6ab93047.journal'
-rw-r-----+ 1 root systemd-journal 128M Mar 20 12:30 'system@16ca61f2092a4b948aef42e48d42a204-0000000000584ff3-0005bdb8ef2a619b.journal'
-rw-r-----+ 1 root systemd-journal 128M Mar 23 11:36 'system@16ca61f2092a4b948aef42e48d42a204-00000000005b5d6c-0005bdf1212af3ec.journal'
-rw-r-----+ 1 root systemd-journal 128M Mar 26 11:00 'system@16ca61f2092a4b948aef42e48d42a204-00000000005e8698-0005be2cbb27a4e8.journal'
-rw-r-----+ 1 root systemd-journal 128M Mar 29 10:58 'system@16ca61f2092a4b948aef42e48d42a204-000000000061b1d7-0005be68910b83e8.journal'
-rw-r-----+ 1 root systemd-journal 128M Apr  1 10:57 'system@16ca61f2092a4b948aef42e48d42a204-000000000064e13a-0005bea4e5b125de.journal'
-rw-r-----+ 1 root systemd-journal 128M Apr  4 10:49 'system@16ca61f2092a4b948aef42e48d42a204-000000000068105c-0005bee13c8b5363.journal'
-rw-r-----+ 1 root systemd-journal 128M Apr  7 10:36 'system@16ca61f2092a4b948aef42e48d42a204-00000000006b3e96-0005bf1d7697c73e.journal'
-rw-r-----+ 1 root systemd-journal 128M Apr 10 10:26 'system@16ca61f2092a4b948aef42e48d42a204-00000000006e6c4d-0005bf59a16d76d4.journal'
-rw-r-----+ 1 root systemd-journal 128M Apr 13 10:27 'system@16ca61f2092a4b948aef42e48d42a204-0000000000719a63-0005bf95d9ad57ee.journal'
-rw-r-----+ 1 root systemd-journal 128M Apr 16 08:25 'system@16ca61f2092a4b948aef42e48d42a204-000000000074ca08-0005bfd237815e30.journal'
-rw-r-----+ 1 root systemd-journal 128M Apr 19 09:04 'system@16ca61f2092a4b948aef42e48d42a204-000000000077ec2e-0005c00cdc182970.journal'
-rw-r-----+ 1 root systemd-journal  32M Apr 19 20:13  system.journal
root@mefin-ntl-rke-03:/var/log/journal/c27b494019ba448580a9cc1dce75e9c6#

Những log  này do systemd sinh ra, có thể được đọc bởi journalctl, Mỗi khi có sự kiện gì xảy ra, systemd sẽ ghi lại nhật ký vào đây, phòng khi thằng quản trị rảnh háng muốn tìm hiểu. Tuy nhiên, mọi tiện ích đều phải trả giá, cái giá phải trả cho việc này là tốn ổ cứng vcl. Không phải máy chủ nào cũng rảnh rang vài trăm GB hay vài TB để thoải mái lưu trữ bất cứ thứ gì mình thích, lúc này, mấy thằng SA nghèo khổ lại phải vắt óc ra mà cấu hình tối ưu lại cho tiết kiệm, tiền ít thì đừng hít cái gì thơm quá.

Cách xử lý folder này như sau:
– Với những ông không có nhu cầu đọc cái này, xử lý nhanh thì có thể xoá sạch file trong folder này đi, tuy nhiên đừng xoá thư mục.
– Với những ông thích cấu hình tối ưu, đỡ phải thi thoảng đi xử lý ba cái sự vụ này:
Cấu hình lại file /etc/systemd/journald.conf, nội dung mặc định như này:

#  This file is part of systemd.
# 
#  systemd is free software; you can redistribute it and/or modify it
#  under the terms of the GNU Lesser General Public License as published by
#  the Free Software Foundation; either version 2.1 of the License, or
#  (at your option) any later version.
#
# Entries in this file show the compile time defaults.
# You can change settings by editing this file.
# Defaults can be restored by simply deleting this file.
#
# See journald.conf(5) for details.

[Journal]
#Storage=auto
#Compress=yes
#Seal=yes
#SplitMode=uid
#SyncIntervalSec=5m
#RateLimitIntervalSec=30s
#RateLimitBurst=10000
#SystemMaxUse=
#SystemKeepFree=
#SystemMaxFileSize=
#SystemMaxFiles=100
#RuntimeMaxUse=
#RuntimeKeepFree=
#RuntimeMaxFileSize=
#RuntimeMaxFiles=100
#MaxRetentionSec=
#MaxFileSec=1month
#ForwardToSyslog=yes
#ForwardToKMsg=no
#ForwardToConsole=no
#ForwardToWall=yes
#TTYPath=/dev/console
#MaxLevelStore=debug
#MaxLevelSyslog=debug
#MaxLevelKMsg=notice
#MaxLevelConsole=info
#MaxLevelWall=emerg
#LineMax=48K
#ReadKMsg=yes

Một số ý nghĩa cấu hình

Storage=volatile|persistent|auto|none
#none = tắt lưu trữ journaling log
#volatile = chỉ lưu trữ trong ram, đọc bằng lệnh journalctl
#persistent = lưu trữ vào ổ cứng, thư mục /var/log/journal, nếu thư mục này k có thì systemd sẽ tạo ra để lưu, 
#nếu có rồi nhưng ko ghi đc file thì sẽ ghi vào /run/log/journal
#auto = lưu trữ vào ổ cứng, tuy nhiên nếu /var/log/journal ko tồn tại thì lưu vào /run/log/journal
SplitMode=uid|none
#điều khiển việc systemd tự tách log theo user, user nào xem log của user đó ( mặc định là uuid)
SystemMaxUse=, SystemKeepFree=, SystemMaxFileSize=, SystemMaxFiles=, RuntimeMaxUse=, RuntimeKeepFree=, RuntimeMaxFileSize=, RuntimeMaxFiles=
# con số quan trọng nhất để bảo toàn số dung lượng ổ cứng ít ỏi của bạn
# SystemMaxUse và RuntimeMaxUse điều khiển số dung lượng ổ cứng ví dụ 1G, 2G tối đa dành việc ghi log này
# SystemKeepFree và RuntimeKeepFree quy định số dung lượng ổ chừa lại cho thằng khác
#SystemMaxFileSize dung lượng file lớn nhất của mỗi file log
#SystemMaxFiles số lượng file log được lưu trữ


Rename VIP hoặc đối tượng nào đó trên F5

SSH vào thiết bị F5
truy cập giao diện tmsh

tmsh

Bật chế độ cho phép move

modify /sys db mcpd.mvenabled value true

Ví dụ cần đổi lên VIP virtual_server100 thành VIP1000

mv ltm virtual virtual_server100 VIP1000
Tắt chế độ cho phép move đi
modify /sys db mcpd.mvenabled value false
Chi tiết xem tạm video:

hpssacli – HP Smart array CLI commands and download link

HP Smart array CLI commands

Download HP Smart array CLI

HP Smart array CLI commands (these should apply to any system with the CLI installed)

Show configuration

/opt/hp/hpssacli/bin/hpssacli ctrl all show config

Controller status

/opt/hp/hpssacli/bin/hpssacli ctrl all show status

Show detailed controller information for all controllers

/opt/hp/hpssacli/bin/hpssacli ctrl all show detail

Show detailed controller information for controller in slot 0

/opt/hp/hpssacli/bin/hpssacli ctrl slot=0 show detail

Rescan for New Devices

/opt/hp/hpssacli/bin/hpssacli rescan

Physical disk status

/opt/hp/hpssacli/bin/hpssacli ctrl slot=0 pd all show status

Show detailed physical disk information

/opt/hp/hpssacli/bin/hpssacli ctrl slot=0 pd all show detail

Logical disk status

/opt/hp/hpssacli/bin/hpssacli ctrl slot=0 ld all show status

View Detailed Logical Drive Status

/opt/hp/hpssacli/bin/hpssacli ctrl slot=0 ld 2 show

Create New RAID 0 Logical Drive

/opt/hp/hpssacli/bin/hpssacli ctrl slot=0 create type=ld drives=1I:1:2 raid=0

Create New RAID 1 Logical Drive

/opt/hp/hpssacli/bin/hpssacli ctrl slot=0 create type=ld drives=1I:1:1,1I:1:2 raid=1

Create New RAID 5 Logical Drive

/opt/hp/hpssacli/bin/hpssacli ctrl slot=0 create type=ld drives=1I:1:1,1I:1:2,2I:1:6,2I:1:7,2I:1:8 raid=5

Delete Logical Drive

/opt/hp/hpssacli/bin/hpssacli ctrl slot=0 ld 2 delete

Add New Physical Drive to Logical Volume

/opt/hp/hpssacli/bin/hpssacli ctrl slot=0 ld 2 add drives=2I:1:6,2I:1:7

Add Spare Disks

/opt/hp/hpssacli/bin/hpssacli ctrl slot=0 array all add spares=2I:1:6,2I:1:7

Enable Drive Write Cache

/opt/hp/hpssacli/bin/hpssacli ctrl slot=0 modify dwc=enable

Disable Drive Write Cache

/opt/hp/hpssacli/bin/hpssacli ctrl slot=0 modify dwc=disable

Erase Physical Drive

/opt/hp/hpssacli/bin/hpssacli ctrl slot=0 pd 2I:1:6 modify erase

Turn on Blink Physical Disk LED

/opt/hp/hpssacli/bin/hpssacli ctrl slot=0 ld 2 modify led=on

Turn off Blink Physical Disk LED

/opt/hp/hpssacli/bin/hpssacli ctrl slot=0 ld 2 modify led=off

Modify smart array cache read and write ratio (cacheratio=readratio/writeratio)

/opt/hp/hpssacli/bin/hpssacli ctrl slot=0 modify cacheratio=100/0

Enable smart array write cache when no battery is present (No-Battery Write Cache option)

/opt/hp/hpssacli/bin/hpssacli ctrl slot=0 modify nbwc=enable

Disable smart array cache for certain Logical Volume

/opt/hp/hpssacli/bin/hpssacli ctrl slot=0 logicaldrive 1 modify arrayaccelerator=disable

Enable smart array cache for certain Logical Volume

/opt/hp/hpssacli/bin/hpssacli ctrl slot=0 logicaldrive 1 modify arrayaccelerator=enable

Enable SSD Smart Path

/opt/hp/hpssacli/bin/hpssacli ctrl slot=0 array a modify ssdsmartpath=enable

Disable SSD Smart Path

/opt/hp/hpssacli/bin/hpssacli ctrl slot=0 array a modify ssdsmartpath=disable

Triển khai Network loadbalancing trên windows server

Mô hình:

10.144.139.17 và 10.144.139.18 là 2 máy windows (Chạy active directory). Mong muốn cần tạo IP VIP cho 2 con này, IP VIP là 10.144.139.25

Thử nghiệm với máy windows 10.144.141.190 kết nối tới VIP, firewall sử dụng là Juniper SRX 4100

Tiến hành cấu hình:

Tạo loadbalancing giữa 2 máy windows, cài đặt features: Network Load Balancing trên cả 2 máy

image003

image005

Đứng trên máy 10.144.139.17, Sau khi cài đặt, mở màn hình Network Load Balancing, nháy phải vào chọn new Cluster

image009

Nhập 10.144.139.17, bấm connect -> next -> Nhập VIP IP giữa 2 con: 10.144.139.25 và subnet tương ứng, kiểu  như này
image016
Internetname có thể ko cần, Cluster operation mode thì để Multicast. Nếu chọn unicast thì máy bị đứt kết nối khỏi mạng luôn. Sau đó next next tới hết

Quay lại màn hình Network Load Balancing, nháy phải vào cluster, chọn add Host, nhập thêm host 10.144.139.18 và làm tương tự.

Quay sang màn hình của Máy 10.144.139.18, Nháy phải, chọn connect to Existing

image009

Sau đó nhập IP 10.144.139.17 là xong.

Ping thử IP 10.144.139.25 trên cả 2 máy 17, 18 và 1 máy trong cùng mạng LAN đó thấy đã OK.

Tuy nhiên từ 10.144.141.190 vẫn chưa Ping được IP ảo mới tạo do SRX không học Mac của 10.144.139.25 này. Tiến hành cấu hình trên firewall SRX:

– ĐỨng từ 10.144.141.190 ping tới 10.144.139.25 thấy chưa thông, show trên firewall:

# run monitor traffic interface reth0.1561
verbose output suppressed, use <detail> or <extensive> for full protocol decode
Address resolution is ON. Use <no-resolve> to avoid any reverse lookup delay.
Address resolution timeout is 4s.
Listening on reth0.1561, capture size 96 bytes
01:54:24.337022  In arp who-has 10.144.139.25 tell 10.144.139.1
01:54:24.337254  In arp reply 10.144.139.25 (03:bf:0a:90:8b:19) is-at 03:bf:0a:90:8b:19
01:54:24.337256  In arp reply 10.144.139.25 (03:bf:0a:90:8b:19) is-at 03:bf:0a:90:8b:19

trong đó reth0.1561 là interface của dải 10.144.139.xxx, ta thấy MAC ảo của IP 25 là 03:bf:0a:90:8b:19
Khai báo trên SRX:

# set interfaces reth0.1561 family inet address 10.144.139.1/26 arp 10.144.139.25 multicast-mac 03:bf:0a:90:8b:19
# commit

Ping thử thấy  từ 190 đã thông tới 25
Done


Tổng hợp key vmware các thể loại

Key Vsphere hypervisor 6.7: Không giới hạn

JV425-4h100-vzhh8-q23np-3a9pp

Key VMware workstation 15

UZ3J8-D8F5M-M84LZ-W6WZZ-WP8T6
AZ5NK-4TGEJ-088PZ-96X5X-ZL2T4
VV510-AWYE1-M85QZ-NMYZG-QA8W6
ZG75A-4DY8K-489TQ-YQNZV-Y2UWA
CY7JA-2LZE4-480CQ-TDM7V-ZK8DF
YA75U-89XE4-08EQY-45WNT-NC890
YV5XR-0AG93-H845Q-DDZQC-M2KWF
AA1JR-0TX86-4847Y-JDQGV-YQKF8
ZA35K-FHX4Q-0848P-MGW5G-N28FD
YZ192-86X1N-H884Q-GWXEC-N7HV0
FZ5XU-40X0H-48EXP-DPYGT-MZKYA
YY3T0-42DEN-H88MZ-RDPEG-Y6RR0
AU75H-2EWE2-M85QQ-JXXNZ-MCHA4
FG3N0-FFD0P-0895Z-64P7C-XQRA2
GG1D8-4QXE1-481NY-C6XQX-Y3U9D
FU58K-2YX9J-M8ETZ-DWNEG-X7KAA
FF788-A1X86-08E9Q-5YN79-XV0YD
FC51U-43Z0L-H85TZ-NZQ5G-PZUW6

Key VMWare Workstation 16 Pro

ZF3R0-FHED2-M80TY-8QYGC-NPKYF
YF390-0HF8P-M81RQ-2DXQE-M2UT6
ZF71R-DMX85-08DQY-8YMNC-PPHV8

Key VMware Workstation 17 Pro

4U612-DN31H-MJEJ0-0V0Z4-978HD
5G44H-ACH50-0J4C9-1VC5P-CY0QD
JC000-8G047-MJDF1-0H3E6-8QR5F
JV2NU-0XL5N-0J4Q8-0T0E6-8GH56
JZ6E0-4R1E0-HJ1Q0-1R8NH-3AK28
0Z48K-4X29Q-MJE80-113GK-C7K3A
HF4H0-46K80-MJ8D9-1KAZP-CKK12
NY69H-2N05P-HJ170-1V1ZM-CG222
4C45A-D8J0H-HJ5T0-1T25H-92A76
0Z4H2-0WK9K-4JE10-0T9G6-9C8M4
5F0TK-A5J05-MJDU9-103ZP-2GUL0
HY0W0-8NK11-HJ4D8-02AE2-1GH54
JV4RK-4Y29N-MJ5F8-12CXP-8L836
5F4RU-D5351-4J8V1-0U2X2-06078
1Y2R0-AHJ9P-4J8L0-1997P-C3056
HZ0TA-DX280-0J0D0-00AZ2-8FA56
0Z4WU-AZ04L-0J919-1C9EK-9QALD
4U4JR-6ML9Q-4JDT0-0CAZ2-8CHQ8
HY492-4Q217-0JD48-021E0-8PH46
5U4HH-2Q053-MJE20-108ZP-CZ8Q6


Key Vcenter 6 standard

0F6PF-20K5L-9ZT01-7K956-03Q5V
HF61K-6511M-PZ8H0-2R270-13E7R
1V4T6-8R21Q-HZYF0-P1250-A2LLD
JY2D7-6904K-7ZA38-Y39G2-3344P


HF6MN-AHH83-7Z4Z0-8R8N0-C2KMU
HC2MT-4H3DH-9Z8R9-TV0Q4-9AT4Y
0C4XW-6N250-ZZWD0-ER056-CC0PQ
NY0GT-8W395-HZD89-AU050-0AAL6
JY2K5-8MJ9P-CZPZ1-8AA5K-934KG

J563P-FC15L-6839A-0T8H0-8RA44

VMware vSphere ESXi 7.0 Enterprise Plus key

JJ2WR-25L9P-H71A8-6J20P-C0K3F
HN2X0-0DH5M-M78Q1-780HH-CN214
JH09A-2YL84-M7EC8-FL0K2-3N2J2

VMware vCenter 7.0 Standard

104HH-D4343-07879-MV08K-2D2H2
410NA-DW28H-H74K1-ZK882-948L4
406DK-FWHEH-075K8-XAC06-0JH08

VMware vSphere 7 Enterprise Plus

JH09A-2YL84-M7EC8-FL0K2-3N2J2
JJ2WR-25L9P-H71A8-6J20P-C0K3F
HN2X0-0DH5M-M78Q1-780HH-CN214
5F64H-4PLD6-488D9-1J07M-0Q266

VMware vSphere 7 Enterprise Plus with Add-on for Kubernetes

4Y28A-FV213-488Q8-202E6-1P024
0G0X0-DL29M-489T1-0C3GK-1Z2J6

=======================================

Key vSphere 8 Enterprise Plus, ESXi 8:

HG00K-03H8K-48929-8K1NP-3LUJ4
4F40H-4ML1K-M89U0-0C2N4-1AKL4


VYLWZ-ZHZPX-D1WAT-FAJTN-YLQ9X
VKZQV-CFZYX-D1VWH-ZZVZZ-ZPXXV
N5ZP8-G4WLZ-K1RH4-HY6QX-RGQNX
NNEWR-62WQE-D1VZH-XVYLX-VC7EZ

Key vCenter 8 Standard:

4F282-0MLD2-M8869-T89G0-CF240
0F41K-0MJ4H-M88U1-0C3N0-0A214
ZF3R0-FHED2-M80TY-8QYGC-NPKYF
YF390-0HF8P-M81RQ-2DXQE-M2UT6
ZF71R-DMX85-08DQY-8YMNC-PPHV8

vSAN 8 Enterprise Plus:

MG292-08L9K-48078-KJ372-27K20

vSphere 8 Enterprise Plus with Add-on for Kubernetes

NZ49H-001D2-080C0-R2272-96H10

Tanzu Standard (Subscription):

MC682-4JK00-M8908-0LAN4-068J0
NSX Firewall with Advanced Threat Prevention:
NC69K-4L040-M81T0-W98ZK-AFA40
HG40K-0Y1E0-M80D0-0J9ZM-8UH60

NSX Data Center Distributed Threat Prevention:
FV3E0-2WF1N-488NP-XFXN9-ZU0R2

NSX Advanced Threat Prevention:
HG40K-0Y1E0-M80D0-0J9ZM-8UH6


Cấu hình portchannel giữa switch cisco và Esxi 6.7

Mô hình:
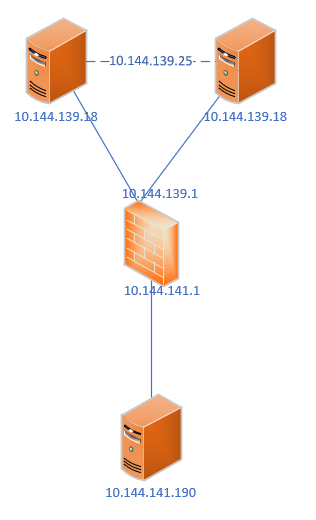
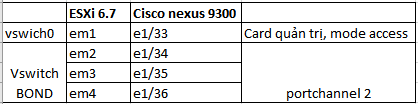
Cấu hình trên swich:

conf t
interface port-channel2
switchport
switchport mode trunk
conf t
int e1/34-36
switchport
switchport mode trunk
channel-group 2 mode on

Cấu hình trên ESXi, tạo Vswitch mới tên BOND, add 3 uplink em2-4 cho vswitch này
Bấm chọn networking ->Virtual switches -> Add standard virtual switch

vSwitch Name = BOND
security policy:
Allow promiscuous mode Yes
Allow forged transmits Yes
Allow MAC changes Yes

NIC teaming policy:
Notify switches Yes
Policy Route based on IP hash
Reverse policy Yes
Failback Yes


Khai báo portgroup cho mỗi vlan cần sử dụng, ví dụ ở đây khai báo vlan 1583. Chúng ta truy cập tab portgroup, add portgroup
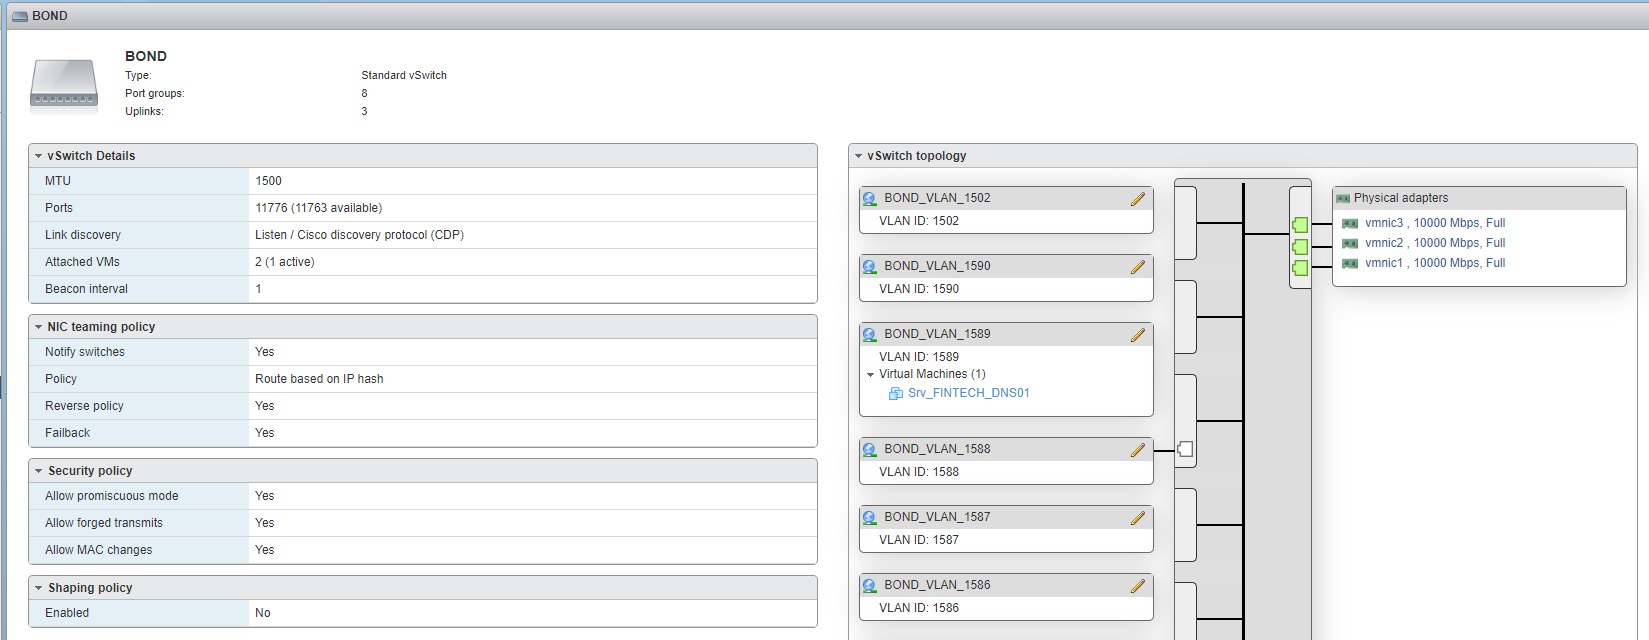
Sau đó sử dụng portgroup này trong các giao diện thêm, sửa network card của máy ảo.

Bên lề: etherchannel của switch cisco có hỗ trợ các giao thức như LACP , PAgP . Tuy nhiên ESXI ko tương thích với 2 món đó, dòng channel-group 2 mode on trên switch để khai báo giao thức động, kệ 2 thằng device thương lượng với nhau. Theo vmware, họ chỉ hỗ trợ LACP khi kết nối với Distributed switch.

Note build zabbix từ source

Download zabbix từ trang chủ: https://www.zabbix.com/download_sources

– Giải nén
– Cài đặt gói cần thiết:

yum install gcc mysql-devel libxml2-devel net-snmp-devel curl-devel unixODBC-devel OpenIPMI-devel libssh2-devel iksemel-devel openldap-devel libevent-devel pcre-devel

– Cài đặt java
– configure

./configure --enable-server --enable-agent --enable-proxy --enable-java --with-mysql --enable-ipv6 --with-net-snmp --with-libcurl --with-libxml2 --with-openipmi --with-unixodbc --with-ssh2 --with-ldap --with-libpcre
make install

Output các file build đc nằm ở /sbin/local/

Một số trick:
– Mặc định timeout giữa server và agent, giữa agent và script external check chỉ tối đa 30s. Có thể tăng con số này lên bằng cách sửa lại source của zabbix sau đó thay đè file binary build được vào máy chủ đã cài trước đó:
Timeout server: Sửa timeout trong file server.c

Cài đặt gcc mới nhất từ source trên centos 7

Mặc định cài từ yum của centos 7 chỉ có gcc 4.8.5. Khá là cũ, các software mới như redis yêu cầu tối thiểu phải 4.9 mới buld được. Cách cài đặt gcc mới hơn như sau:

Tìm source từ trang chủ: https://gcc.gnu.org/mirrors.html
Tìm được  1 repo cảm thấy gần mình nhất sau đó truy cập vào, lấy ra link release, wget về là OK, ở đây là link:

wget http://ftp.tsukuba.wide.ad.jp/software/gcc/releases/gcc-10.1.0/gcc-10.1.0.tar.gz

Giải nén sau đó tiến hành cài đặt:

yum -y install bzip2 wget gcc gcc-c++ gmp-devel mpfr-devel libmpc-devel make
wget http://ftp.tsukuba.wide.ad.jp/software/gcc/releases/gcc-10.1.0/gcc-10.1.0.tar.gz
tar xzvf gcc-10.1.0.tar.gz
cd gcc-10.1.0
./configure --enable-languages=c,c++ --disable-multilib
make -j$(nproc)
make install

Sau khi make install tiến hành khai báo

export PATH=/usr/local/bin:$PATH
export LD_LIBRARY_PATH=/usr/local/lib64:$LD_LIBRARY_PATH
cat <<EOF >  /etc/profile.d/gcc10.sh
export PATH=/usr/local/bin:$PATH
export LD_LIBRARY_PATH=/usr/local/lib64:$LD_LIBRARY_PATH
EOF

test lại output thế này là OK

[root@redis1 redis-6.0.1]# gcc -v
Using built-in specs.
COLLECT_GCC=gcc
COLLECT_LTO_WRAPPER=/usr/local/libexec/gcc/x86_64-pc-linux-gnu/10.1.0/lto-wrapper
Target: x86_64-pc-linux-gnu
Configured with: ./configure --enable-languages=c,c++ --disable-multilib
Thread model: posix
Supported LTO compression algorithms: zlib
gcc version 10.1.0 (GCC)
[root@redis1 redis-6.0.1]#


Xử lý lỗi Memory limit doesn’t accept the negative value trên giao diện web vmware vsphere

Screen Shot 2017-08-17 at 01.04.34.png

Khi sử dụng vmware vsphere trên firefox thường có những lỗi vặt  như thế này rất khó chịu. Nguyên  nhân do bug của bản ESXi Embedded Host Client 1.8.0
Để khắc phục cần update patch cho thằng này.
Cách làm như sau:
– Download vib patch về.
– Sử dụng winscp, copy file vừa down lên host ESXi (ESXi sẽ cần enable SSH để làm được việc này)
– Cài đặt:

esxcli software vib install -v esxui-signed-12086396.vib

nếu báo lỗi xung đột với ghettovcb thì remove ghettovcb

[root@nola:/tmp] esxcli software vib install -v esxui-signed-12086396.vib
 [DependencyError]
 VIB virtuallyGhetto_bootbank_ghettoVCB_1.0.0-0.0.0's acceptance level is community, which is not compliant with the ImageProfile acceptance level partner
 VIB virtuallyGhetto_bootbank_ghettoVCB_1.0.0-0.0.0 violates extensibility rule checks: ['(line 24: col 0) Element vib failed to validate content']
 To change the host acceptance level, use the 'esxcli software acceptance set' command.
 Please refer to the log file for more details.
[root@nola:/tmp]  esxcli software vib remove -n ghettoVCB
Removal Result
   Message: Operation finished successfully.
   Reboot Required: false
   VIBs Installed:
   VIBs Removed: virtuallyGhetto_bootbank_ghettoVCB_1.0.0-0.0.0
   VIBs Skipped:
[root@nola:/tmp] esxcli software acceptance set --level=CommunitySupported
Host acceptance level changed to 'CommunitySupported'.
[root@nola:/tmp] esxcli software vib install -v esxui-signed-12086396.vib
Installation Result
   Message: Operation finished successfully.
   Reboot Required: false
   VIBs Installed: VMware_bootbank_esx-ui_1.33.1-12086396
   VIBs Removed: VMware_bootbank_esx-ui_1.8.0-4516221
   VIBs Skipped:
[root@nola:/tmp]


Notice: ob_end_flush(): failed to send buffer of zlib output compression (0) in /home/devopsvn/public_html/wp-includes/functions.php on line 5427