 Use case: user root bị lock lại do đăng nhập sai nhiều quá, SSH vào có thể thấy báo lỗi:
/usr/lib/vmware/misc/bin/tally_vob.sh failed: exit code 1
Để khắc phục, chạy lệnh sau:
pam_tally2 --user root --reset

Use case: user root bị lock lại do đăng nhập sai nhiều quá, SSH vào có thể thấy báo lỗi:
/usr/lib/vmware/misc/bin/tally_vob.sh failed: exit code 1
Để khắc phục, chạy lệnh sau:
pam_tally2 --user root --reset
Cài đặt epel-repo
# yum update
# yum install epel-release
Cài đặt fail2ban
yum install fail2ban
backup các file mặc định của fail2ban
# cp /etc/fail2ban/action.d/iptables-allports.conf /etc/fail2ban/action.d/iptables-allports.conf.backup
# mv /etc/fail2ban/jail.conf /etc/fail2ban/jail.conf.backup
Tạo file /etc/fail2ban/filter.d/zimbra.conf với nội dung sau
vi /etc/fail2ban/filter.d/zimbra.conf
# Fail2Ban configuration file
#
# Author:
#
# $Revision: 1 $
#

[Definition]

# Option: failregex
# Notes.: regex to match the password failures messages in the logfile. The
# host must be matched by a group named "host". The tag "<HOST>" can
# be used for standard IP/hostname matching and is only an alias for
# (?:::f{4,6}:)?(?P<host>[\w\-.^_]+)
# Values: TEXT
#
failregex = \[ip=<HOST>;\] account - authentication failed for .* \(no such account\)$
\[ip=<HOST>;\] security - cmd=Auth; .* error=authentication failed for .*, invalid password;$
;oip=<HOST>;.* security - cmd=Auth; .* protocol=soap; error=authentication failed for .* invalid password;$
\[oip=<HOST>;.* SoapEngine - handler exception: authentication failed for .*, account not found$
WARN .*;ip=<HOST>;ua=ZimbraWebClient .* security - cmd=AdminAuth; .* error=authentication failed for .*;$
NOQUEUE: reject: RCPT from .*\[<HOST>\]: 550 5.1.1 .*: Recipient address rejected:

# .*\[ip=<HOST>;\] .* - authentication failed for .* \(invalid password\)
#
# Option: ignoreregex
# Notes.: regex to ignore. If this regex matches, the line is ignored.
# Values: TEXT
#
ignoreregex =
File này định nghĩa các patten được coi là lỗi, có biểu hiện bất thường trong file log.
Tạo file có nội dung như sau
vi /etc/fail2ban/jail.conf
# Fail2Ban configuration file
#
# Author: Cyril Jaquier
#
# $Revision: 747 $
## The DEFAULT allows a global definition of the options. They can be overridden
# in each jail afterwards.
[DEFAULT]
# "ignoreip" can be an IP address, a CIDR mask or a DNS host. Fail2ban will not
# ban a host which matches an address in this list. Several addresses can be
# defined using space separator.
#ignoreip = 127.0.0.1/8 ip_public/32
ignoreip = 127.0.0.1/8
# "bantime" is the number of seconds that a host is banned.
bantime = 600
# A host is banned if it has generated "maxretry" during the last "findtime"
# seconds.
findtime = 600

# "maxretry" is the number of failures before a host get banned.
maxretry = 3

# "backend" specifies the backend used to get files modification. Available
# options are "gamin", "polling" and "auto". This option can be overridden in
# each jail too (use "gamin" for a jail and "polling" for another).
#
# gamin: requires Gamin (a file alteration monitor) to be installed. If Gamin
# is not installed, Fail2ban will use polling.
# polling: uses a polling algorithm which does not require external libraries.
# auto: will choose Gamin if available and polling otherwise.
backend = auto

# This jail corresponds to the standard configuration in Fail2ban 0.6.
# The mail-whois action send a notification e-mail with a whois request
# in the body.

[ssh-iptables]

enabled = false
filter = sshd
action = iptables[name=SSH, port=ssh, protocol=tcp]
sendmail-whois[name=SSH, dest=yourmail1@company.loc;yourmail2@company.loc]
logpath = /var/log/messages
maxretry = 5

# This jail forces the backend to "polling".

[sasl-iptables]

enabled = false
filter = sasl
backend = polling
action = iptables[name=sasl, port=smtp, protocol=tcp]
sendmail-whois[name=sasl, dest=yourmail1@company.loc;yourmail2@company.loc]
logpath = /var/log/zimbra.log

# Here we use TCP-Wrappers instead of Netfilter/Iptables. "ignoreregex" is
# used to avoid banning the user "myuser".

[ssh-tcpwrapper]

enabled = false
filter = sshd
action = hostsdeny
sendmail-whois[name=SSH, dest=yourmail1@company.loc;yourmail2@company.loc]
ignoreregex = for myuser from
logpath = /var/log/messages

# This jail uses ipfw, the standard firewall on FreeBSD. The "ignoreip"
# option is overridden in this jail. Moreover, the action "mail-whois" defines
# the variable "name" which contains a comma using "". The characters '' are
# valid too.

[zimbra-account]
enabled = true
filter = zimbra
action = iptables-allports[name=zimbra-account]
sendmail[name=zimbra-account, dest=yourmail1@company.loc;yourmail2@company.loc]
logpath = /opt/zimbra/log/mailbox.log
bantime = 600
maxretry = 5

[zimbra-audit]
enabled = true
filter = zimbra
action = iptables-allports[name=zimbra-audit]
sendmail[name=Zimbra-audit, dest=yourmail1@company.loc;yourmail2@company.loc]
logpath = /opt/zimbra/log/audit.log
bantime = 600
maxretry = 5

[zimbra-recipient]
enabled = true
filter = zimbra
action = iptables-allports[name=zimbra-recipient]
sendmail[name=Zimbra-recipient, dest=yourmail1@company.loc;yourmail2@company.loc]
logpath = /var/log/zimbra.log
#findtime = 604800
bantime = 172800
maxretry = 5

[postfix]
enabled = true
filter = postfix
action = iptables-multiport[name=postfix, port=smtp, protocol=tcp]
sendmail-buffered[name=Postfix, dest=yourmail1@company.loc;yourmail2@company.loc]
logpath = /var/log/zimbra.log
bantime = -1
maxretry = 5

#[sasl]
#enabled = true
#port = smtp,ssmtp,imap2,imap3,imaps,pop3,pop3s
#filter = sasl
# You might consider monitoring /var/log/warn.log instead
# if you are running postfix. See http://bugs.debian.org/507990
#logpath = /var/log/zimbra.log
Nhớ thay đổi thông tin yourmail1@company.loc, yourmail2@company.loc thành địa chỉ của mình và thêm IP của mình vào ignoreip = nhé
Tiếp tục, sửa file sau:
/etc/fail2ban/action.d/sendmail.conf
thay đổi dòng Fail2Ban” | /usr/sbin/sendmail -f <sender> <dest> thành:
Fail2Ban" | /opt/zimbra/postfix/sbin/sendmail -f <sender> <dest>
Cuối cùng là bật fail2ban lên
# systemctl start fail2ban

# systemctl enable fail2ban
Monitor fail2ban
fail2ban-client status

Case: tạo user trên AD windows 2016. sau đó log in trên màn hình console thì báo lỗi. Hướng xử lý như sau:
Quay lại sử dụng user administrator
1) Open the Group Policy editor using gpmc.msc
2) Select your domain and expand Group Policy Objects then right click on "Default Domain Controller Policy"    and Click Edit
3) Under Computer Management, expand Policies and then select Windows Settings
4) Expand Security Settings and Select Local Policies and then click on User Rights Management
5) Right click on Allow Logon Locally and click on Properties
6) In the next screen you can Add the User of Group that you want
Hoặc
1) Open the Group Policy editor using gpmc.msc
2) Select your domain and expand Group Policy Objects then right click on "Default Domain Controller Policy"    and Click Edit
3) Under Computer Management, expand Policies and then select Windows Settings
4) Expand Security Settings and Select Local Policies and then click on User Rights Management
5) Right click on Deny log on locally and click on Properties
6) In the next screen you can remove the User of Group that you want
I- Chuẩn bị
3 máy centos 7: <hostname>:<IP>
– node-master: 192.168.151.171
– node1: 192.168.151.172
– node2: 192.168.151.173
Phần môi trường cần cài đặt trên 3 máy:
java jdk 1.8 trở lên
yum install -y epel-release vim curl wget telnet
disable firewall hoặc mở sẵn port
service iptables stop
chkconfig iptables off
II- Kiến trúc hadoop cluster
Kiến trúc hadoop cluster gồm 2 loại node chính:
o Master node: lưu giữ thông tin về hệ thống file phân tán, tương đương với bảng inode của ext3, ngoài ra còn có nhiệm vụ lên kế hoạch phân bổ tài nguyên. Trong guide này, node master có 2 nhiệm vụ chính:
o Name node: quản lý hệ thống file phân tán, nắm thông tin block dữ liệu nào nằm ở đâu trong cluster.
o ResourceManager: quản lý các job của YARN và quản lý các job được xếp lịch chạy trên các node slave.
o Slave node: lưu dữ liệu thực và cung cấp sức mạnh phần cứng để chạy các job, trong lab này là node1 và node2:
o Datanode quản lý các block dữ liệu về mặt vật lý.
o Nodemanager, quản lý thực hiện các task trên node.
III- Cấu hình hệ thống.
1. Tạo file host trên mỗi node
192.168.150.171 node-master
192.168.150.172 node1
192.168.150.173 node2
2. Tạo keypair xác thực cho hadoop user
Master node sẽ sử dụng ssh để kết nối tới các node khác và quản lý cluster. Thực hiện:
Log in vào node-master với user hadoop , tạo 1 ssh-key gán cho user hadoop. Sau đó thử ssh bằng user hadoop vào từng node 1, nếu k hỏi password tức là thành công
ssh hadoop@node-master
ssh-keygen -b 4096
ssh-copy-id -i $HOME/.ssh/id_rsa.pub hadoop@node-master
ssh-copy-id -i $HOME/.ssh/id_rsa.pub hadoop@node1
ssh-copy-id -i $HOME/.ssh/id_rsa.pub hadoop@node2
3. Download và giải nén bộ cài hadoop
Đăng nhập vào node-master với user hadoop, download bộ cài hadoop từ trang chủ
cd
wget http://mirrors.viethosting.com/apache/hadoop/common/hadoop-2.8.4/hadoop-2.8.4.tar.gz
tar zxvf hadoop-2.8.4.tar.gz
mv hadoop-2.8.4 hadoop
4. Thiết lập biến môi trường.
Thêm folder hadoop vừa giải nén vào biến môi trường PATH
vim /home/hadoop/.bash_profile
Thêm dòng sau:
PATH=/home/hadoop/hadoop/bin:/home/hadoop/hadoop/sbin:$PATH
IV- Cấu hình Master Node
1. Thiết lập JAVA_HOME
Tìm vị trí cài đặt java, mặc định ở /usr/java/jdk1.8.0_171-amd64
Có thể tìm bằng cách:
update-alternatives --display java
Thêm các dòng sau vào /home/hadoop/.bash_profile
export JAVA_HOME=/usr/java/jdk1.8.0_171-amd64
Đường dẫn JAVA_HOME thay đổi tuỳ từng lúc nhé. ở đây mình làm ra thế.
2. Đặt đường dẫn Namenode
Trên mỗi node đều cần thiết đặt file core-site.xml, ở đây ở địa chỉ:
~/hadoop/etc/hadoop/core-site.xml
Trong đó ~/hadoop/etc/hadoop/ là thư mục chứa file cấu hình của hệ thống hdfs, nhớ đường dẫn này, sẽ sử dụng ở các bước sau:
Nội dung file:
<?xml version="1.0" encoding="UTF-8"?>
<?xml-stylesheet type="text/xsl" href="configuration.xsl"?>
    <configuration>
        <property>
            <name>fs.default.name</name>
            <value>hdfs://node-master:9000</value>
        </property>
    </configuration>
Chỉnh sửa file hdfs-site.conf
<configuration>
    <property>
            <name>dfs.namenode.name.dir</name>
            <value>/home/hadoop/data/nameNode</value>
    </property>

    <property>
            <name>dfs.datanode.data.dir</name>
            <value>/home/hadoop/data/dataNode</value>
    </property>

    <property>
            <name>dfs.replication</name>
            <value>1</value>
    </property>
</configuration>
Lưu ý thuộc tính dfs.replication, thuộc tính này là số lần dữ liệu được nhân bản (nhằm mục đích dự phòng, node này chết thì còn bản sao ở node khác). ở đây mình có 2 node có thể set mục này tối đa bằng 2 để dữ liệu được nhân bản trên cả 2 node (tốn tài nguyên). Không được đặt con số này nhiều hơn số datanode mà chúng ta có.
3. Thiết lập Yarn làm Job Scheduler
Đổi tên file mapred-site.xml.template thành mapred-site.xml. Nội dung:
<configuration>
    <property>
            <name>mapreduce.framework.name</name>
            <value>yarn</value>
    </property>
</configuration>
Lưu ý giá trị là yarn, tốt nhất tìm vị trí khoá như trên rồi sửa lại.
Sửa file yarn-site.xml
<configuration>
    <property>
            <name>yarn.acl.enable</name>
            <value>0</value>
    </property>

    <property>
            <name>yarn.resourcemanager.hostname</name>
            <value>node-master</value>
    </property>

    <property>
            <name>yarn.nodemanager.aux-services</name>
            <value>mapreduce_shuffle</value>
    </property>
</configuration>
4. Cấu hình Slave
Khai báo danh sách các datanode mà ta có với namenode, sửa file ~/hadoop/etc/hadoop/slaves
Điền mỗi namenode 1 dòng
node1
node2
5. Cấu hình phân bổ RAM
Việc phân bổ ram có thể làm để những node có ram yếu có thể chạy được. các giá trị mặc định được thiết kế cho các máy 8GB ram trở lên. Dưới đây là những tuỳ chỉnh cho những node 2GB Ram.
6. Các thuộc tính phân bổ RAM
Một Yarn job được chạy với 2 loại:
– Một application manager: chịu trách nhiệm giám sát ứng dụng và phối hợp để phân phối excecutor trong cluster (phân phối xem node nào sẽ thực hiện job).
– Một số executor được tạo bởi application manager chạy các job. Đối với các mapredure job, chúng thực hiện các tiến trình map và redure song song.
Cả 2 app trên chạy trên slave node. Mỗi slave node chạy một NodeManager dạng deamon, chịu trách nhiệm đối với việc tạo container trên mỗi node. Toàn bộ cluster chịu sự quản lý của ResourceManager, lên kế hoạch phân bổ các container trên toàn bộ slavenode, dựa trên nhu cầu cần thiết cho mỗi action hiện tại.
Bốn hình thức cấp phát tài nguyên được cấu hình chuẩn để cluster có thể làm việc:
– Số bộ nhớ RAM có thể cung cấp cho Yarn container trên mỗi node. Giới hạn này nên để cao, nếu không việc cung cấp tài nguyên cho container sẽ bị reject, ứng dụng sẽ fail. Tuy nhiên, không được cấp toàn bộ số RAM trên node. Giá trị này được cấu hình trên file yarn-site.xml với key = yarn.nodemanager.resource.memory-mb
– Lượng bộ nhớ mà 1 node đơn có thể chiếm và số bộ nhớ cấp phát nhỏ nhất được cho phép. Được cấu hình tại yarn-site.xml với key = yarn.scheduler.minimum-allocation-mb
– Lượng RAM được cấp cho mỗi tiến trình map hoặc redure. Nên nhỏ hơn số bộ nhớ tối đa. Được cấu hình tại file mapred-site.xml với key = mapreduce.map.memory.mb và mapreduce.reduce.memory.mb
– Lượng RAM sẽ được cấp cho ApplicationMaster.
Hình minh hoạ cho các cấu hình này:

Ví dụ về cấu hình cho node 2GB RAM
Property                                   Value
yarn.nodemanager.resource.memory-mb        1536
yarn.scheduler.maximum-allocation-mb       1536
yarn.scheduler.minimum-allocation-mb       128
yarn.app.mapreduce.am.resource.mb          512
mapreduce.map.memory.mb                    256
mapreduce.reduce.memory.mb                 256
Sửa file /home/hadoop/hadoop/etc/hadoop/yarn-site.xml và thêm các dòng sau:
<property>
        <name>yarn.nodemanager.resource.memory-mb</name>
        <value>1536</value>
</property>

<property>
        <name>yarn.scheduler.maximum-allocation-mb</name>
        <value>1536</value>
</property>

<property>
        <name>yarn.scheduler.minimum-allocation-mb</name>
        <value>128</value>
</property>

<property>
        <name>yarn.nodemanager.vmem-check-enabled</name>
        <value>false</value>
</property>
Sửa file /home/hadoop/hadoop/etc/hadoop/mapred-site.xml và thêm các dòng sau:
<property>
        <name>yarn.app.mapreduce.am.resource.mb</name>
        <value>512</value>
</property>

<property>
        <name>mapreduce.map.memory.mb</name>
        <value>256</value>
</property>

<property>
        <name>mapreduce.reduce.memory.mb</name>
        <value>256</value>
</property>
V- Nhân bản cấu hình vừa thiết lập tới các slave node
1- Copy hadoop sang slave node:
cd /home/hadoop/
scp hadoop-*.tar.gz node1:/home/hadoop
scp hadoop-*.tar.gz node2:/home/hadoop
Kết nối tới node1, node2 qua SSH, giải nén 2 gói vừa copy sang
tar -xzf hadoop-2.8.1.tar.gz
mv hadoop-2.8.1 hadoop
exit
Quay lại node-master, copy config sang
for node in node1 node2; do
    scp ~/hadoop/etc/hadoop/* $node:/home/hadoop/hadoop/etc/hadoop/;
done
2- Format HDFS
HDFS sau khi tạo cũng cần phải được format trước khi sử dụng, tương tự như đối với bất kỳ file system truyền thống nào khác.
Trên node master chúng ta gõ lệnh
hdfs namenode -format
Đến đây thì việc cài đặt HDFS đã hoàn tất và sẵn sàng để chạy
VI- Chạy và monitỏ HDFS
1- Start và Stop HDFS
Mọi thao tác được thực hiện trên node-master
start-dfs.sh
stop-dfs.sh
Sau khi chạy lệnh start, master sẽ tự động SSH sang node1+node2 (qua key đã tạo ở trên) để tiến hành bật datanode. Kiểm tra các tiến trình đã được khởi động trên mỗi node bằng lệnh jps , kết quả như bên dưới, bao gồm PID và process name
21922 Jps
21603 NameNode
21787 SecondaryNameNode
19728 DataNode
19819 Jps
2- Monitor HDFS cluster.
Lấy thông tin về cluster đang chạy bằng lệnh:
hdfs dfsadmin -report
Lấy các thông tin về các lệnh được hỗ trợ bằng lệnh help
hdfs dfsadmin -help
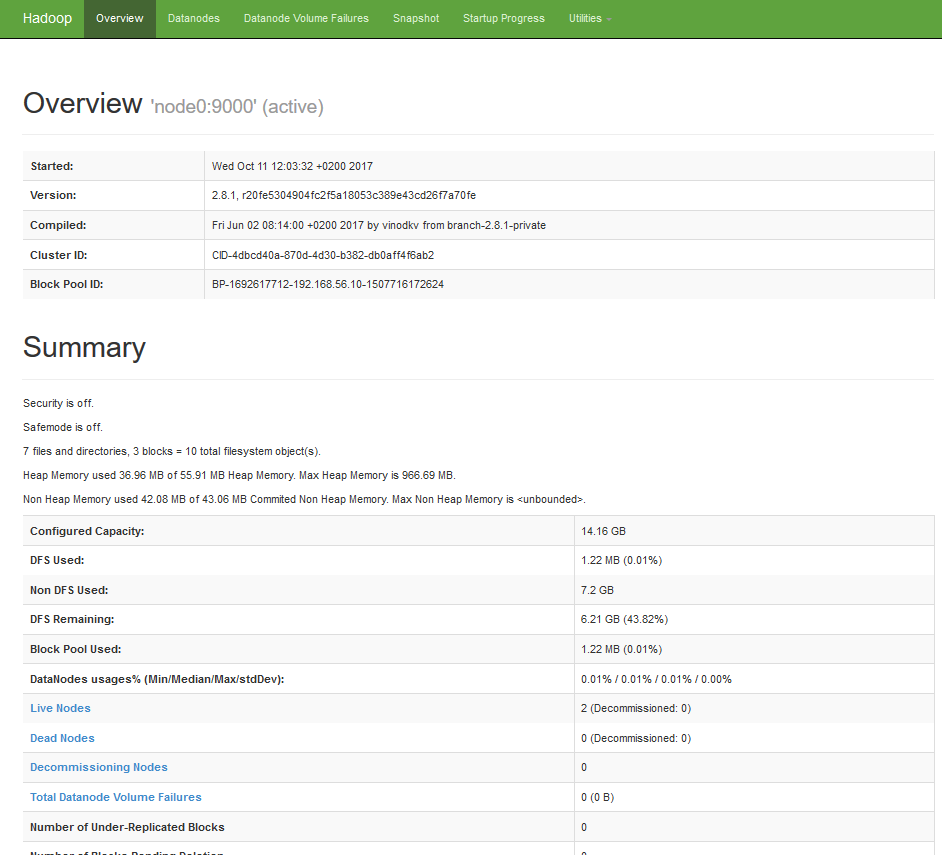
Ngoài ra còn có thể truy cập trang web quản trị:
http://node-master-IP:50070
3- Test đẩy dữ liệu lên HDFS
Sử dụng lệnh hdfs dfs để thao tác với dữ liệu trên hdfs. Đầu tiên, ta tạo một thư mục mặc định, tất cả các lệnh khác sẽ sử dụng đường dẫn quan hệ tới thư mục home mặc định này.
hdfs dfs -mkdir -p /user/hadoop
Tạo thêm thư mục books bên trong hdfs
hdfs dfs -mkdir books
Nếu SSH tới máy chủ quá chậm, kể cả SSH trong LAN, hay đối với máy chủ vừa mới cài xong, đôi khi mỗi lần SSH phải đợi tầm 5-10s mới login thành công. Nguyên nhân do sshd cố phân giải IP sang hostname hoặc domain name đối với mọi IP truy cập tới. Để tắt việc này, sửa file sau đó restart service sshd
/etc/ssh/sshd_config
#change usrDNS ==> no
useDNS no
Nếu vấn đề vẫn k giải quyết, có thể debug như sau:
SSH tới máy chủ với option -vv xem nó chậm ở đâu
Ví dụ:
ssh -vv 10.186.32.13
Output như ở dưới
[root@web01 tmp]# ssh -vv 10.186.32.13
OpenSSH_5.3p1, OpenSSL 1.0.1e-fips 11 Feb 2013
debug1: Reading configuration data /etc/ssh/ssh_config
debug1: Applying options for *
debug2: ssh_connect: needpriv 0
debug1: Connecting to 10.186.32.13 [10.186.32.13] port 22.
debug1: Connection established.
debug1: permanently_set_uid: 0/0
debug1: identity file /root/.ssh/identity type -1
debug1: identity file /root/.ssh/identity-cert type -1
debug1: identity file /root/.ssh/id_rsa type -1
debug1: identity file /root/.ssh/id_rsa-cert type -1
debug1: identity file /root/.ssh/id_dsa type -1
debug1: identity file /root/.ssh/id_dsa-cert type -1
debug1: identity file /root/.ssh/id_ecdsa type -1
debug1: identity file /root/.ssh/id_ecdsa-cert type -1
debug1: Remote protocol version 2.0, remote software version OpenSSH_5.3
debug1: match: OpenSSH_5.3 pat OpenSSH*
debug1: Enabling compatibility mode for protocol 2.0
debug1: Local version string SSH-2.0-OpenSSH_5.3
debug2: fd 3 setting O_NONBLOCK
debug1: SSH2_MSG_KEXINIT sent
debug1: SSH2_MSG_KEXINIT received
debug2: kex_parse_kexinit: diffie-hellman-group-exchange-sha256,diffie-hellman-group-exchange-sha1,diffie-hellman-group14-sha1,diffie-hellman-group1-sha1
debug2: kex_parse_kexinit: ssh-rsa-cert-v01@openssh.com,ssh-dss-cert-v01@openssh.com,ssh-rsa-cert-v00@openssh.com,ssh-dss-cert-v00@openssh.com,ssh-rsa,ssh-dss
debug2: kex_parse_kexinit: aes128-ctr,aes192-ctr,aes256-ctr,arcfour256,arcfour128,aes128-cbc,3des-cbc,blowfish-cbc,cast128-cbc,aes192-cbc,aes256-cbc,arcfour,rijndael-cbc@lysator.liu.se
debug2: kex_parse_kexinit: aes128-ctr,aes192-ctr,aes256-ctr,arcfour256,arcfour128,aes128-cbc,3des-cbc,blowfish-cbc,cast128-cbc,aes192-cbc,aes256-cbc,arcfour,rijndael-cbc@lysator.liu.se
debug2: kex_parse_kexinit: hmac-md5,hmac-sha1,umac-64@openssh.com,hmac-sha2-256,hmac-sha2-512,hmac-ripemd160,hmac-ripemd160@openssh.com,hmac-sha1-96,hmac-md5-96
debug2: kex_parse_kexinit: hmac-md5,hmac-sha1,umac-64@openssh.com,hmac-sha2-256,hmac-sha2-512,hmac-ripemd160,hmac-ripemd160@openssh.com,hmac-sha1-96,hmac-md5-96
debug2: kex_parse_kexinit: none,zlib@openssh.com,zlib
debug2: kex_parse_kexinit: none,zlib@openssh.com,zlib
debug2: kex_parse_kexinit:
debug2: kex_parse_kexinit:
debug2: kex_parse_kexinit: first_kex_follows 0
debug2: kex_parse_kexinit: reserved 0
debug2: kex_parse_kexinit: diffie-hellman-group-exchange-sha256,diffie-hellman-group-exchange-sha1,diffie-hellman-group14-sha1,diffie-hellman-group1-sha1
debug2: kex_parse_kexinit: ssh-rsa,ssh-dss
debug2: kex_parse_kexinit: aes128-ctr,aes192-ctr,aes256-ctr,arcfour256,arcfour128,aes128-cbc,3des-cbc,blowfish-cbc,cast128-cbc,aes192-cbc,aes256-cbc,arcfour,rijndael-cbc@lysator.liu.se
debug2: kex_parse_kexinit: aes128-ctr,aes192-ctr,aes256-ctr,arcfour256,arcfour128,aes128-cbc,3des-cbc,blowfish-cbc,cast128-cbc,aes192-cbc,aes256-cbc,arcfour,rijndael-cbc@lysator.liu.se
debug2: kex_parse_kexinit: hmac-md5,hmac-sha1,umac-64@openssh.com,hmac-sha2-256,hmac-sha2-512,hmac-ripemd160,hmac-ripemd160@openssh.com,hmac-sha1-96,hmac-md5-96
debug2: kex_parse_kexinit: hmac-md5,hmac-sha1,umac-64@openssh.com,hmac-sha2-256,hmac-sha2-512,hmac-ripemd160,hmac-ripemd160@openssh.com,hmac-sha1-96,hmac-md5-96
debug2: kex_parse_kexinit: none,zlib@openssh.com
debug2: kex_parse_kexinit: none,zlib@openssh.com
debug2: kex_parse_kexinit:
debug2: kex_parse_kexinit:
debug2: kex_parse_kexinit: first_kex_follows 0
debug2: kex_parse_kexinit: reserved 0
debug2: mac_setup: found hmac-md5
debug1: kex: server->client aes128-ctr hmac-md5 none
debug2: mac_setup: found hmac-md5
debug1: kex: client->server aes128-ctr hmac-md5 none
debug1: SSH2_MSG_KEX_DH_GEX_REQUEST(1024<1024<8192) sent
debug1: expecting SSH2_MSG_KEX_DH_GEX_GROUP
debug2: dh_gen_key: priv key bits set: 129/256
debug2: bits set: 495/1024
debug1: SSH2_MSG_KEX_DH_GEX_INIT sent
debug1: expecting SSH2_MSG_KEX_DH_GEX_REPLY
debug1: Host '10.186.32.13' is known and matches the RSA host key.
debug1: Found key in /root/.ssh/known_hosts:17
debug2: bits set: 525/1024
debug1: ssh_rsa_verify: signature correct
debug2: kex_derive_keys
debug2: set_newkeys: mode 1
debug1: SSH2_MSG_NEWKEYS sent
debug1: expecting SSH2_MSG_NEWKEYS
debug2: set_newkeys: mode 0
debug1: SSH2_MSG_NEWKEYS received
debug1: SSH2_MSG_SERVICE_REQUEST sent
debug2: service_accept: ssh-userauth
debug1: SSH2_MSG_SERVICE_ACCEPT received
debug2: key: /root/.ssh/identity ((nil))
debug2: key: /root/.ssh/id_rsa ((nil))
debug2: key: /root/.ssh/id_dsa ((nil))
debug2: key: /root/.ssh/id_ecdsa ((nil))
debug1: Authentications that can continue: publickey,gssapi-keyex,gssapi-with-mic,password
debug1: Next authentication method: gssapi-keyex
debug1: No valid Key exchange context
debug2: we did not send a packet, disable method
debug1: Next authentication method: gssapi-with-mic
debug1: Unspecified GSS failure.  Minor code may provide more information
Cannot determine realm for numeric host address

debug1: Unspecified GSS failure.  Minor code may provide more information
Cannot determine realm for numeric host address

debug1: Unspecified GSS failure.  Minor code may provide more information


debug1: Unspecified GSS failure.  Minor code may provide more information
Cannot determine realm for numeric host address
Đến đây là thấy chậm, chúng ta tìm được nguyên nhân do GSSAPIAuthentication, vào tắt cấu hình này đi trong file /etc/ssh/sshd_config
GSSAPIAuthentication no
Khi có user log in vào máy qua SSH, các file trong thư mục /etc/profile.d/ sẽ được thực thi. Lợi dụng việc này, ta sẽ viết script để tự động gửi mail thông báo khi có ai đó log in thành công
Thiết kế:
/opt/batch/backup_web/mail.py   File gửi mail, được viết bằng python
/etc/profile.d/notify_login.sh  File sh, sẽ được chạy mỗi khi login, file này sẽ gọi tới file python ở trên để gửi mail
Nội dung cả 2 file:
File mail.py
#!/usr/bin/python
# -*- coding: utf-8 -*-
# coding=utf-8
import sys
import smtplib
import os
from email.MIMEMultipart import MIMEMultipart
from email.MIMEBase import MIMEBase
from email.MIMEText import MIMEText
from email import Encoders
import datetime
def mail(to='abcd@gmail.com', subject='Email backup du lieu', text='day la body', attach='/var/log/secure'):
  gmail_user='abcd@gmail.com'
  gmail_pwd='ebzrmwozqckeqcoa'
  msg = MIMEMultipart()
  msg['From'] = 'abcd@gmail.com'
  msg['To'] = to
  msg['Subject'] = subject
  msg.attach(MIMEText(text+"\r\n"+datetime.datetime.today().strftime('%Y-%m-%d')))

  part = MIMEBase('application', 'octet-stream')
  part.set_payload(open(attach, 'rb').read())
  Encoders.encode_base64(part)
  part.add_header('Content-Disposition',
          'attachment; filename="%s"' % os.path.basename(attach))
  msg.attach(part)

  mailServer = smtplib.SMTP("smtp.gmail.com", 587)
  mailServer.ehlo()
  mailServer.starttls()
  mailServer.ehlo()
  mailServer.login(gmail_user, gmail_pwd)
  mailServer.sendmail(gmail_user, to, msg.as_string())
  # Should be mailServer.quit(), but that crashes...
  mailServer.close()

mail(subject=sys.argv[1], text=sys.argv[2], attach=sys.argv[3])
File sh
#!/bin/bash

sendmailpy=/opt/batch/backup_web/mail.py
ACCESS_IP=`/bin/echo $SSH_CLIENT | awk '{ print $1 }'`
SUBJECT="$ACCESS_IP Đã truy cập"
BODY="$(date) => $SSH_CLIENT đã truy cập bằng user $USER"
attach_local=/var/log/secure
/bin/nohup /usr/bin/python $sendmailpy $SUBJECT "$BODY" $attach_local >> /var/log/ssh_login_$(date +%F) &
Thông tin về email sử dụng để gửi cảnh báo được định nghĩa trong file mail.py
Lưu ý: Sử dụng trên gmail thấy google chặn đăng nhập đối với các user sử dụng password chính, còn đối với các user bật xác minh 2 bước, sử dụng pass ứng dụng thì google cho đăng nhập thoải mái. các bạn lưu ý.
Gồm 2 script, cơ chế:
– Dọn nén các file .log trong folder chứa log, ở đây là /opt/batch/<tên batch>/log (Điều chỉnh tron file chạy chính)
– Sau khi nén xong thì đưa lên file server để chứa: ở đây đã mount file server vào /net/filesv (cấu hình điều chỉnh trong file thứ cấp)
– Các file log được dọn là các file log có từ tháng trước, và hiện tại không có tiến trình nào đang đọc ghi: ví dụ: hnay là tháng 8 thì sẽ dọn các file có timestamp là tháng 7
File chạy chính, clean_all_log.sh
#!/bin/bash

## find all directory named log or logs and call clean_log_batch.sh script


START=$(date +%s)

function timecal {
        END=$(date +%s)
        TOTAL=$(expr $END - $START)
        HOURS=$(expr $TOTAL / 3600)
        MINUTES=$(expr $TOTAL % 3600 / 60)
        RUNNING_TIME="$MINUTES minute(s)"
        [[ $HOURS -gt 0 ]]&&{ RUNNING_TIME="$HOURS hour(s), $RUNNING_TIME"; }
        echo "[INFO] Total time: $RUNNING_TIME"
}

trap "timecal" EXIT

BASEDIR=$(dirname $0)
## batch dir, value must be absolute path
BATCH_DIR=/opt/batch
[ ! -d $BATCH_DIR ]&&{ echo $BATCH_DIR not found; exit 1; }
LOG_DIRS=$(find $BATCH_DIR -type d -name 'log' -or -name 'logs')
for LOG_DIR in $LOG_DIRS
do
	echo "[INFO] Clean log path $LOG_DIR"
	./clean_log_batch.sh $LOG_DIR
done
File thứ cấp: clean_log_batch.sh
#!/bin/bash

## This script requires autofs installed on the running machine
## and read/write on REMOTE_HOST via nfs share
## LOG_DIR must be absolute path

## Log file must have timestamp in its name with format YYYY[.-_]mm[/-_]dd
## Log file must have .log in its name
## Log file must have its name pattern placed before timestamp
## Even so, cover all the log pattern generated by developers on a whim without a standard still be painful

LOG_DIR=$1
TEMP_DIR=${LOG_DIR}/temp
REMOTE_HOST=filesv
REMOTE_FOLDER=/net/${REMOTE_HOST}/drbd/applog/applicationserver/`hostname`${1}
MONTHS_TO_KEEP=1  # months to keep log, the older ones will be archived. e.g: if current month is Sep, and month to keep is 1, the logs from August and older will be archived.

[[ ! -d $1 ]]&&{ echo "[ERROR] $1 not found";exit 1; }
[[ ! -d /net/${REMOTE_HOST} ]]&&{ echo "[ERROR] remote dir /net/${REMOTE_HOST} not found"; exit 1; }
[[ ! -d $TEMP_DIR ]]&&{ mkdir -p ${TEMP_DIR}; }   # Create temp folder if it doesn't exist
TIMELINE=$(date -d "$(date +%Y-%m-15) -$MONTHS_TO_KEEP months" +'%Y%m')

cd $LOG_DIR

# move all .gz files to temp dir if they 're available in LOG_DIR
find . -maxdepth 1 -type f -name "*.gz" -exec mv {} $TEMP_DIR/ \;

PATTERNS=$(ls -p | awk -F'[._-]20[0-9][0-9]|20[0-9][0-9]' '/.log/ {print $1}' | uniq | sed 's/\.log//' | grep -v /)
for PATTERN in $PATTERNS
do
 RETRY=$(ls $LOG_DIR/${PATTERN}* 2>/dev/null | wc -l) # Times of retry until exit from loop. This value is equal to the number of files with PATTERN in LOG_DIR.
 OLDEST_TIME_STAMP=$(ls -p | grep -m1 "^${PATTERN}[._-]\{0,1\}\(log[._-]\)\{0,1\}20[0-9][0-9]" 2>/dev/null | sed "s/${PATTERN}//" | tr -cd '[:digit:]')
 if [[ ${#OLDEST_TIME_STAMP} -lt 8 ]]; then
  echo "[WARN] Timestamp extracted from file name $OLDEST_TIME_STAMP is invalid. Ignore pattern $PATTERN"
  continue
 fi
 RETRY_TIME=0
# while the 6 first characters of time stamp (e.g: 201607) is greater than current time
# and $RETRY_TIME is less than $RETRY
 while [[ "${OLDEST_TIME_STAMP}" ]]&&[[ ${OLDEST_TIME_STAMP:0:6} -le ${TIMELINE} ]]&&[[ $RETRY_TIME -lt $RETRY ]]
 do
# TIME_STAMP_PATTERN format: YYYY-mm
  YEAR=${OLDEST_TIME_STAMP:0:4}
  MONTH=${OLDEST_TIME_STAMP:4:2}
  TIME_STAMP_PATTERN=${YEAR}-${MONTH}
  echo "[INFO] Archiving ${PATTERN}_${TIME_STAMP_PATTERN}"
# files with PATTERN and TIME_STAMP_PATTERN
  LOG_FILES=$(find . -maxdepth 1 -type f -regextype sed -regex "\./${PATTERN}[-_.]\{0,1\}${YEAR}[-._]\{0,1\}${MONTH}.*" -or -regextype sed -regex "\./${PATTERN}.*[-_.]\{0,1\}${YEAR}[-_.]\{0,1\}${MONTH}.*")
# Check if log files is being used by any process
  fuser $LOG_FILES && {
    echo "[WARNING] There 're files being used. Abort archive ${PATTERN}_${TIME_STAMP_PATTERN}"
    RETRY_TIME=$(($RETRY_TIME + 1))
    continue
  }
  tar -cvzf ${TEMP_DIR}/${PATTERN}_${YEAR}-${MONTH}.tar.gz ${LOG_FILES} --remove-files
# Reset the OLDEST_TIME_STAMP variable
  OLDEST_TIME_STAMP=$(ls -p | grep -m1 "${PATTERN}[._-]\{0,1\}\(log[._-]\)\{0,1\}20[0-9][0-9]" 2>/dev/null | sed "s/${PATTERN}//" | tr -cd '[:digit:]')
  RETRY_TIME=$(($RETRY_TIME + 1)) # increase value of RETRY_TIME by 1
 done
done
# Exit if TEMP_DIR empty
[[ "$(ls -A $TEMP_DIR)" ]]||{ exit 0; }
# copy all archived file from TEMP_DIR to remote host
# and delete if copy is successful
mkdir -p $REMOTE_FOLDER && \
rsync -have --progress --backup --backup-dir=${REMOTE_FOLDER} --remove-source-files ${TEMP_DIR}/* ${REMOTE_FOLDER} && rmdir ${TEMP_DIR}
![]()
Bước 1: cần có 1 con bot trên telegram, cách tạo bot các bạn chat với @botfather và làm theo hướng dẫn. Sau khi thực hiện, sẽ có token trả về, sử dụng để authen đối với các request tới bot
token có dạng đại loại như:
481775980:NAGtU-UYFQfYhufthedUAwMB2XWzRc8F6AA
Bước 2: tạo 1 room chat với con bot chúng ta vừa tạo, cứ tạo cuộc trò chuyện mới sau đó add con bot mới vào.
Bước 3: Lấy chat ID của cuộc trò chuyện vừa tạo
sử dụng URL có định dạng:
https://api.telegram.org/bot<token của bot>/getUpdates
VD: https://api.telegram.org/bot481775980:NAGtU-UYFQfYhufthedUAwMB2XWzRc8F6AA/getUpdates
call lên url mới có với header: “Content-Type: application/json”
curl -H "Content-Type: application/json" https://api.telegram.org/bot481775980:NAGtU-UYFQfYhufthedUAwMB2XWzRc8F6AA/getUpdates
chúng ta sẽ nhận được chuỗi json trả về, với chatID tương ứng
{
  "ok": true,
  "result": [
    {
      "update_id": 911858273,
      "message": {
        "message_id": 15396,
        "from": {
          "id": 432109061,
          "is_bot": false,
          "first_name": "some name",
          "last_name": "ハンサム",
          "username": "some username",
          "language_code": "en"
        },
        "chat": {
          "id": -359110891,
          "title": "GmsABD",
          "type": "group",
          "all_members_are_administrators": true
        },
        "date": 1566359213,
        "new_chat_participant": {
          "id": 471543210,
          "is_bot": true,
          "first_name": "SexyBot",
          "username": "damducbot"
        },
        "new_chat_member": {
          "id": 471543210,
          "is_bot": true,
          "first_name": "SexyBot",
          "username": "damducbot"
        },
        "new_chat_members": [
          {
            "id": 471543210,
            "is_bot": true,
            "first_name": "SexyBot",
            "username": "damducbot"
          }
        ]
      }
    },
    {
      "update_id": 911858274,
      "message": {
        "message_id": 15397,
        "from": {
          "id": 432109061,
          "is_bot": false,
          "first_name": "some name",
          "last_name": "ハンサム",
          "username": "some username",
          "language_code": "en"
        },
        "chat": {
          "id": -359110891,
          "title": "GmsABD",
          "type": "group",
          "all_members_are_administrators": true
        },
        "date": 1566359341,
        "new_chat_photo": [
          {
            "file_id": "AgADBQADsqcxG5SuihmFyQGf595pCVSo-TIABAEAAwIAA2EAAz3VAQABFgQ",
            "file_size": 5297,
            "width": 160,
            "height": 160
          },
          {
            "file_id": "AgADBQADsqcxG5SuihmFyQGf595pCVSo-TIABAEAAwIAA2IAAz7VAQABFgQ",
            "file_size": 11196,
            "width": 320,
            "height": 320
          },
          {
            "file_id": "AgADBQADsqcxG5SuihmFyQGf595pCVSo-TIABAEAAwIAA2MAAz_VAQABFgQ",
            "file_size": 25020,
            "width": 640,
            "height": 640
          }
        ]
      }
    },
    {
      "update_id": 911858275,
      "message": {
        "message_id": 15398,
        "from": {
          "id": 442710299,
          "is_bot": false,
          "first_name": "Mr Dam",
          "username": "Damnnvn"
        },
        "chat": {
          "id": -359110891,
          "title": "GmsABD",
          "type": "group",
          "all_members_are_administrators": true
        },
        "date": 1566359505,
        "new_chat_participant": {
          "id": 867065125,
          "is_bot": false,
          "first_name": "Mr du",
          "username": "mrdu"
        },
        "new_chat_member": {
          "id": 867065125,
          "is_bot": false,
          "first_name": "Mr du",
          "username": "mrdu"
        },
        "new_chat_members": [
          {
            "id": 867065125,
            "is_bot": false,
            "first_name": "Mr du",
            "username": "mrdu"
          }
        ]
      }
    }
  ]
}
Theo như ở trên, chúng ta có nhóm
"chat": {
          "id": -359110891,
          "title": "GmsABD",
          "type": "group",
          "all_members_are_administrators": true
        },
Đã có chat ID
Bước 4:
Điền thông tin vào PRTG, truy cập PTRG, setup –> notify template
Sửa or add 1 template
Phần Execute HTTP Action
URL dạng: https://api.telegram.org/bot481775980:NAGtU-UYFQfYhufthedUAwMB2XWzRc8F6AA/sendMessage
HTTP Method: POST
Payload:
chat_id= số chat ID lấy được ở bước trên&text=
[%sensor](%linksensor)
*Last Value* %lastvalue
*Last Message* %lastmessage
*Down since* %since
*Device* %device
*Group* %group&parse_mode=Markdown
Ví dụ hoàn chỉnh
chat_id=-359110891&text=
[%sensor](%linksensor)
*Last Value* %lastvalue
*Last Message* %lastmessage
*Down since* %since
*Device* %device
*Group* %group&parse_mode=Markdown
Lưu tất cả lại.
Sau đó khi add trigger notifycation, chọn template này là OK
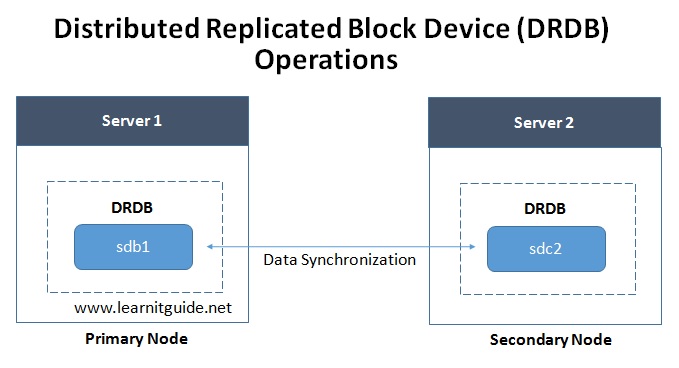
DRBD viết tắt của Distributed Replicated Block Device, là một tiện ích sử dụng để nâng cao tính sẵn sàng của hệ thống. Nó là được xây dựng trên nền ứng dụng mã nguồn mở để đơn giản hóa việc chia sẻ các dữ liệu trong hệ thống lưu trữ với nhau qua đường truyền mạng. Chúng ta có thể hiểu nôm na rằng đây là RAID-1 sử dụng các giao tiếp mạng để trao đổi dữ liệu cho nhau.
Về tổng quan, DRBD gồm 2 server cung cấp 2 tài nguyên lưu trữ độc lập, không liên quan gì với nhau. Trong một thời điểm, một server sẽ được cấu hình làm node primary đọc và ghi dữ liệu; node còn lại là secondary làm nhiệm vụ đồng bộ dữ liệu từ node primary để đảm bảo tính đồng nhất dữ liệu 2 node.
Nhìn chung, các dịch vụ đồng bộ dữ liệu hoạt động ở chế độ Active – Passive. Ở chế độ này, node chính (primary) sẽ lắng nghe toàn bộ các thao tác (đọc, ghi) của người dùng. Node phụ (secondary) sẽ được kích hoạt thành node chính khi một giải pháp cluster nào đó phát hiện node chính down. Việc ghi dữ liệu sẽ được xảy ra đồng thời trên cả 2 node. DRBD hỗ trợ 2 kiểu ghi dữ liệu là fully synchronous and asynchronous.
DRBD cũng có thể hỗ trợ chế độ Active – Active, điều đó có nghĩa là việc ghi dữ liệu sẽ đồng thời xảy ra trên 2 node. Mode này được dựa trên một hệ thống chia sẻ tập tin, chẳng hạn như Global File System (GFS) hoặc các phiên bản Oracle Cluster File System 2 (OCFS2), trong đó bao gồm khả năng phân phối và quản lý file.
DRBD hỗ trợ 3 chế độ replication, cụ thể như sau:
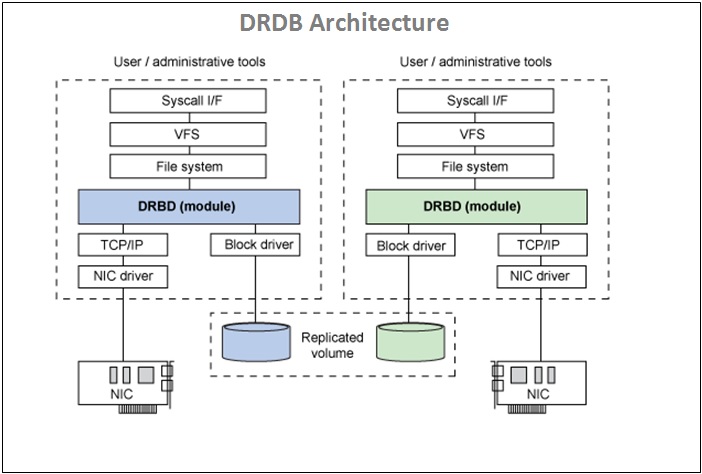
DRBD được chia làm 2 thành phần:
Một vài câu lệnh dùng để quản lý cài đặt DRBD:

Môi trường thực hiện: Centos 7
ổ cứng mới = 80GB
mount point = /net
kiểm tra ổ đĩa mới thêm bằng fdisk -l
[root@localhost ~]# fdisk -l

Disk /dev/sda: 21.5 GB, 21474836480 bytes, 41943040 sectors
Units = sectors of 1 * 512 = 512 bytes
Sector size (logical/physical): 512 bytes / 512 bytes
I/O size (minimum/optimal): 512 bytes / 512 bytes
Disk label type: dos
Disk identifier: 0x000b1107

   Device Boot      Start         End      Blocks   Id  System
/dev/sda1   *        2048     2099199     1048576   83  Linux
/dev/sda2         2099200    41943039    19921920   8e  Linux LVM

Disk /dev/sdb: 85.9 GB, 85899345920 bytes, 167772160 sectors
Units = sectors of 1 * 512 = 512 bytes
Sector size (logical/physical): 512 bytes / 512 bytes
I/O size (minimum/optimal): 512 bytes / 512 bytes


Disk /dev/mapper/centos-root: 18.2 GB, 18249416704 bytes, 35643392 sectors
Units = sectors of 1 * 512 = 512 bytes
Sector size (logical/physical): 512 bytes / 512 bytes
I/O size (minimum/optimal): 512 bytes / 512 bytes


Disk /dev/mapper/centos-swap: 2147 MB, 2147483648 bytes, 4194304 sectors
Units = sectors of 1 * 512 = 512 bytes
Sector size (logical/physical): 512 bytes / 512 bytes
I/O size (minimum/optimal): 512 bytes / 512 bytes

[root@localhost ~]#
Thấy phần ổ đĩa mới: Disk /dev/sdb: 85.9 GB, 85899345920 bytes, 167772160 sectors
gõ: fdisk /dev/sdb
[root@localhost ~]# fdisk /dev/sdb
Welcome to fdisk (util-linux 2.23.2).

Changes will remain in memory only, until you decide to write them.
Be careful before using the write command.

Device does not contain a recognized partition table
Building a new DOS disklabel with disk identifier 0xa07e2d9e.

Command (m for help): m
Command action
   a   toggle a bootable flag
   b   edit bsd disklabel
   c   toggle the dos compatibility flag
   d   delete a partition
   g   create a new empty GPT partition table
   G   create an IRIX (SGI) partition table
   l   list known partition types
   m   print this menu
   n   add a new partition
   o   create a new empty DOS partition table
   p   print the partition table
   q   quit without saving changes
   s   create a new empty Sun disklabel
   t   change a partition's system id
   u   change display/entry units
   v   verify the partition table
   w   write table to disk and exit
   x   extra functionality (experts only)

Command (m for help): n
Partition type:
   p   primary (0 primary, 0 extended, 4 free)
   e   extended
Select (default p): p
Partition number (1-4, default 1):
First sector (2048-167772159, default 2048):
Using default value 2048
Last sector, +sectors or +size{K,M,G} (2048-167772159, default 167772159):
Using default value 167772159
Partition 1 of type Linux and of size 80 GiB is set

Command (m for help): w
The partition table has been altered!

Calling ioctl() to re-read partition table.
Syncing disks.
[root@localhost ~]#
Đã tạo xong phân vùng, tiến hành format sang định dạng ext4, lưu ý, phân vùng mới tạo từ sdb ở trên giờ là sdb1
[root@localhost ~]# mkfs -t ext4 /dev/sdb1
mke2fs 1.42.9 (28-Dec-2013)
Filesystem label=
OS type: Linux
Block size=4096 (log=2)
Fragment size=4096 (log=2)
Stride=0 blocks, Stripe width=0 blocks
5242880 inodes, 20971264 blocks
1048563 blocks (5.00%) reserved for the super user
First data block=0
Maximum filesystem blocks=2168455168
640 block groups
32768 blocks per group, 32768 fragments per group
8192 inodes per group
Superblock backups stored on blocks:
        32768, 98304, 163840, 229376, 294912, 819200, 884736, 1605632, 2654208,
        4096000, 7962624, 11239424, 20480000

Allocating group tables: done
Writing inode tables: done
Creating journal (32768 blocks): done
Writing superblocks and filesystem accounting information: done
Giờ ổ đĩa đã sẵn sàng, chỉ cần mount vào đâu đó thì chúng đã sẵn sàng sử dụng, ví dụ mount vào /net1
[root@localhost ~]# mount /dev/sdb1 /net1/
[root@localhost ~]#
[root@localhost ~]#
[root@localhost ~]# df -h
Filesystem               Size  Used Avail Use% Mounted on
/dev/mapper/centos-root   17G  1.5G   16G   9% /
devtmpfs                 478M     0  478M   0% /dev
tmpfs                    489M     0  489M   0% /dev/shm
tmpfs                    489M  6.7M  482M   2% /run
tmpfs                    489M     0  489M   0% /sys/fs/cgroup
/dev/sda1               1014M  125M  890M  13% /boot
tmpfs                     98M     0   98M   0% /run/user/0
/dev/sdb1                 79G   57M   75G   1% /net1
Đã thêm thành công
Để tự động mount ổ khi reboot, có thể thao tác bằng nhiều cách:
– Chạy tự động lệnh mount /dev/sdb1 /net1/ mỗi lần khởi động
– thêm vào /etc/fstab
/dev/sdb1 /net1 ext4 noauto 0 0