1. OpenVPN là gì?
OpenVPN là một phần mềm thương mại mã nguồn mở thực hiện kỹ thuật mạng riêng ảo (VPN) để tạo ra các kết nối điểm-tới-điểm hoặc site-to-site an toàn. Nó dùng một giao thức bảo mật tùy chỉnh sử dụng SSL/TLS để trao đổi khóa. Nó được viết bởi James Yonan và được phát hành theo giấy phép công cộng GNU (GPL).
OpenVPN cho phép các bên xác thực lẫn nhau bằng cách sử dụng khóa bí mật chia sẻ trước, chứng thư khoá công khai (public key certificate) hoặc tên người dùng/mật khẩu. Khi được sử dụng trong cấu hình multiclient-server, nó cho phép máy chủ phát hành một chứng thư xác thực cho mỗi client. Nó sử dụng thư viện mã hoá OpenSSL cũng như giao thức TLS một cách rộng rãi, và chứa nhiều tính năng kiểm soát và bảo mật.
Openvpn có phiên bản free và bản thương mại. Bản thương mại là OpenVPN Access Server, version này có nhiều tính năng nổi trội so với bản free như:
– có web quản trị
– Giao diện web cho enduser tự đổi password + lấy mã QRCODE TOTP
– VPN client khi VPN tự nhảy popup nhập 2FA
– Chỉ cần cài 1 lần, có tất cả thành phần cơ bản của 1 hệ thống VPN hoàn chỉnh, bảo mật, ko cần tốn thêm tài nguyên tự dựng radius hay webpage như đối với các phiên bản free.
Tuy nhiên mặc định nếu ko add license thì được phép sử dụng đồng thời 2 user, ko đủ để sử dụng cho bất cứ doanh nghiệp nào. Còn nếu mua license thì khá tốn kém , tầm chi phí cho nó đủ để mua các hệ thống VPN hardware chuyên nghiệp hơn như checkpoint, fortinet, pulse secure.
sau đây mình sẽ hướng dẫn cài đặt, và unlock license lên free 2048 user
2. Cài đặt
Chuẩn bị 1 máy chủ centos 7, yêu cầu:
hệ điều hành centos 7
ram = 4GB
CPU: càng nhiều core càng tốt, ở đây sử dụng 4 core làm lab
tắt selinux
Cấu hình sysctl
cat >/etc/sysctl.d/openvpn.conf <<EOL
net.ipv4.ip_forward = 1
EOL
Cài đặt các gói cơ bản:
yum install -y epel-release vim curl wget net-tools telnet && yum update -y
systemctl disable --now firewalld
reboot lại server
sau khi server restart, lên trang chủ openvpn cài đặt bản mới nhất, hiện tại là ver 2.9.2
Cài đặt theo hướng dẫn của trang chủ
yum -y install https://as-repository.openvpn.net/as-repo-centos7.rpm
yum -y install openvpn-as
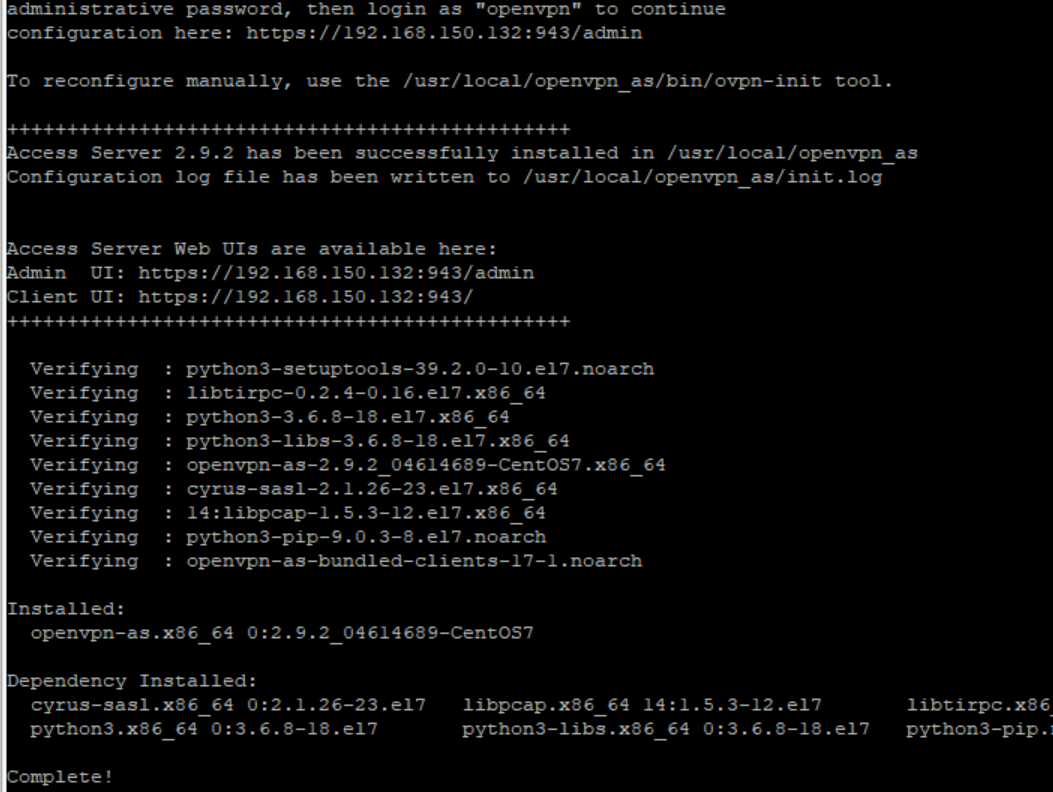
Sau khi cài xong, làm theo hướng dẫn, đặt password cho user openvpn mặc định (do openvpn tự tạo ra trong khi cài đặt)
User này cũng sẽ là user sử dụng để đăng nhập trang quản trị
passwd openvpn
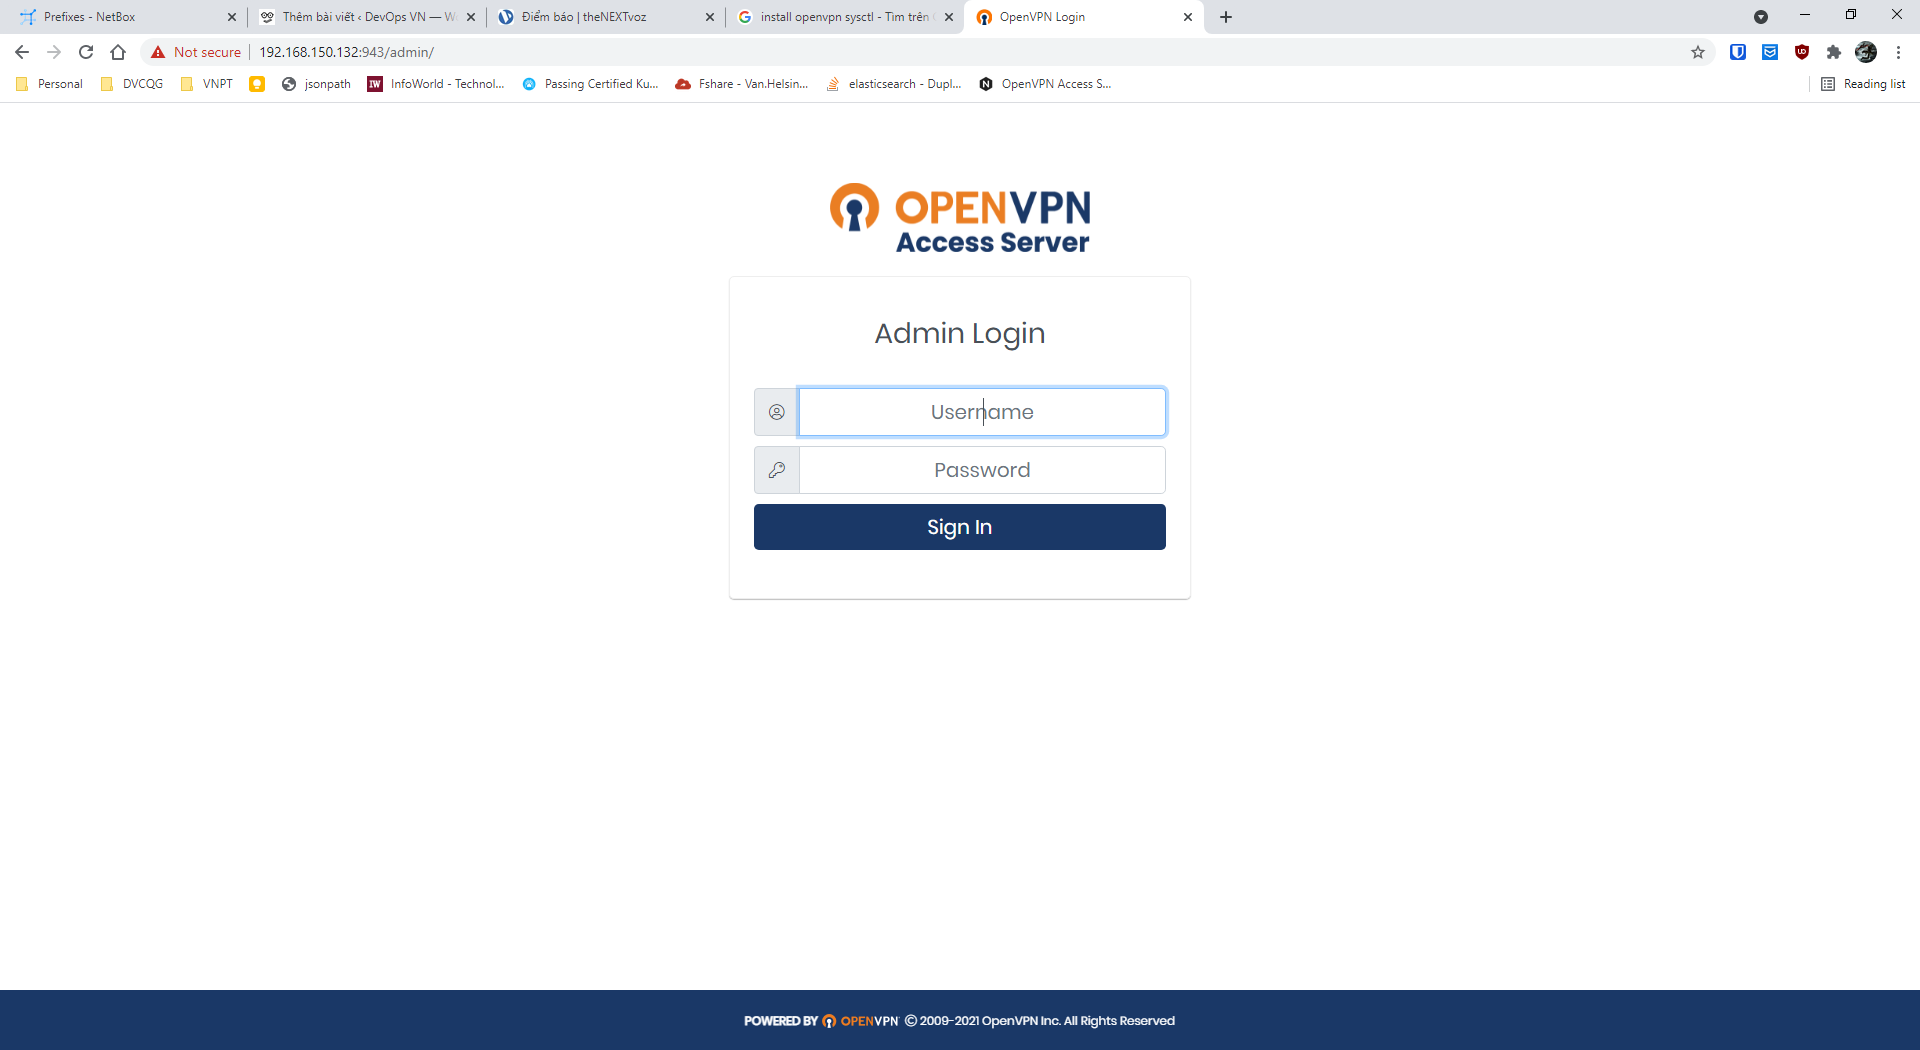
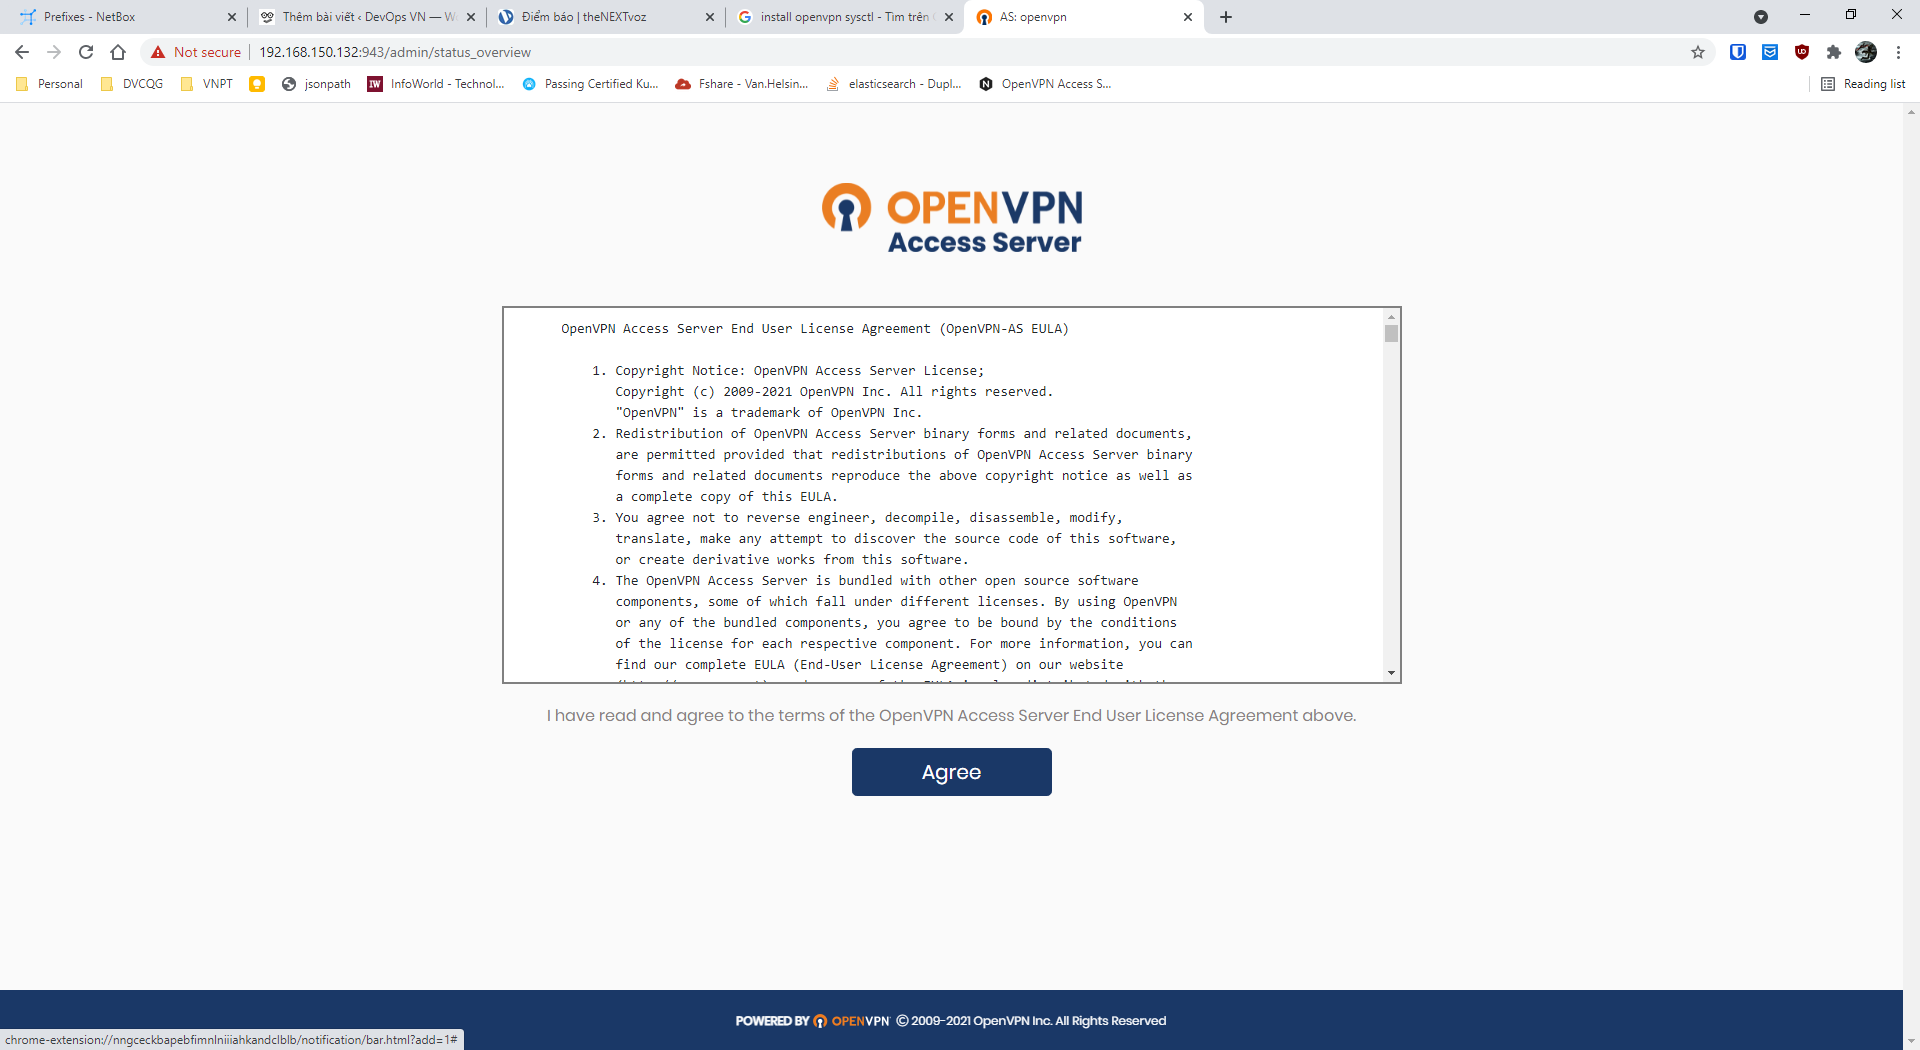
Đăng nhập thử:
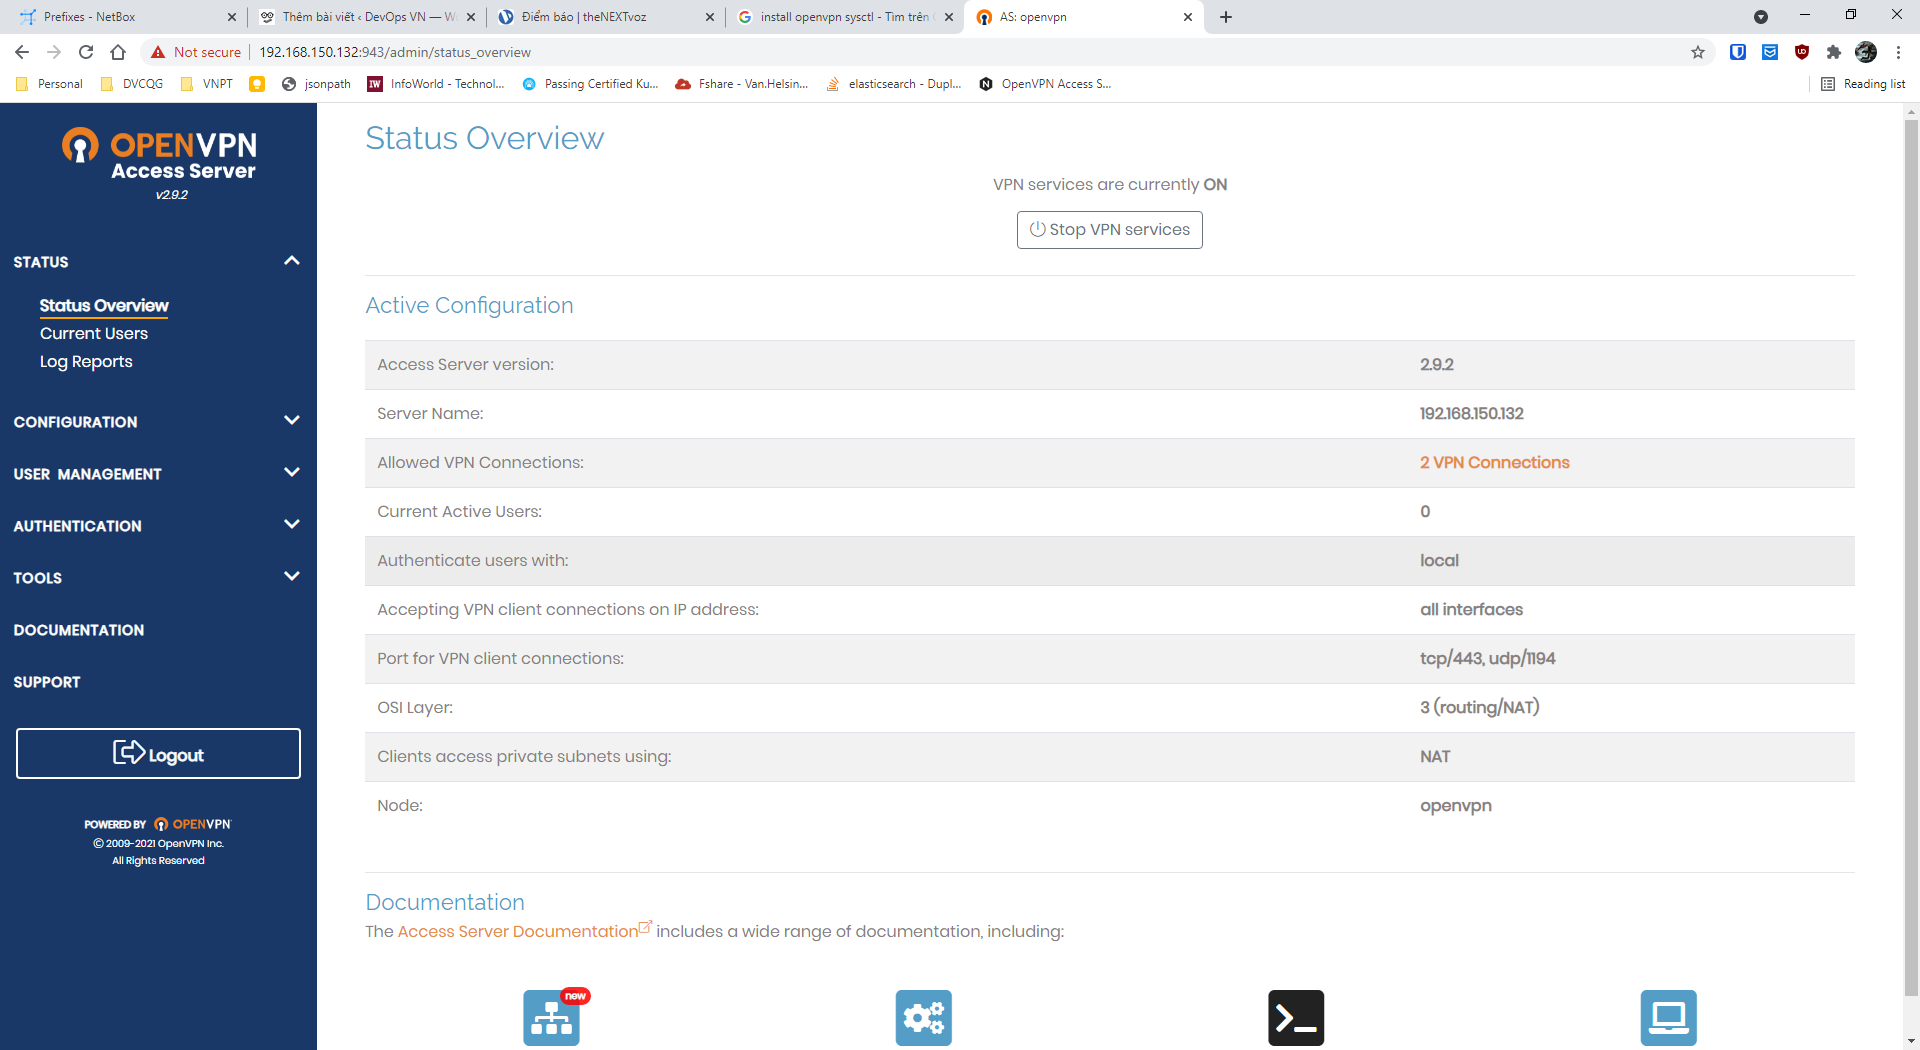
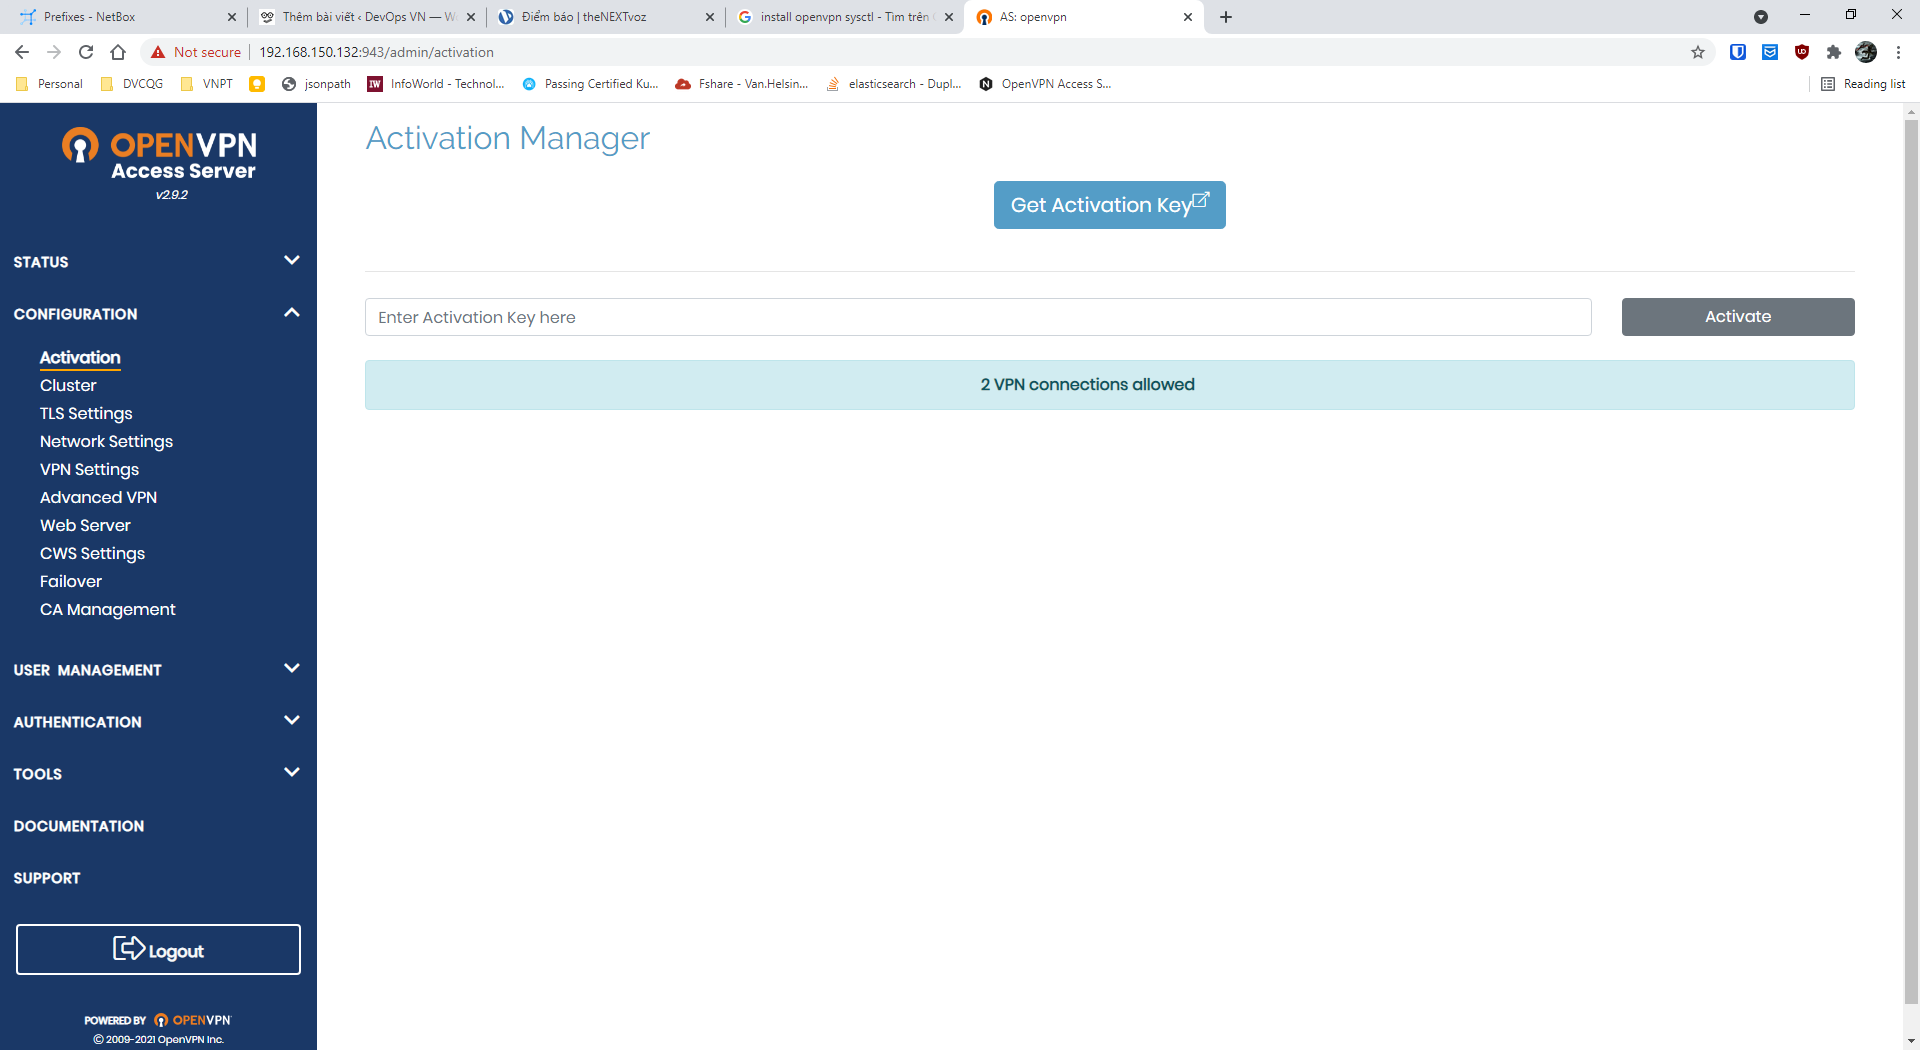
Đã cài đặt thành công, tuy nhiên, chúng ta thấy chỉ có 2 user được sử dụng đồng thời.
Giờ sẽ tiến hành sửa lại 2 –> 2048
Tắt hết openvpn service đi:
[root@openvpn ~]# systemctl stop openvpnas
[root@openvpn ~]# ps -ef | grep openvpn
root       2451   1779  0 11:31 pts/0    00:00:00 grep --color=auto openvpn
cd /usr/local/openvpn_as/lib/python
thư mục /usr/local/openvpn_as/lib/python chứa toàn bộ thư viện openvpn-as sử dụng, đương nhiên bao gồm cả phần license. phần license do thư viện pyovpn-2.0-py3.6.egg xử lý.
Chúng ta tiến hành edit lại file này để unlock, backup file gốc, tạo thư mục mới để làm việc tạm
[root@openvpn python]# pwd
/usr/local/openvpn_as/lib/python
[root@openvpn python]# mkdir unlock_license
[root@openvpn python]# mv pyovpn-2.0-py3.6.egg pyovpn-2.0-py3.6.egg_bak
[root@openvpn python]# cp -rp pyovpn-2.0-py3.6.egg_bak unlock_license/pyovpn-2.0-py3.6.zip
[root@openvpn python]# cd unlock_license/
[root@openvpn unlock_license]# ll -h
total 5.7M
-rw-r--r-- 1 root root 5.7M Jul  7 20:24 pyovpn-2.0-py3.6.zip
[root@openvpn unlock_license]#
bản chất egg là file zip, nên chỉ rename, rồi giải nén là có thể edit được nội dung.
yum install -y zip unzip
unzip pyovpn-2.0-py3.6.zip
[root@openvpn unlock_license]# ll -h
total 5.7M
drwxr-xr-x  2 root root   79 Jul 29 11:37 common
drwxr-xr-x  2 root root  106 Jul 29 11:37 EGG-INFO
drwxr-xr-x 37 root root 4.0K Jul 29 11:37 pyovpn
-rw-r--r--  1 root root 5.7M Jul  7 20:24 pyovpn-2.0-py3.6.zip
Sửa tiếp file uprop.pyc trong thư mục pyovpn/lic
[root@openvpn unlock_license]# cd pyovpn/lic/
[root@openvpn lic]# ls -lh uprop.pyc
-rw-r--r-- 1 root root 2.8K Jul  7 13:24 uprop.pyc
File pyc là file python đã compiled, tiến hành dịch ngược ra file source code python để chỉnh sửa, cài đặt uncompyle6
[root@openvpn lic]# pip3 install uncompyle6
WARNING: Running pip install with root privileges is generally not a good idea. Try `pip3 install --user` instead.
Collecting uncompyle6
  Downloading https://files.pythonhosted.org/packages/65/24/04e4e3eeb1d39c2a910f552bf0a69185a4d618924be2a98fad8e048e7cdf/uncompyle6-3.7.4-py3-none-any.whl (316kB)
    100% |████████████████████████████████| 317kB 2.4MB/s
Collecting xdis<5.1.0,>=5.0.4 (from uncompyle6)
  Downloading https://files.pythonhosted.org/packages/5a/d1/e6d3f51655eada8dc4628862357edaebafe7fa997ace9f51832c0389fd88/xdis-5.0.11-py2.py3-none-any.whl (129kB)
    100% |████████████████████████████████| 133kB 6.0MB/s
Collecting spark-parser<1.9.0,>=1.8.9 (from uncompyle6)
  Downloading https://files.pythonhosted.org/packages/e1/c3/745adc57618998882a6e120cedebfba6ebf76aa9052c8b89e49c0fe47c2e/spark_parser-1.8.9-py3-none-any.whl
Collecting click (from xdis<5.1.0,>=5.0.4->uncompyle6)
  Downloading https://files.pythonhosted.org/packages/76/0a/b6c5f311e32aeb3b406e03c079ade51e905ea630fc19d1262a46249c1c86/click-8.0.1-py3-none-any.whl (97kB)
    100% |████████████████████████████████| 102kB 5.1MB/s
Collecting six>=1.10.0 (from xdis<5.1.0,>=5.0.4->uncompyle6)
  Downloading https://files.pythonhosted.org/packages/d9/5a/e7c31adbe875f2abbb91bd84cf2dc52d792b5a01506781dbcf25c91daf11/six-1.16.0-py2.py3-none-any.whl
Collecting importlib-metadata; python_version < "3.8" (from click->xdis<5.1.0,>=5.0.4->uncompyle6)
  Downloading https://files.pythonhosted.org/packages/3f/e1/e5bba549a033adf77448699a34ecafc7a32adaeeb4369396b35f56d5cc3e/importlib_metadata-4.6.1-py3-none-any.whl
Collecting zipp>=0.5 (from importlib-metadata; python_version < "3.8"->click->xdis<5.1.0,>=5.0.4->uncompyle6)
  Downloading https://files.pythonhosted.org/packages/92/d9/89f433969fb8dc5b9cbdd4b4deb587720ec1aeb59a020cf15002b9593eef/zipp-3.5.0-py3-none-any.whl
Collecting typing-extensions>=3.6.4; python_version < "3.8" (from importlib-metadata; python_version < "3.8"->click->xdis<5.1.0,>=5.0.4->uncompyle6)
  Downloading https://files.pythonhosted.org/packages/2e/35/6c4fff5ab443b57116cb1aad46421fb719bed2825664e8fe77d66d99bcbc/typing_extensions-3.10.0.0-py3-none-any.whl
Installing collected packages: zipp, typing-extensions, importlib-metadata, click, six, xdis, spark-parser, uncompyle6
Successfully installed click-8.0.1 importlib-metadata-4.6.1 six-1.16.0 spark-parser-1.8.9 typing-extensions-3.10.0.0 uncompyle6-3.7.4 xdis-5.0.11 zipp-3.5.0
[root@openvpn lic]#
Dịch ngược
[root@openvpn lic]# uncompyle6 uprop.pyc > uprop.py
[root@openvpn lic]# ll -h uprop.py
-rw-r--r-- 1 root root 3.5K Jul 29 11:40 uprop.py
[root@openvpn lic]#
Mở file uprop.py, tìm tới funtion figure
Nội dung funtion như sau:
    def figure(self, licdict):
        proplist = set(('concurrent_connections', ))
        good = set()
        ret = None
        if licdict:
            for key, props in list(licdict.items()):
                if 'quota_properties' not in props:
                    print('License Manager: key %s is missing usage properties' % key)
                else:
                    proplist.update(props['quota_properties'].split(','))
                    good.add(key)

        for prop in proplist:
            v_agg = 0
            v_nonagg = 0
            if licdict:
                for key, props in list(licdict.items()):
                    if key in good:
                        if prop in props:
                            try:
                                nonagg = int(props[prop])
                            except:
                                raise Passthru('license property %s (%s)' % (prop, props.get(prop).__repr__()))

                            v_nonagg = max(v_nonagg, nonagg)
                            prop_agg = '%s_aggregated' % prop
                            agg = 0
                            if prop_agg in props:
                                try:
                                    agg = int(props[prop_agg])
                                except:
                                    raise Passthru('aggregated license property %s (%s)' % (
                                     prop_agg, props.get(prop_agg).__repr__()))

                                v_agg += agg
                        if DEBUG:
                            print('PROP=%s KEY=%s agg=%d(%d) nonagg=%d(%d)' % (
                             prop, key, agg, v_agg, nonagg, v_nonagg))

            apc = self._apc()
            v_agg += apc
            if ret == None:
                ret = {}
            ret[prop] = max(v_agg + v_nonagg, bool('v_agg') + bool('v_nonagg'))
            ret['apc'] = bool(apc)
            if DEBUG:
                print("ret['%s'] = v_agg(%d) + v_nonagg(%d)" % (prop, v_agg, v_nonagg))

        return ret
Để ý dòng cuối dùng return ret
Thêm 1 dòng ngay trước nó:ret[‘concurrent_connections’] = 2048
nội dung funtion sau khi sửa đổi như sau:
    def figure(self, licdict):
        proplist = set(('concurrent_connections', ))
        good = set()
        ret = None
        if licdict:
            for key, props in list(licdict.items()):
                if 'quota_properties' not in props:
                    print('License Manager: key %s is missing usage properties' % key)
                else:
                    proplist.update(props['quota_properties'].split(','))
                    good.add(key)

        for prop in proplist:
            v_agg = 0
            v_nonagg = 0
            if licdict:
                for key, props in list(licdict.items()):
                    if key in good:
                        if prop in props:
                            try:
                                nonagg = int(props[prop])
                            except:
                                raise Passthru('license property %s (%s)' % (prop, props.get(prop).__repr__()))

                            v_nonagg = max(v_nonagg, nonagg)
                            prop_agg = '%s_aggregated' % prop
                            agg = 0
                            if prop_agg in props:
                                try:
                                    agg = int(props[prop_agg])
                                except:
                                    raise Passthru('aggregated license property %s (%s)' % (
                                     prop_agg, props.get(prop_agg).__repr__()))

                                v_agg += agg
                        if DEBUG:
                            print('PROP=%s KEY=%s agg=%d(%d) nonagg=%d(%d)' % (
                             prop, key, agg, v_agg, nonagg, v_nonagg))

            apc = self._apc()
            v_agg += apc
            if ret == None:
                ret = {}
            ret[prop] = max(v_agg + v_nonagg, bool('v_agg') + bool('v_nonagg'))
            ret['apc'] = bool(apc)
            if DEBUG:
                print("ret['%s'] = v_agg(%d) + v_nonagg(%d)" % (prop, v_agg, v_nonagg))

        ret['concurrent_connections'] = 2048
        return ret
Tiến hành đóng gói lại thành file pyc như cũ
[root@openvpn lic]# rm -f uprop.pyc
[root@openvpn lic]# python3 -O -m compileall uprop.py && mv __pycache__/uprop.cpython-36.opt-1.pyc uprop.pyc
Compiling 'uprop.py'...
[root@openvpn lic]# ll -h
total 116K
drwxr-xr-x 2 root root   26 Jul 29 11:37 conf
-rw-r--r-- 1 root root 7.5K Jul  7 13:24 info.pyc
-rw-r--r-- 1 root root  134 Jul  7 13:24 __init__.pyc
-rw-r--r-- 1 root root 1.4K Jul  7 13:24 ino.pyc
-rw-r--r-- 1 root root  13K Jul  7 13:24 lbcs.pyc
-rw-r--r-- 1 root root 1.8K Jul  7 13:24 lbq.pyc
-rw-r--r-- 1 root root  862 Jul  7 13:24 lic_entry.pyc
-rw-r--r-- 1 root root  441 Jul  7 13:24 licerror.pyc
-rw-r--r-- 1 root root 6.9K Jul  7 13:24 lichelper.pyc
-rw-r--r-- 1 root root 6.0K Jul  7 13:24 lickey.pyc
-rw-r--r-- 1 root root 2.3K Jul  7 13:24 licser.pyc
-rw-r--r-- 1 root root  13K Jul  7 13:24 licstore.pyc
-rw-r--r-- 1 root root 4.2K Jul  7 13:24 liman.pyc
-rw-r--r-- 1 root root 1.1K Jul  7 13:24 lspci.pyc
-rw-r--r-- 1 root root 2.5K Jul  7 13:24 prop.pyc
drwxr-xr-x 2 root root    6 Jul 29 11:45 __pycache__
-rw-r--r-- 1 root root 3.5K Jul 29 11:44 uprop.py
-rw-r--r-- 1 root root 2.8K Jul 29 11:45 uprop.pyc
-rw-r--r-- 1 root root 9.2K Jul  7 13:24 vprop.pyc
[root@openvpn lic]# rm -rf __pycache__ uprop.py
[root@openvpn lic]#
nén lại thành file egg như cũ
[root@openvpn unlock_license]# pwd
/usr/local/openvpn_as/lib/python/unlock_license
[root@openvpn unlock_license]# ll -h
total 5.7M
drwxr-xr-x  2 root root   79 Jul 29 11:37 common
drwxr-xr-x  2 root root  106 Jul 29 11:37 EGG-INFO
drwxr-xr-x 37 root root 4.0K Jul 29 11:37 pyovpn
-rw-r--r--  1 root root 5.7M Jul  7 20:24 pyovpn-2.0-py3.6.zip
[root@openvpn unlock_license]# zip -r pyovpn-2.0-py3.6_cracked.zip common EGG-INFO pyovpn

[root@openvpn unlock_license]# ll -h
total 12M
drwxr-xr-x  2 root root   79 Jul 29 11:37 common
drwxr-xr-x  2 root root  106 Jul 29 11:37 EGG-INFO
drwxr-xr-x 37 root root 4.0K Jul 29 11:37 pyovpn
-rw-r--r--  1 root root 5.7M Jul 29 12:14 pyovpn-2.0-py3.6_cracked.zip
-rw-r--r--  1 root root 5.7M Jul  7 20:24 pyovpn-2.0-py3.6.zip
[root@openvpn unlock_license]#
[root@openvpn unlock_license]#
[root@openvpn unlock_license]# mv pyovpn-2.0-py3.6_cracked.zip pyovpn-2.0-py3.6.egg
[root@openvpn unlock_license]# mv pyovpn-2.0-py3.6.egg ../ && cd ..
[root@openvpn python]# ls -lh pyovpn-2.0-py3.6.egg
-rw-r--r-- 1 root root 5.7M Jul 29 12:14 pyovpn-2.0-py3.6.egg
[root@openvpn python]#
Xoá python cache trong /usr/local/openvpn_as/lib/python
cd /usr/local/openvpn_as/lib/python
[root@openvpn python]# rm -rf __pycache__/*
Khởi tạo lại profile openvpn
cd /usr/local/openvpn_as/bin

./ovpn-init
[root@openvpn bin]# ./ovpn-init
Detected an existing OpenVPN-AS configuration.
Continuing will delete this configuration and restart from scratch.
Please enter 'DELETE' to delete existing configuration: DELETE

          OpenVPN Access Server
          Initial Configuration Tool
------------------------------------------------------
OpenVPN Access Server End User License Agreement (OpenVPN-AS EULA)
...
Please enter 'yes' to indicate your agreement [no]: yes

Once you provide a few initial configuration settings,
OpenVPN Access Server can be configured by accessing
its Admin Web UI using your Web browser.

Will this be the primary Access Server node?
(enter 'no' to configure as a backup or standby node)
> Press ENTER for default [yes]:

Please specify the network interface and IP address to be
used by the Admin Web UI:
(1) all interfaces: 0.0.0.0
(2) ens33: 192.168.150.132
Please enter the option number from the list above (1-2).
> Press Enter for default [1]:

What public/private type/algorithms do you want to use for the OpenVPN CA?

Recommended choices:

rsa       - maximum compatibility
secp384r1 - elliptic curve, higher security than rsa, allows faster connection setup and smaller user profile files
showall   - shows all options including non-recommended algorithms.
> Press ENTER for default [rsa]:

What key size do you want to use for the certificates?
Key size should be between 2048 and 4096

> Press ENTER for default [ 2048 ]:

What public/private type/algorithms do you want to use for the self-signed web certificate?

Recommended choices:

rsa       - maximum compatibility
secp384r1 - elliptic curve, higher security than rsa, allows faster connection setup and smaller user profile files
showall   - shows all options including non-recommended algorithms.
> Press ENTER for default [rsa]:

What key size do you want to use for the certificates?
Key size should be between 2048 and 4096

> Press ENTER for default [ 2048 ]:

Please specify the port number for the Admin Web UI.
> Press ENTER for default [943]:

Please specify the TCP port number for the OpenVPN Daemon
> Press ENTER for default [443]:

Should client traffic be routed by default through the VPN?
> Press ENTER for default [yes]:

Should client DNS traffic be routed by default through the VPN?
> Press ENTER for default [yes]:

Use local authentication via internal DB?
> Press ENTER for default [yes]:

Private subnets detected: ['192.168.150.0/24']

Should private subnets be accessible to clients by default?
> Press ENTER for default [yes]:

To initially login to the Admin Web UI, you must use a
username and password that successfully authenticates you
with the host UNIX system (you can later modify the settings
so that RADIUS or LDAP is used for authentication instead).

You can login to the Admin Web UI as "openvpn" or specify
a different user account to use for this purpose.

Do you wish to login to the Admin UI as "openvpn"?
> Press ENTER for default [yes]:

> Please specify your Activation key (or leave blank to specify later):


Initializing OpenVPN...
Removing Cluster Admin user login...
userdel "admin_c"
Adding new user login...
useradd -s /sbin/nologin "openvpn"
Writing as configuration file...
Perform sa init...
Wiping any previous userdb...
Creating default profile...
Modifying default profile...
Adding new user to userdb...
Modifying new user as superuser in userdb...
Getting hostname...
Hostname: openvpn
Preparing web certificates...
Getting web user account...
Adding web group account...
Adding web group...
Adjusting license directory ownership...
Initializing confdb...
Generating PAM config...
Enabling service
Starting openvpnas...

NOTE: Your system clock must be correct for OpenVPN Access Server
to perform correctly.  Please ensure that your time and date
are correct on this system.

Initial Configuration Complete!

You can now continue configuring OpenVPN Access Server by
directing your Web browser to this URL:

https://192.168.150.132:943/admin
Login as "openvpn" with the same password used to authenticate
to this UNIX host.

During normal operation, OpenVPN AS can be accessed via these URLs:
Admin  UI: https://192.168.150.132:943/admin
Client UI: https://192.168.150.132:943/

See the Release Notes for this release at:
   https://openvpn.net/vpn-server-resources/release-notes/
Đăng nhập lại openvpn sẽ thấy license đã lên 2048 user

Update 2025-07:
[2025-07] Hướng dẫn cài đặt và unlock OpenVPN Access server version 2.14.3
![[Zabbix] Trải ngiệm dựng và tối ưu zabbix 5.4 với database postgres](https://devopsvn.xyz/wp-content/uploads/2020/05/zabbixhero.jpg)
 – vào thư mục source code của zabbix front end: edit file sau


 Khi gọi http request trên ubuntu, ở đây là ubuntu 20 thì hay gặp lỗi